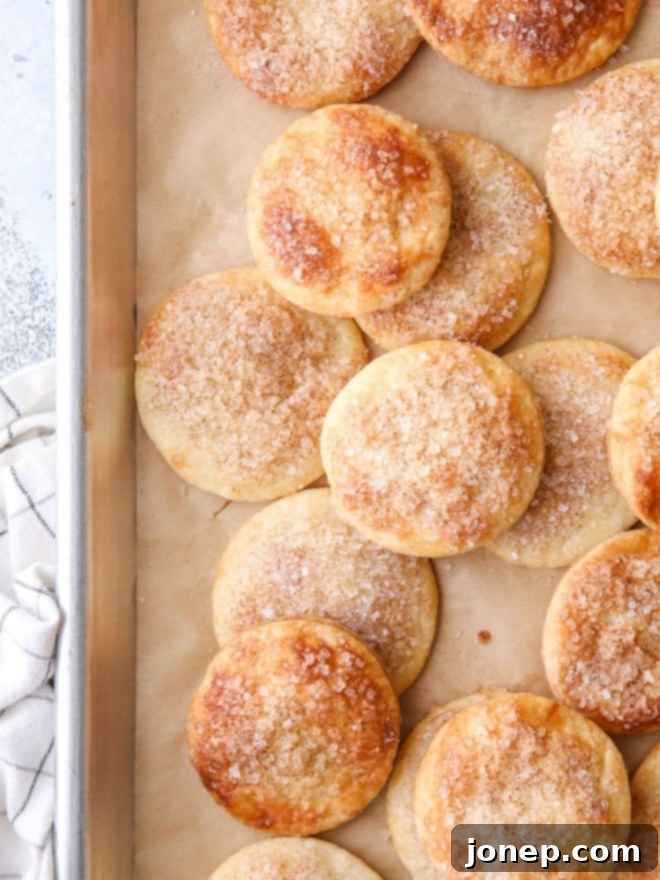
Easy Pie Crust Cookies: Turn Leftover Pie Dough into Delicious, Flaky Treats
Discover the delightful secret of turning humble leftover pie crust scraps into irresistible, golden-baked cookies! These simple yet incredibly satisfying treats are not just a genius way to avoid food waste; they are a buttery, crisp, and utterly addictive snack in their own right. Imagine biting into a warm, flaky cookie, lightly sweetened with cinnamon sugar – a perfect prelude to your main pie or a standalone indulgence that comes together in minutes.
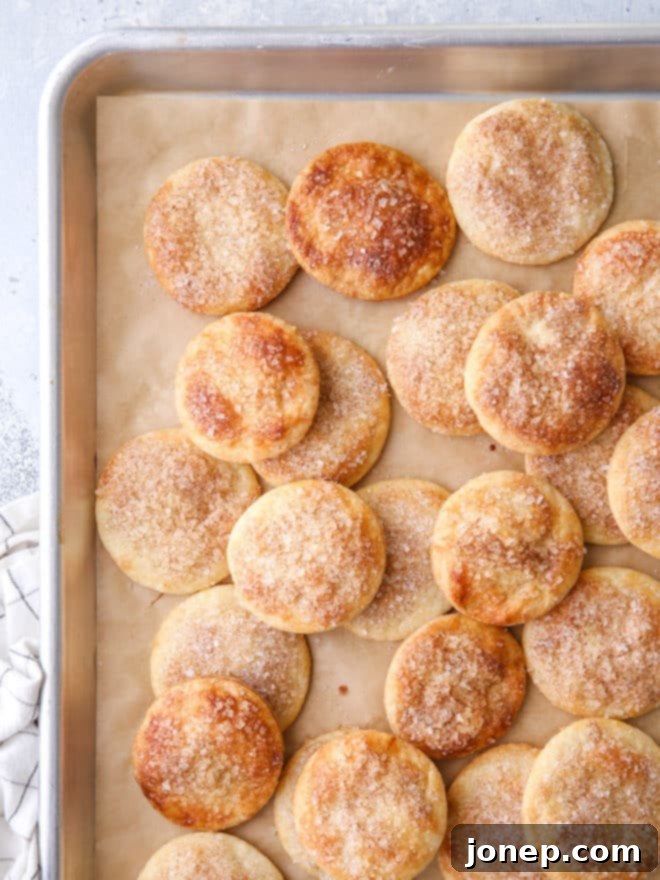
Every home baker knows the feeling: after meticulously crafting a beautiful pie, you’re often left with those odd-shaped bits and pieces of dough. While some might be tempted to discard them, resourceful cooks throughout history have always found creative ways to utilize every ingredient. The concept of pie crust “cookies” likely stems from this very tradition of “waste not, want not.” Whether it was a savvy grandmother or a clever baking enthusiast who first thought of this ingenious idea, we can all agree: thank you! These little treats are truly brilliant.
Consider these leftover pie crust cookies your personal reward for a baking job well done. They serve as a wonderful little warm-up for the main event, offering a taste of the buttery goodness to come while your pie cools. But don’t underestimate them as mere appetizers; they are crisp, tender, richly buttery, and so completely addictive that they might just steal the show. They are the perfect way to enjoy the deliciousness of pie crust in a convenient, snackable form, turning every last scrap into a moment of pure joy.
Table of Contents
- How to Make Easy Pie Crust Cookies
- Gather, Roll, and Cut Your Dough
- Apply the Perfect Egg Wash & Cinnamon-Sugar Topping
- Bake to Golden Perfection and Enjoy!
- Why You’ll Love These Flaky Treats
- Exciting Flavor Variations & Topping Ideas
- Storage and Make-Ahead Tips
- Get the Full Recipe
How to Make Easy Pie Crust Cookies: A Step-by-Step Guide
Making these delicious pie crust cookies is incredibly straightforward, effortlessly transforming what might have been discarded into a delightful snack. The beauty of this “recipe” is its remarkable flexibility; it works whether you have just a few small scraps of dough or even an entire unused disc of pie crust that never made it into a full pie.
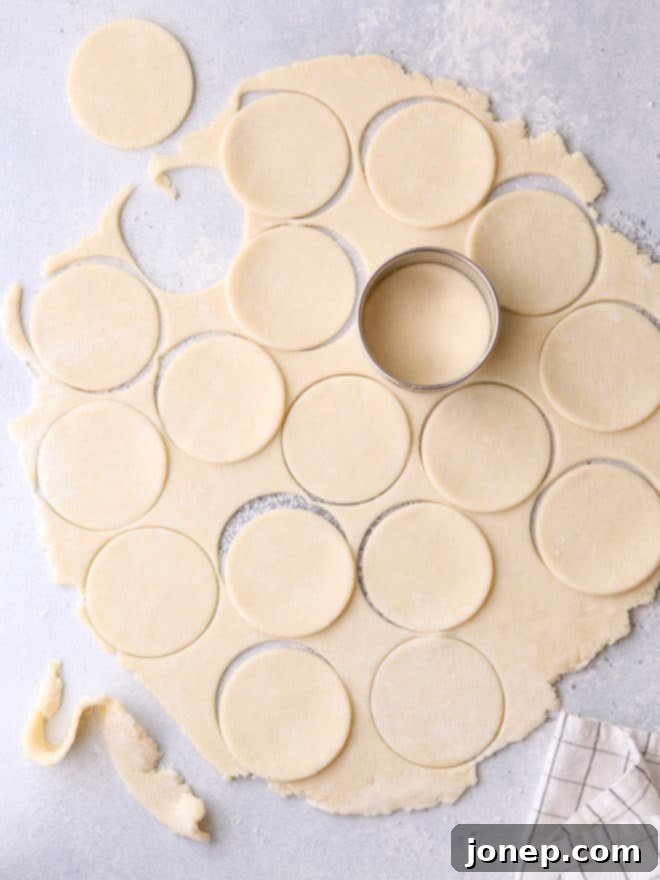
1. Gather, Roll, and Cut Your Dough
The first essential step is to collect all your leftover pie dough scraps. Gently bring them together, pressing them lightly to form a cohesive ball. It’s crucial to handle the dough as little as possible during this process to prevent it from becoming tough; overworking the dough can develop the gluten too much, resulting in a less tender, flaky cookie. Once you have a workable ball, lightly flour your work surface and your rolling pin to prevent sticking. Roll the dough out to an even thickness of approximately 1/4 inch (about 6mm). This consistent thickness is absolutely key for ensuring that all your cookies bake evenly, yielding perfect results every time.
Now comes the most creative and fun part: cutting the shapes! You have endless possibilities here. Utilize various cookie cutters to create charming stars, elegant hearts, simple rounds, or any festive shapes that suit your mood or the occasion. For a more rustic and homely approach, a simple knife can be used to cut the dough into charming strips, neat squares, or whimsical triangles. The size and specific shape are entirely up to your personal preference, but remember that smaller, more delicate shapes will bake faster than larger ones. For instance, a simple 2-inch round cutter, as beautifully demonstrated in the accompanying images, yields perfectly sized, pop-able cookies that are ideal for snacking.
While you can technically bake dough scraps as they are, without the process of rolling and cutting, it’s generally not the recommended method. Pieces that are irregularly shaped and sized will inevitably cook at different rates, often leading to some being unfortunately overbaked and overly crispy, while others remain disappointingly underbaked and doughy. Taking a few extra minutes to uniformly roll and cut your dough ensures a consistent, uniformly delicious result for every single delightful cookie.
Tip: Unleash your creativity with cookie cutters! Employ seasonal shapes like delicate leaves for autumn gatherings, joyful stars for holiday celebrations, or cheerful flowers for spring brunches. These beautifully baked and decorated cookies can ingeniously double as charming edible garnishes or unique decorations for your main pie, adding an extra special, thoughtful touch to a rich pumpkin pie or a classic, creamy custard pie.
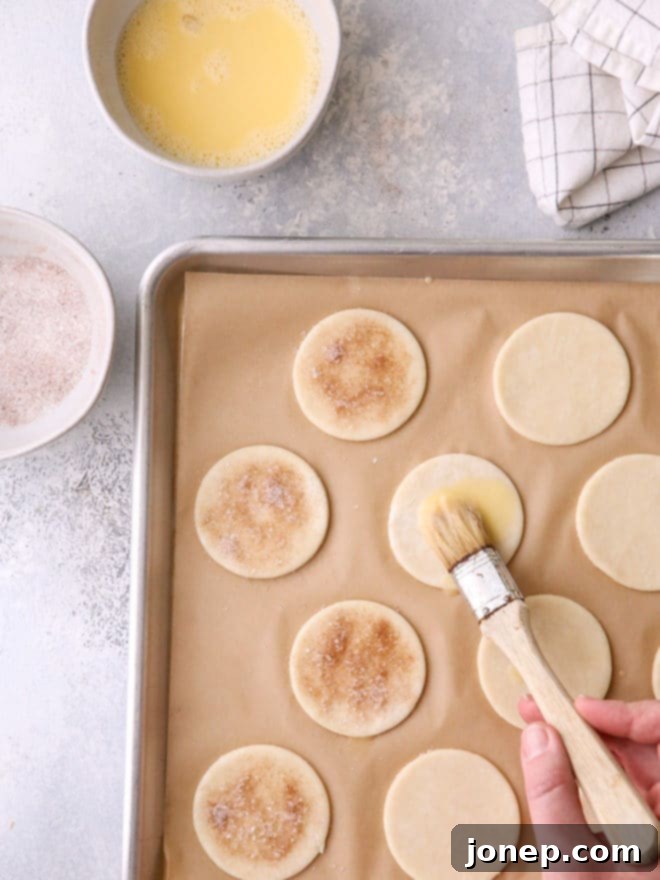
2. Apply the Perfect Egg Wash & Cinnamon-Sugar Topping
The foundation of truly delicious pie crust cookies lies in starting with a high-quality pie dough. If you begin with a really good all-butter pie dough, you’ll swiftly discover that these cookies require very little additional embellishment to taste absolutely amazing. The inherent rich flavor of the butter, combined with the wonderfully flaky texture, is already a winning combination that needs minimal interference.
To further enhance their visual appeal and to provide a perfect canvas for a sweet, golden finish, a simple egg wash is an ideal choice. To prepare, whisk one large egg together with about 1 tablespoon of water until the mixture is thoroughly combined and smooth. This delicate mixture, when brushed lightly yet evenly over the surface of each individual dough shape, performs a dual function: it helps them achieve that beautiful, coveted golden-brown color during baking and, perhaps more importantly, provides a slightly sticky surface to which your chosen topping can adhere perfectly. As an alternative, for a slightly richer and more intensely buttery flavor profile, you could opt to brush the dough with a little melted unsalted butter instead of the traditional egg wash.
Once the egg wash or melted butter is meticulously applied, generously sprinkle a classic cinnamon-sugar mixture over each cookie. This timeless combination is a beloved favorite for good reason: it adds a comforting, warm spice note and a delightful textural crunch. As the cookies bake, the sugar beautifully caramelizes, creating a wonderfully sweet, glistening, and slightly crispy top layer that perfectly complements the rich, buttery, and flaky texture of the pie crust beneath.
Tip: For achieving the ideal balance of sweetness and spice, we recommend creating your own homemade cinnamon-sugar mixture. A classic and highly effective ratio is 1 part ground cinnamon to 4 parts sugar. For example, combine 1 tablespoon of fragrant ground cinnamon with 4 tablespoons of your preferred sugar (granulated, coarse, or turbinado work equally well). This convenient homemade blend can be stored indefinitely in a small, airtight bowl or jar alongside your other spices, ensuring you’re always ready for your next baking adventure!
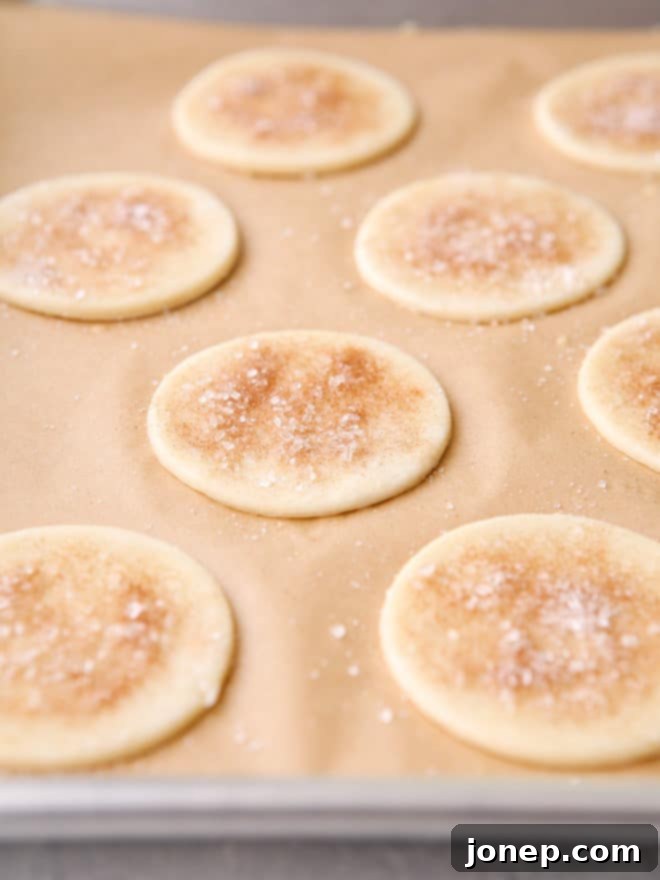
3. Bake to Golden Perfection and Enjoy!
With your pie crust cookies perfectly prepped and beautifully topped, they are now eagerly ready for their quick journey into the oven. These delicate and delectable treats demand just a few swift minutes in a hot oven, preheated to a precise 425°F (218°C). The high temperature is crucial; it ensures they puff up beautifully, achieve that wonderfully crisp texture, and turn a delightful golden brown in a remarkably short amount of time. It’s important to keep a close and vigilant eye on them, as baking times can fluctuate slightly depending on the exact thickness and size of your specific cutouts. Typically, you can expect them to be perfectly baked and ready for enjoyment in approximately 8 to 12 minutes.
Once baked to golden perfection, carefully remove the baking sheet from the oven and immediately transfer the hot cookies to a wire rack. This allows them to cool slightly and prevents them from becoming soggy on the bottom. While they are undeniably delicious when enjoyed warm from the oven, allowing them to cool for a few minutes will significantly enhance and set their wonderfully crisp texture. These pie crust cookies are absolutely fantastic all by themselves, offering a simple yet elegantly satisfying snack. However, their incredible versatility means they also make a superb and thoughtful accompaniment to a wide variety of desserts. Consider serving them alongside a generous scoop of creamy vanilla bean ice cream, a rich chocolate pudding, a warm and bubbling fruit crisp, or even a refreshing bowl of fresh berries topped with a dollop of freshly whipped cream. They add a delightful textural contrast and a burst of buttery flavor to virtually any sweet treat, making every bite an unforgettable experience.
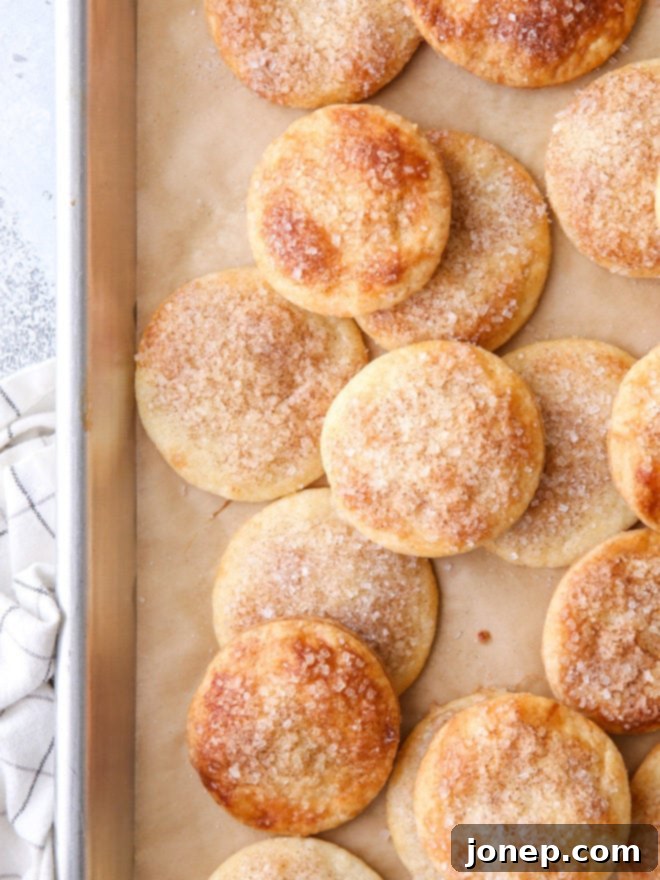
Why You’ll Love These Flaky Treats
Beyond being an incredibly smart and eco-friendly way to use up every last bit of your precious homemade pie dough, these pie crust cookies are truly a joy to bake and an absolute pleasure to eat. Here’s a detailed look at why they’ll swiftly become a beloved staple in your baking repertoire:
- The Ultimate Zero-Waste Hero: Say a resounding goodbye to discarding those invaluable pie dough scraps! This clever recipe ensures that every single buttery flake finds its delicious purpose, transforming potential waste into a delightful treat.
- Effortlessly Delicious & Impressive: With a minimal list of ingredients and a set of refreshingly simple steps, you possess the power to create a sophisticated-tasting cookie that completely belies its easy preparation. They taste and look far more complex than they actually are to make.
- Perfect Texture Harmony: Each bite delivers a delightful contrast – crisp and golden on the outside, yet wonderfully tender and exquisitely flaky on the inside. This multi-layered texture offers an incredibly satisfying sensory experience with every piece.
- Remarkably Versatile & Infinitely Customizable: As you’ll discover in our dedicated flavor variations section, these pie crust cookies are essentially a blank canvas. They invite and inspire your creativity, allowing for an endless array of delicious adaptations and personal touches.
- Instant Gratification in Baking: From the initial rolling out of the dough to the final moments of baking, the entire process is incredibly swift. This means you can indulge in the comforting pleasure of a warm, homemade treat in well under 30 minutes, perfect for those sudden sweet cravings.
- The Ideal Companion for Any Occasion: Whether you choose to serve them alongside a freshly brewed cup of coffee, a soothing mug of tea, a scoop of your favorite ice cream, or simply as a standalone snack, these cookies effortlessly elevate any simple moment into a special, memorable occasion. They’re also perfect for lunchboxes or a quick after-dinner nibble.
Exciting Flavor Variations & Topping Ideas
While the classic cinnamon-sugar topping is an enduring favorite and always a winner, these pie crust cookies are incredibly adaptable and forgiving. Don’t hesitate to experiment with different seasonings, spices, and toppings to create your very own signature treats that cater to every palate:
- Sweet & Visually Festive: For a burst of color and a fun twist, consider using festive sprinkles, vibrant colored sanding sugar, or even delicate edible glitter instead of the traditional cinnamon sugar. These are perfect for holiday baking or birthday celebrations.
- Spicy & Aromatic Blends: Elevate the spice profile beyond simple cinnamon. Pumpkin pie spice is an absolutely perfect choice for adding warm, autumnal notes, especially during the fall season. Alternatively, try a more complex and fragrant chai spice mixture in place of plain cinnamon for a truly sophisticated flavor experience.
- Decadent Drizzles & Glazes: Once your cookies have completely cooled, take them to the next level of indulgence. Drizzle them generously with a rich homemade caramel sauce, luscious melted dark, milk, or white chocolate, or even a simple, elegant glaze crafted from powdered sugar whisked with a touch of milk or lemon juice.
- Creative Filled Delights: For a more substantial and indulgent treat, transform two cookies into a delightful sandwich. Fill them with a dollop of light and airy freshly whipped cream, your favorite fruit jam or preserves, a thin layer of decadent cream cheese frosting, or even a creamy nut butter.
- An Unexpected Savory Twist: For those who prefer a less sweet snack, these cookies can easily take on a savory character. Skip the egg wash and instead brush the dough with a good quality olive oil. Then, sprinkle generously with flaky sea salt, freshly cracked black pepper, and a pinch of fragrant dried herbs like rosemary, thyme, or oregano for a sophisticated savory cracker.
- Bright Citrus Zest Infusion: Add a refreshing and bright note by finely grating the zest of a lemon, orange, or lime directly into your sugar topping mixture before sprinkling it over the dough. The citrus oils will infuse the cookies with a delightful aromatic lift.
Storage and Make-Ahead Tips
These delightful pie crust cookies are undeniably at their absolute best when enjoyed fresh, ideally on the same day they are baked, as this is when their characteristic crispness and flaky texture are at their peak. However, if you happen to have leftovers or wish to prepare a batch slightly in advance, here are some helpful tips to ensure they remain as delicious as possible:
- Storing Baked Cookies: Once your cookies have completely cooled to room temperature, transfer them to an airtight container. They can be stored at room temperature for up to 2-3 days while maintaining a good level of crispness. To further help preserve their delightful crunch, consider placing a piece of paper towel at the bottom of the container to absorb any potential excess moisture. Avoid refrigerating baked cookies, as the humidity in the fridge can quickly cause them to become soft and lose their desired texture.
- Freezing Baked Cookies: While it is technically possible to freeze baked pie crust cookies, it’s generally not the ideal method if you prioritize their delicate, flaky texture. Upon thawing, they tend to lose a significant amount of their crispness and can become somewhat chewy. If you must freeze them, ensure they are completely cooled, then layer them between parchment paper in an airtight freezer-safe container for up to 1 month. Thaw at room temperature.
- Preparing Dough Ahead: For a fantastic head start, you can easily prepare and cut your dough shapes in advance. Arrange the raw dough cutouts on a parchment-lined baking sheet. You can then either refrigerate them, covered, for up to 24 hours or freeze them until they are completely solid. If freezing, once solid, transfer the individual frozen shapes to an airtight freezer bag and store for up to 2-3 weeks. When you’re ready to bake, you can often place them directly from frozen onto a baking sheet, adding just a couple of extra minutes to the baking time. Remember to apply the egg wash and cinnamon sugar (or your chosen topping) just before they go into the oven.
- Reviving Less-Than-Crisp Cookies: If your baked cookies have lost a bit of their initial crispness after a day or two, a quick refresh in a preheated oven can work wonders. Spread them out on a baking sheet and bake in an oven set to around 300°F (150°C) for approximately 3-5 minutes. Let them cool completely on a wire rack afterwards; this gentle reheating will often help to restore some of their delightful crunch.
Get the Full Recipe

Pie Crust Cookies
Pin Recipe
Leave a Review
Ingredients
- Leftover pie crust
- 1 large egg + 1 tablespoon water , for egg wash
- 2 tablespoons granulated, coarse, or turbinado sugar
- 1 teaspoon ground cinnamon
Equipment
Instructions
-
Preheat your oven to a high temperature of 425°F (218°C) to ensure quick puffing and crispness. Line a large baking sheet with parchment paper to prevent sticking and for easy cleanup.
-
Gather all your leftover pie crust scraps into a ball. On a lightly floured surface, use a rolling pin to roll the dough out evenly to about 1/4 inch (6mm) thick.
-
Using cookie cutters or a sharp knife, cut the dough into your desired shapes. Arrange the cutouts on the prepared baking sheet, ensuring a little space between each.
-
In a small bowl, whisk together the large egg and 1 tablespoon of water to create an egg wash. Lightly brush this mixture over the surface of each dough cutout. In a separate small bowl, combine the granulated sugar and ground cinnamon, then generously sprinkle this sweet mixture over the egg-washed cookies.
-
Bake in the preheated oven for approximately 8-12 minutes, or until the cookies are visibly puffed, golden brown, and delightfully crisp. Baking time will vary based on the size and thickness of your cookies, so watch them closely.
-
Carefully remove the baking sheet from the oven and transfer the hot cookies to a wire rack to cool completely. Enjoy these flaky, buttery treats on their own, or serve them as an accompaniment to your favorite desserts.
Notes
- The amount of cinnamon sugar provided is a guideline. Feel free to double or triple the mixture as needed, depending on the quantity of pie crust scraps you are using. Store any excess in an airtight container for future use.
- This recipe is wonderfully adaptable and can be successfully made with any type of pie crust, whether it’s an all-butter, shortening-based, or combination dough.
- For an even more pronounced buttery flavor, you can brush the cut dough pieces with melted unsalted butter instead of an egg wash before sprinkling with cinnamon sugar.
- Consider adding a tiny pinch of fine sea salt to your cinnamon sugar mixture to subtly balance the sweetness and enhance the overall flavor, creating a ‘salted caramel’ effect.
