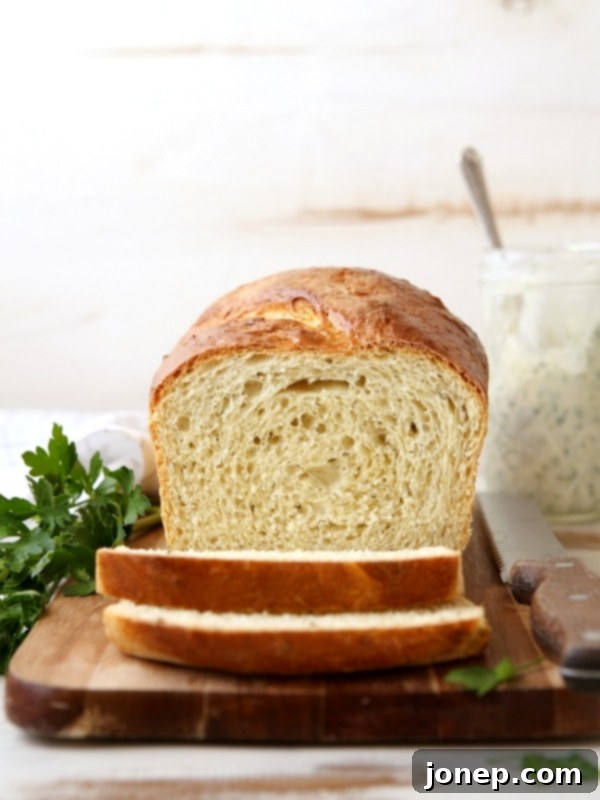
Homemade Buttermilk Ranch Sandwich Bread: Your New Favorite Loaf Recipe
There’s nothing quite like the aroma of freshly baked bread filling your home, and this Buttermilk Ranch Sandwich Bread takes that experience to a whole new level. Imagine a loaf that’s incredibly light and tender, infused with the rich, tangy notes of buttermilk, the pungent warmth of garlic, and a vibrant medley of fresh herbs. This isn’t just any sandwich bread; it’s a culinary masterpiece designed to elevate your everyday meals.
This exceptional recipe was developed in partnership with Red Star Yeast, a brand synonymous with quality and reliability in home baking. Their premium yeast ensures a consistently perfect rise, making your bread baking journey even more rewarding.
Embracing the Joys of Autumn Baking
After a summer break from serious bread baking, a natural hiatus dictated by warmer weather and lighter fare, the crisp embrace of mid-September has rekindled my passion for all things baked. With the exception of grilled pizza, my oven lay mostly dormant for yeast creations. But now, as chilly weather beckons and the days grow shorter, my cravings have shifted. Soups, comforting casseroles, and a steaming mug of hot chocolate are on my mind – and with them, an undeniable urge to bake *aaaaallll* the bread. This return to the warmth of the kitchen, the comforting scent of yeast, and the tactile joy of kneading dough is truly one of the season’s greatest pleasures.
The Inspiration: Ranch Dressing in a Loaf!
This Buttermilk Ranch Sandwich Loaf is my latest delightful creation, born from a simple yet ambitious idea: to craft the perfect sandwich bread. I wanted something beyond the ordinary, a loaf that would not just hold fillings but enhance them with its own incredible flavor profile. The answer came to me in the form of ranch dressing – a universally beloved flavor combination! I envisioned all those savory, tangy, and herbaceous notes baked right into a soft, fluffy bread. And so, this unique bread came to life, infused with the creamy tang of buttermilk, the aromatic punch of fresh garlic, and a generous blend of classic ranch herbs: vibrant parsley, delicate chives, and fragrant dill.
I am absolutely thrilled to report that this bread exceeds all expectations! It makes an utterly excellent deli sandwich, transforming a simple BLT into something extraordinary. Even my morning avocado toast was elevated to new heights, its rich, creamy flavors perfectly complemented by the savory bread. Beyond sandwiches, consider serving a thick slice alongside your favorite bowl of soup – it’s a match made in heaven. This isn’t just homemade white bread; it’s an upgraded, more flavorful, and infinitely more exciting version!
Achieving the Perfect Rise: Essential Baking Tips
Baking with yeast can be incredibly rewarding, but sometimes the environment plays a big role in your success, especially during colder months. If your kitchen tends to be on the cool side, the fermentation process can slow down considerably, meaning your dough might take longer to rise. Don’t let this deter you! Here are some fantastic “baking tips” to help your dough rise faster and more reliably, ensuring that light and airy texture we all crave for our Buttermilk Ranch Sandwich Bread:
baking tip:How to help your dough rise faster
If you’re making a recipe with yeast during the cold fall and winter months, your kitchen may be colder and the cool temps will slow down the rise of your dough. To help your dough rise faster, here’s a few warmer suggestions:
- Oven: Heat your oven to its lowest setting for a few minutes, then turn it off. Place the covered dough on the center rack and close the door. The residual warmth provides a cozy environment for your yeast to thrive.
- Microwave: Heat 1 cup of water in your microwave for 2 minutes until steamy. Remove the water, then immediately place your covered dough in the microwave and close the door. The warm, moist air inside creates an ideal proofing box.
- Other creative spots: I’ve also successfully risen bread on top of a warm oven (when the oven is in use for something else), next to a running dryer machine, or even on a chair positioned over a heater vent. The key is consistent, gentle warmth, not direct high heat. Always ensure the dough is covered to prevent it from drying out!
The Science of Delicious Bread
Beyond finding the right warm spot for your dough, understanding a few fundamental principles can significantly improve your bread-baking results. Using high-quality yeast, such as Red Star Platinum Yeast, is paramount. It’s formulated for excellent performance, giving you a strong and reliable rise. Buttermilk, a star ingredient in this recipe, does more than just add flavor; its acidity helps tenderize the gluten, resulting in a softer crumb and a subtle tang that complements the savory herbs and garlic beautifully. The butter adds richness and contributes to that tender texture. Precise measuring, especially of flour, is also crucial. While the recipe calls for cups, using a kitchen scale for grams will yield the most consistent results, ensuring your dough isn’t too stiff or too sticky. Kneading is another vital step – it develops the gluten, creating the elastic structure that traps the gas produced by the yeast, giving the bread its characteristic texture.
Every step in this Buttermilk Ranch Sandwich Bread recipe is designed to be straightforward, making it accessible for both novice and experienced bakers. From the initial mixing to the final golden-brown crust, you’ll find the process immensely satisfying. The reward? A truly delicious, aromatic loaf that will disappear quickly from your kitchen counter.

Buttermilk Ranch Sandwich Bread
Pin Recipe
Leave a Review
Ingredients
- 1 ⅓ cup buttermilk (330 ml)
- 3 tablespoons unsalted butter
- 4 cups all-purpose flour (480 grams)
- 1 ½ teaspoon salt
- 2 tablespoons granulated sugar
- 2 packets Red Star Platinum Yeast (4 ½ teaspoons)
- 2 cloves garlic minced
- 1 tablespoon chopped fresh dill (or 1 teaspoon dried)
- 1 tablespoon chopped fresh parsley (or 1 teaspoon dried)
- 1 tablespoon chopped fresh chives (or 1 teaspoon dried)
- 1 large egg + 1 teaspoon water , for egg wash
Instructions
-
Heat buttermilk and butter in a small saucepan set over low heat until butter is melted. Let sit for a few minutes to cool, or until temperature is between 120-130°F. This crucial step activates the yeast without killing it.
-
In the bowl of a stand mixer fitted with a dough hook (or a large bowl if you plan to mix and knead by hand), combine 2 ½ cups of the flour, salt, sugar, yeast, minced garlic, and fresh herbs (dill, parsley, chives). Whisk these dry ingredients together to ensure even distribution of flavors.
-
Add the lukewarm buttermilk mixture to the dry ingredients and mix on low speed until it forms a shaggy, wet dough. Gradually add the remaining flour, 1/4 cup at a time, until the dough comes together, clears the sides of the bowl, and is no longer sticky to the touch.
-
Continue kneading the dough with the dough hook on medium-low speed, or by hand on a lightly floured surface, until it becomes smooth, supple, and elastic. This usually takes about 7-8 minutes with a stand mixer, or 10-12 minutes by hand. A well-kneaded dough will spring back when gently poked.
-
Form the kneaded dough into a neat ball and place it in a lightly greased bowl, turning it once to coat. Cover the bowl tightly with plastic wrap or a clean kitchen towel and let it rise in a warm spot (refer to our baking tips above!) until it has doubled in size, which should take approximately 1 hour.
-
Once risen, gently punch down the dough to release the air. Turn it out onto a lightly floured surface and knead it a few times to reshape it back into a smooth ball. This step helps redistribute the yeast and creates a finer crumb.
-
Roll the dough out into a rough 9×15-inch rectangle. Starting at one of the 9-inch ends, tightly roll the dough into a log. Pinch the seam closed and tuck the ends underneath to create a smooth loaf shape. Place this prepared log into a greased 9×5-inch loaf pan, cover it again with plastic wrap, and let it rise for a second time until doubled, typically 45-60 minutes.
-
Meanwhile, preheat your oven to 375°F (190°C). Once the loaf has completed its second rise, whisk together the large egg and 1 teaspoon of water to create an egg wash. Gently brush the top of the risen loaf with this egg wash; this will give it a beautiful golden crust. Bake the bread for 30-35 minutes, or until the top is a deep golden brown and the loaf sounds hollow when tapped on the bottom.
-
Immediately remove the baked bread from the pan and transfer it to a wire rack to cool completely. Cooling on a rack prevents the bottom from becoming soggy. While bread is often best enjoyed warm from the oven on the day it’s baked, you can wrap any leftovers tightly in plastic wrap or store in an airtight container at room temperature for up to 3 days.
Disclosure: This recipe was proudly developed in partnership with Red Star Yeast. We extend our sincere gratitude for supporting brands we genuinely love and believe in. Such collaborations are what make the content and recipes on Completely Delicious possible. Rest assured, all opinions expressed here are 100% my own, as always. We believe in transparency and only recommend products that truly enhance your baking experience.
Stay connected and discover more amazing baking inspiration with Red Star Yeast! You can find them on Twitter, Facebook, Pinterest, and Google+. For an abundance of recipes, invaluable bread baking tips, and a wealth of information, be sure to also visit their comprehensive website. Happy baking!
