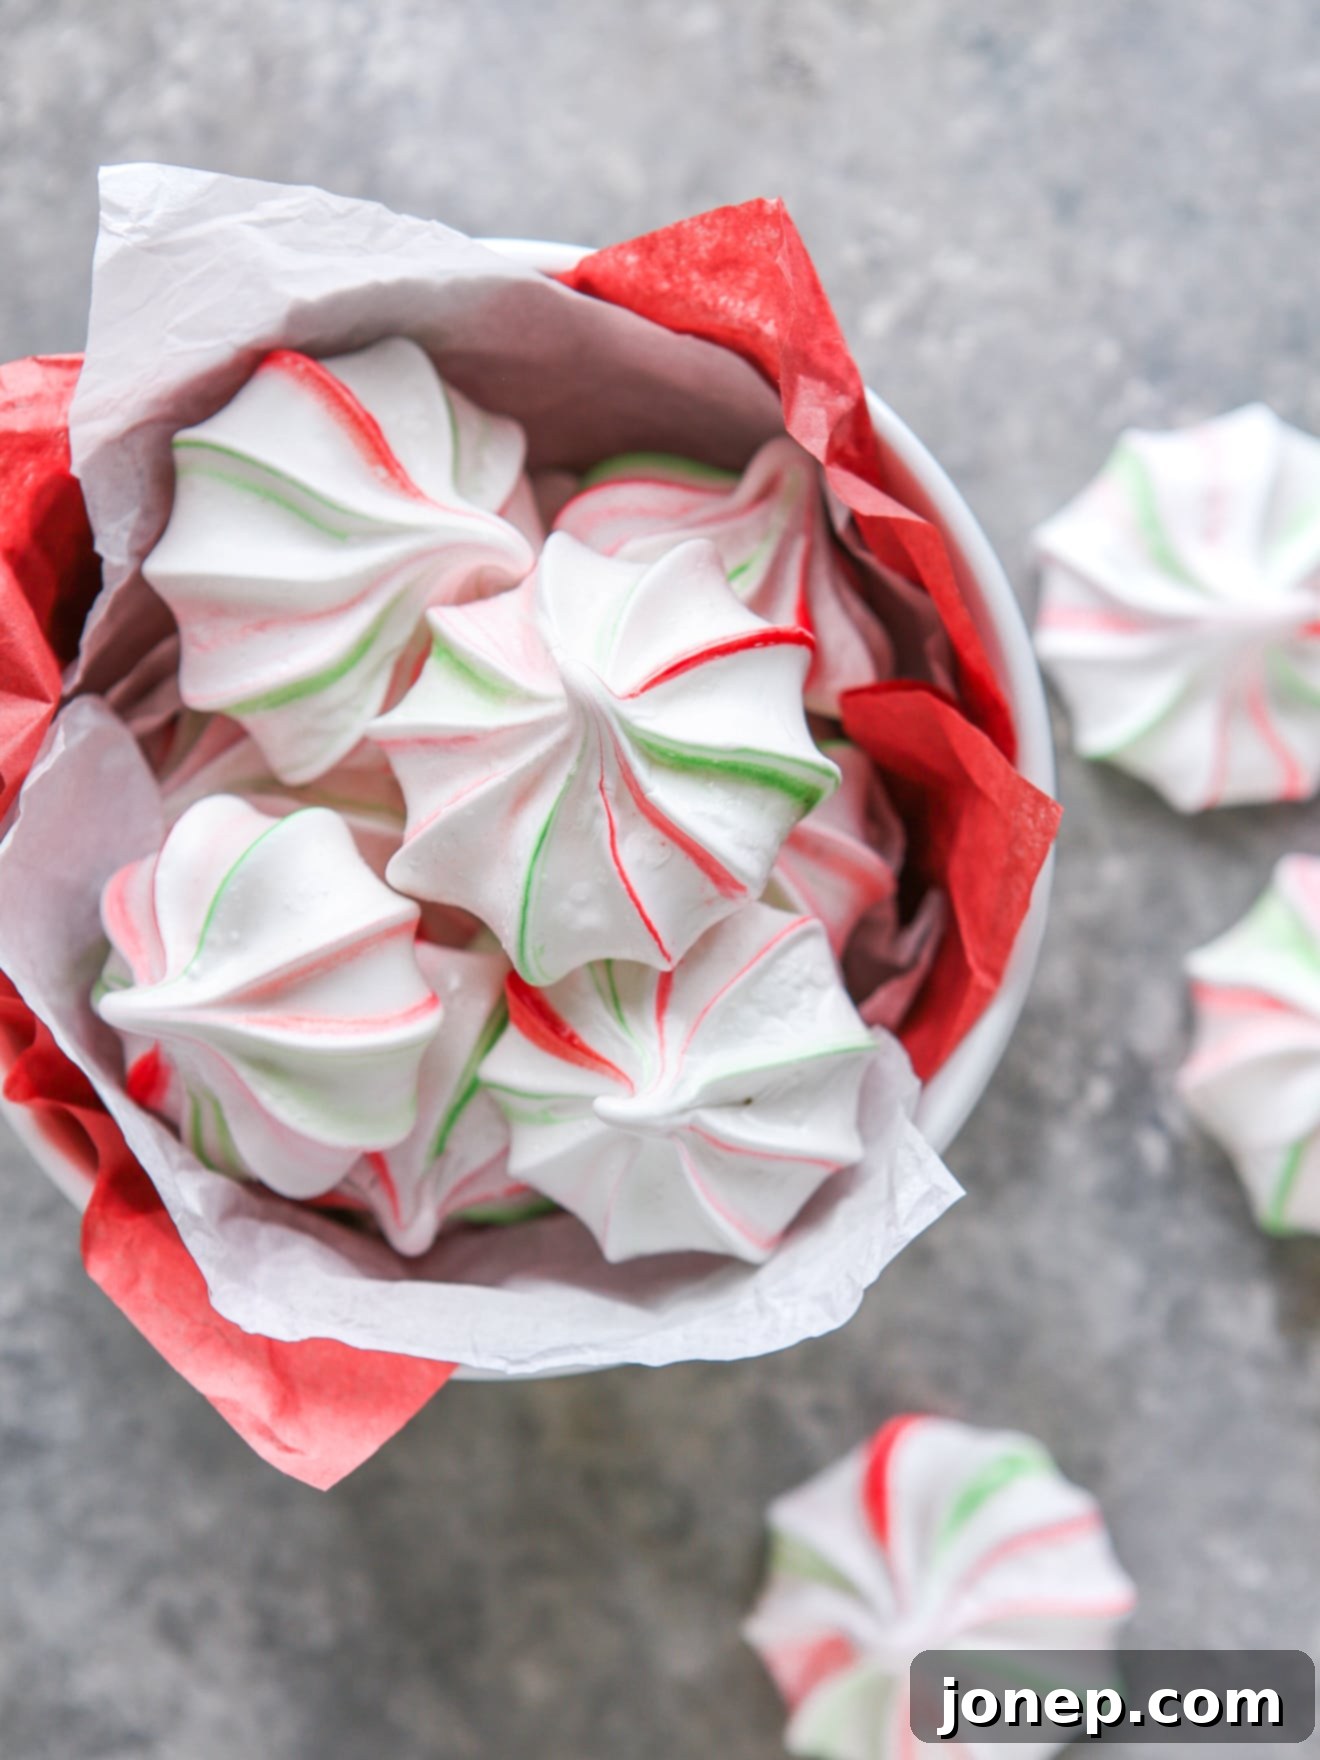
Peppermint Meringues: Your Ultimate Guide to Festive Red and Green Holiday Treats
Get ready to infuse your holiday season with a burst of festive color and delightful flavor! These red and green-striped peppermint meringues are not just a treat for the taste buds but also a feast for the eyes. Incredibly simple to make, they transform basic ingredients into light, airy, and spectacularly pretty confections perfect for any celebratory occasion during the holidays.
Imagine biting into a cloud of crisp sweetness, followed by a pleasantly chewy center, all infused with the invigorating taste of peppermint. That’s exactly what these meringues offer! With just four core ingredients and a minimal amount of active preparation, your oven will do most of the magic, leaving you with more time to enjoy the festivities.
These adorable, bite-sized peppermint meringues are a joy to create and even more fun to share. Their vibrant stripes make them a standout addition to any cookie tray, a thoughtful homemade gift, or simply a delightful treat to savor throughout the holiday season. Whether you’re a seasoned baker or just starting out, this recipe promises impressive results with minimal fuss.
Why You’ll Adore This Peppermint Meringue Recipe
- Effortlessly Festive: Achieve stunning red and green stripes with a simple technique, making these meringues a visual centerpiece.
- Minimal Ingredients: You only need 4 basic ingredients, most of which you likely already have in your pantry.
- Light & Airy Texture: Enjoy a wonderfully crisp exterior that yields to a deliciously chewy, melt-in-your-mouth center.
- Perfect for Gifting: Pack them into pretty boxes or bags for an edible holiday gift that friends and family will cherish.
- Versatile Treat: Ideal for holiday parties, cookie exchanges, or a sweet indulgence with your afternoon tea or coffee.
- Low Effort, High Reward: Minimal active cooking time means your oven does the hard work, freeing you up for other holiday preparations.
Essential Ingredients for Your Peppermint Meringues
Creating these magical meringues requires a handful of common baking staples. Each ingredient plays a crucial role in achieving that perfect texture and festive flavor:
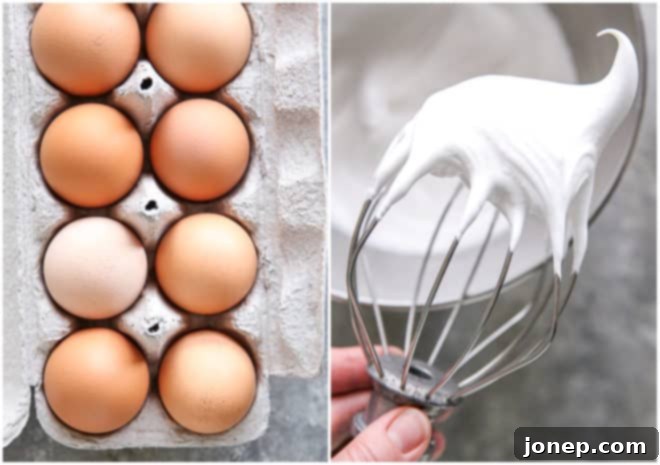
- Egg Whites: The foundation of any good meringue! They provide the structure and lightness. Ensure they are completely free of any yolk contamination for proper whipping. Large egg whites are typically used for consistent results.
- Granulated Sugar: Not just for sweetness, sugar also stabilizes the whipped egg whites, helping them hold their shape and creating that signature crisp-chewy texture.
- Peppermint Extract: This is where the signature holiday flavor comes in! A good quality extract makes all the difference. Start with the recommended amount and adjust to your personal preference for peppermint intensity.
- Red and Green Gel Food Coloring: Liquid food coloring can add too much moisture and dilute the meringue, so gel-paste food coloring is essential here. It provides vibrant, concentrated color without affecting the meringue’s consistency, allowing those beautiful stripes to truly pop!
How to Craft Your Beautiful Peppermint Meringues: Step-by-Step Guide
Follow these detailed steps to create flawless, festive peppermint meringues that will impress everyone!
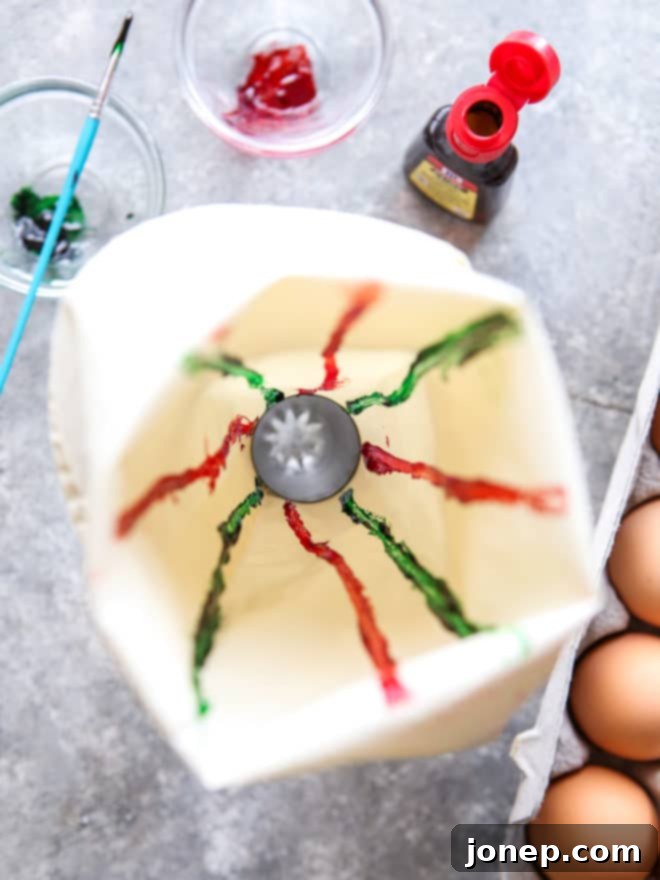
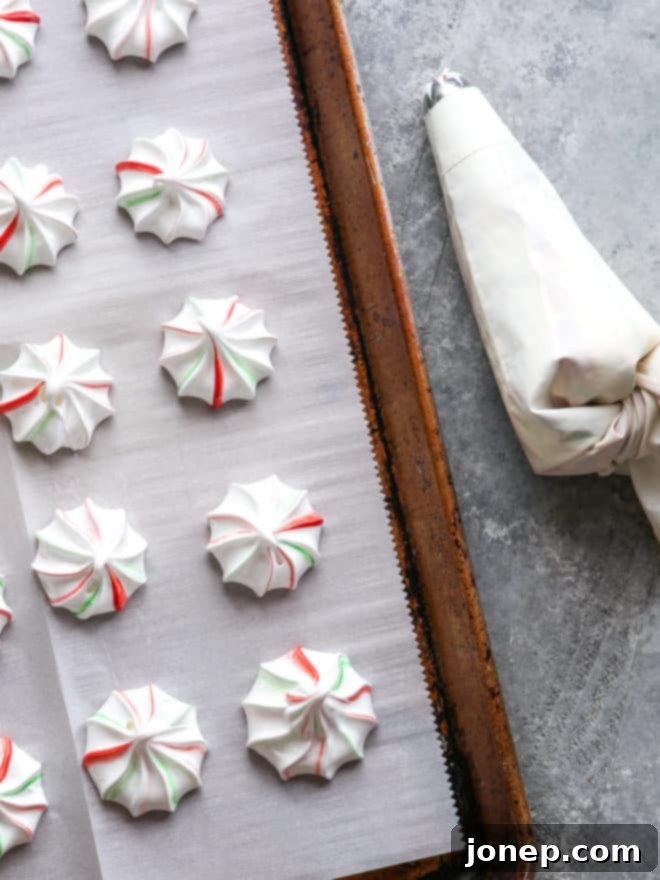
- Prepare Your Piping Bag with Festive Stripes: This step is key for the signature holiday look. Take a piping bag, fitted with your preferred star tip (a medium star tip works wonderfully for classic starburst shapes), and use a small, clean paint brush to lightly brush alternating stripes of red and green gel food coloring up the sides of the bag. Aim for about three stripes of each color for a vibrant effect. This technique ensures the stunning, swirled color pattern as you pipe the meringue.
- Gently Warm Egg Whites and Sugar: Combine your egg whites and granulated sugar in the metal bowl of a stand mixer. Place this bowl over a pot of simmering water (creating a double boiler effect, ensuring the bowl doesn’t touch the water). Stir the mixture frequently for about 3 minutes, or until all the sugar crystals have completely dissolved and the mixture feels warm to the touch. This step is crucial for stable meringues, as dissolved sugar prevents weeping and results in a smoother, more stable foam.
- Whip to Stiff, Glossy Peaks: Remove the bowl from the simmering water and attach it to your stand mixer. Using the wire whisk attachment, beat the egg white mixture on high speed. Continue beating until the meringue holds very stiff, glossy peaks. This typically takes about 4-5 minutes, but can vary depending on your mixer. When you lift the whisk, the peaks should stand upright firmly without collapsing. At this point, add the peppermint extract and beat for another 30 seconds to incorporate it evenly.
- Carefully Fill the Piping Bag: Using a rubber spatula, gently scoop the beautifully whipped meringue into your prepared piping bag. Be careful not to deflate the meringue by handling it too roughly. Fill the bag about two-thirds full, leaving some space at the top to twist and seal.
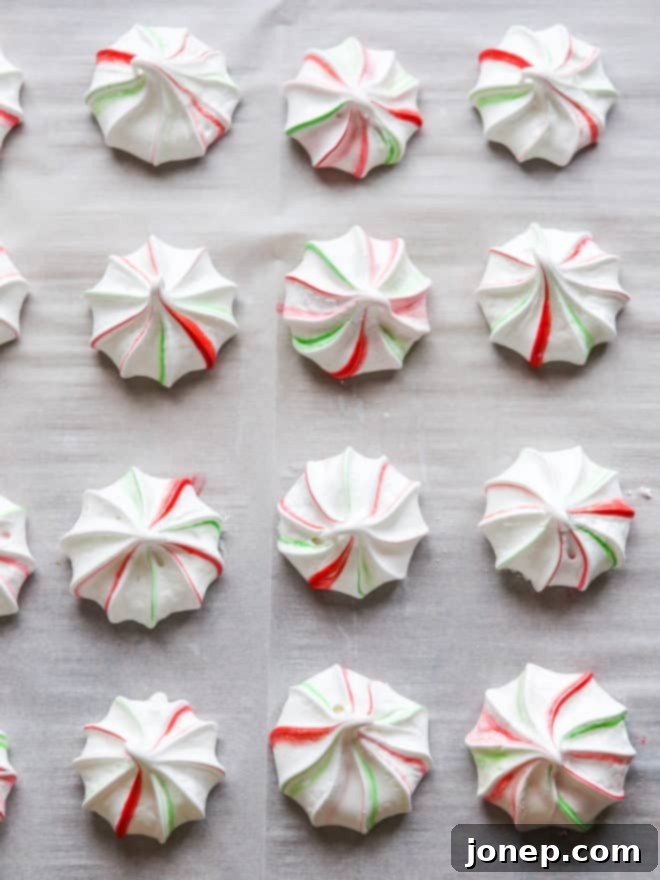
- Pipe Onto Lined Sheet Pans: Before piping your decorative stars, pipe a small amount of meringue into a separate bowl until you start to see the red and green stripes emerge from the tip. This ensures your first piped meringues have the desired festive colors. Then, confidently pipe starbursts or your desired shapes onto sheet pans lined with parchment paper. Aim for uniform size for even baking. Remember to preheat your oven to 175°F (80°C) and line two sheet pans with parchment paper prior to starting this step.
- Bake Low and Slow for Perfect Crispness: Transfer your sheet pans to the preheated oven. Bake the meringues at this very low temperature for approximately 2 hours, or until they are completely crisp and dry to the touch, but not at all browned. They should lift easily from the parchment paper without sticking. The low temperature allows the meringues to dry out slowly, creating that ideal crisp texture without caramelizing the sugar.
- Cool Completely and Store Properly: Once baked, turn off the oven and allow the meringues to cool completely inside the oven for another hour or two (or even overnight). This slow cooling helps prevent cracking. Once fully cooled, store your peppermint meringues in an airtight container at room temperature. They will maintain their crispness and fresh flavor for about a week.
Expert Tips for Making Flawless Peppermint Meringues
Achieving perfect meringues can sometimes feel like a delicate art, but with these pro tips, you’ll be well on your way to success:
- Spotless Equipment is Non-Negotiable: Your mixer bowl and whisk attachment must be impeccably clean and completely free of any grease or fat. Even a tiny speck of yolk, oil, or butter can prevent your egg whites from whipping up properly, resulting in a flat, soupy meringue.
- Master Egg Separation: To avoid any yolk contamination, separate your eggs carefully. If you’re new to this or need a refresher, check out this detailed tutorial on how to separate eggs effectively. It’s a small step that makes a huge difference.
- Gel Food Coloring is Essential: As mentioned, liquid food coloring contains water, which can destabilize meringue. Gel-paste food coloring is concentrated and won’t add excess moisture, allowing it to adhere beautifully to the inside of the piping bag for those vibrant stripes.
- Choose Your Mixer Wisely: While a stand mixer with a whisk attachment is highly recommended for its power and consistent whipping, a good quality hand mixer can also do the job. Just be prepared for a bit more arm work and ensure you whip until truly stiff peaks form.
- Humidity is Your Foe: Meringues are highly sensitive to humidity. For the best results, try to bake meringues on a dry, low-humidity day. High humidity can make meringues sticky, chewy, or prevent them from drying out properly.
- Don’t Rush the Cooling Process: Resist the urge to open the oven door during baking or to remove the meringues immediately after the baking time is up. Allowing them to cool slowly inside the oven helps them set properly and prevents cracking.
- Ensure Sugar is Fully Dissolved: The grainy texture of undissolved sugar can lead to weeping meringues. The warming step over simmering water is critical for this. You can test a small amount of the mixture between your fingers; if it feels smooth, the sugar is dissolved.
Can I Make This Recipe Without a Piping Bag & Tip?
Absolutely! While the piped starbursts with their striking stripes add to the visual charm of these peppermint meringues, you can certainly make them without specialized piping equipment. If you don’t own a piping bag, you can easily adapt a sturdy plastic ziplock bag by snipping off one corner to create a makeshift piping bag. It might not produce the same intricate detail as a star tip, but it will still allow for piping.
Alternatively, if you prefer to skip the piping altogether, simply do your best to gently swirl the red and green gel food coloring directly into your whipped egg whites using a spatula, creating a marbled effect. Then, use a small cookie scoop or two spoons to drop dollops of the meringue onto your parchment-lined baking sheets. What your meringues might lack in intricate presentation, they will more than make up for in delicious peppermint flavor and delightful texture!
Frequently Asked Questions About Peppermint Meringues
How do I know if my egg whites are whipped enough?
Your meringue is ready when it forms very stiff, glossy peaks. When you lift the whisk, the peak should stand upright without drooping or collapsing. If it’s still soft, continue whipping.
Why are my meringues sticky or weeping?
Sticky or weeping meringues are often due to humidity, undissolved sugar, or being underbaked. Ensure you bake on a dry day, properly dissolve the sugar in the initial step, and bake for the full duration until they are completely dry and crisp.
Can I make these meringues ahead of time?
Yes, meringues are an excellent make-ahead treat! Once completely cooled, store them in an airtight container at room temperature. They will stay fresh and crispy for up to a week.
Can I use different flavor extracts?
Absolutely! While peppermint is perfect for the holidays, feel free to experiment with other extracts like vanilla, almond, lemon, or even a touch of rum extract for a different flavor profile.
What’s the best way to store baked meringues?
Always store cooled meringues in an airtight container at room temperature. Avoid refrigerating them, as the moisture can make them soft and chewy. They do not freeze well.
Delicious Variations & Serving Suggestions
These peppermint meringues are wonderful on their own, but don’t hesitate to get creative:
- Chocolate Dipped: For an extra decadent touch, dip the cooled meringues in melted dark or white chocolate. The chocolate will beautifully complement the peppermint flavor.
- Sprinkle Fun: Before baking, sprinkle a few festive sprinkles over the piped meringues for added sparkle and texture.
- Different Colors & Flavors: Adapt this recipe for other occasions! Use blue food coloring and vanilla extract for a winter wonderland theme, or pastel colors and fruit extracts for spring.
- Dessert Garnish: Crush a few meringues and sprinkle them over ice cream, hot chocolate, or a rich chocolate cake for an added crunch and burst of flavor.
- Edible Gifts: Arrange them artfully in cellophane bags tied with ribbon, or in decorative tins, for a homemade gift that’s always appreciated.
Shop Tools for this Recipe
This recipe was originally published December 2010.
Peppermint Meringues
Pin Recipe
Leave a Review
Ingredients
- 3 (105 grams) large egg whites
- ¾ cup (150 grams) granulated sugar
- ½ teaspoon peppermint extract
- red and green gel-paste food coloring
Instructions
-
Preheat your oven to a low 175°F (80°C). This low temperature is crucial for drying out the meringues without browning them. Line two large sheet pans with parchment paper. This will prevent the meringues from sticking and ensures easy removal after baking.
-
In the metal bowl of a stand mixer, combine the egg whites and granulated sugar. Place this bowl directly over a pot of gently simmering water, ensuring the bottom of the bowl does not touch the water. Stir the mixture continuously but gently until all the sugar crystals are completely dissolved and the mixture is warm to the touch (around 120-130°F or 49-54°C). This process, known as a Swiss meringue method, dissolves the sugar and stabilizes the egg whites, leading to a much stronger and glossier meringue. This usually takes about 3 minutes.
-
Carefully remove the bowl from the simmering water and attach it to your stand mixer. Using the whisk attachment, beat the egg white mixture on high speed. Continue beating until the meringue forms stiff, glossy peaks. This means when you lift the whisk, the meringue should hold its shape firmly without curling over. This process typically takes about 5 minutes. Once stiff peaks are achieved, add the peppermint extract and beat for another 30 seconds to fully incorporate it.
-
Prepare your pastry bag: fit it with a medium star tip. Using a small, clean paint brush, paint 3 distinct stripes each of red and green gel food coloring up the inside sides of the pastry bag. Alternate the colors for the best striped effect. This method ensures that as the meringue is piped, it picks up the color in beautiful swirls.
-
Carefully fill the prepared pastry bag with the meringue. Before piping onto your sheet pans, pipe a small amount of meringue into a separate bowl. The initial meringue may not have strong stripes as it comes from inside the tip, not the colored sides of the bag. Continue piping into the bowl until you see the vibrant stripes appear. Then, pipe 2-inch sized stars or your desired shapes onto the parchment-lined sheet pans, leaving a little space between each meringue.
-
Place the sheet pans in the preheated oven and bake for approximately 2 hours. The goal is for the meringues to be completely crisp and dry, but not at all browned. They should easily peel off the parchment paper without sticking. Once the baking time is complete, turn off the oven and let the meringues cool completely inside the oven for another 1-2 hours (or even overnight). This gradual cooling helps prevent cracking. Once fully cooled, store your delightful peppermint meringues in an airtight container at room temperature for up to 1 week to maintain their crispness.
Video
Notes
NOTES
- Your mixer bowl and whisk attachment need to be clean and completely free of any grease or fat or your egg whites will not whip up properly. This is crucial for successful meringues.
- To properly separate your eggs, ensuring no yolk (i.e., fat) contaminates your whites, see my detailed tutorial here. Precision in separation is key!
- Gel food coloring is required for this recipe, as liquid food coloring won’t adhere well to the sides of the piping bag and can add too much moisture, negatively affecting the meringue’s consistency.
- I prefer to use a stand mixer when whipping meringues for its efficiency and consistent results, but a robust hand mixer would also work. Just be sure to whip until truly stiff peaks are achieved.
Adapted from Joy the Baker.
Conclusion: Your New Favorite Holiday Tradition
These peppermint meringues are more than just a sweet treat; they’re a delightful, whimsical addition to your holiday baking repertoire. Their striking red and green stripes, combined with the refreshing burst of peppermint, make them an instant classic that’s as enjoyable to make as it is to eat. Whether you’re planning a festive gathering, looking for the perfect edible gift, or simply want to indulge in a light and airy dessert, this recipe delivers on all fronts.
So, gather your ingredients, follow these simple steps, and prepare to fill your home with the sweet aroma of the holidays. These cheerful meringues are guaranteed to bring smiles and a touch of magic to your celebrations. Happy baking!
