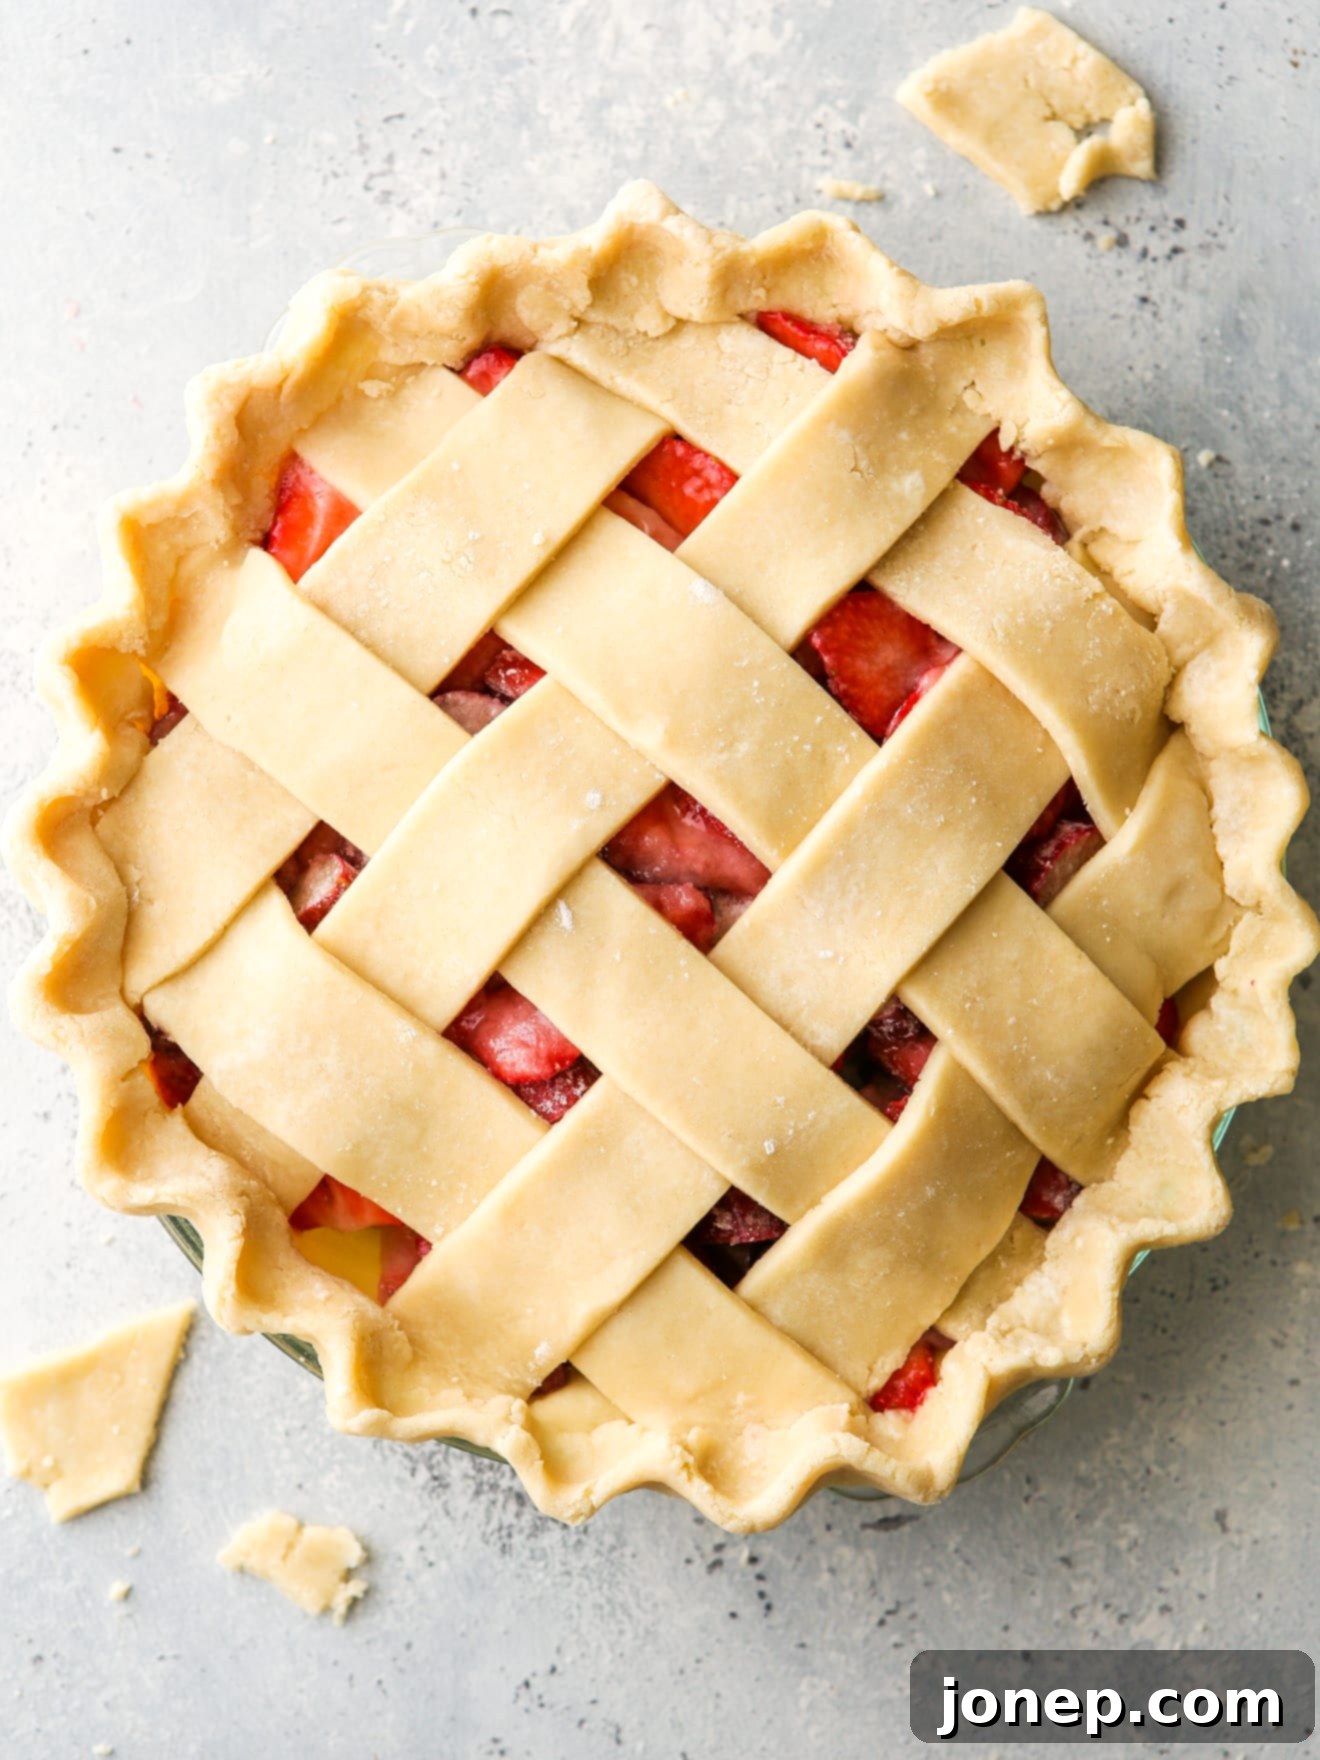
Mastering the Art of Lattice Pie Crust: A Step-by-Step Guide for Stunning Homemade Pies
Creating a beautiful lattice crust for your homemade pies might seem like a daunting task reserved for professional bakers, but it’s surprisingly simple and incredibly rewarding. This detailed, step-by-step tutorial will guide you through the process, making it easy for anyone to craft a picture-perfect woven pie crust. Get ready to impress everyone with your stunning, golden-brown lattice-topped pies!
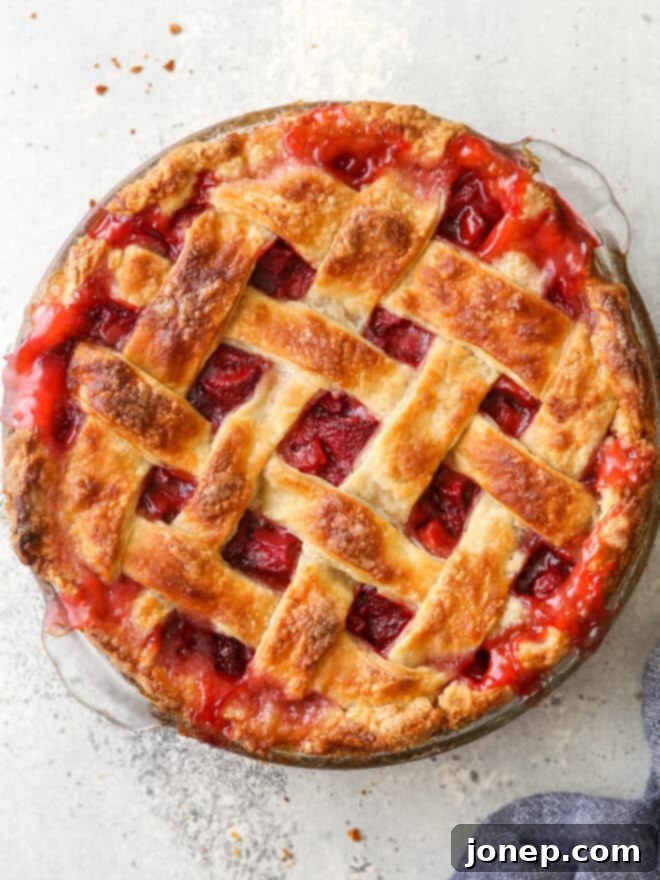
A homemade pie adorned with an intricate lattice crust is truly one of the most exquisite desserts you can bake, guaranteed to be a crowd-pleaser at any gathering. The good news? This elegant finish is far easier to achieve than you might imagine, transforming a simple pie into a work of art.
If you’ve always admired lattice-topped pies but felt too intimidated to try making one yourself, this guide is for you! We’re here to demystify the process and show you just how straightforward it is to create this classic, beautiful pie topping. You’ll gain the confidence to elevate your baking and impress friends and family with your newfound skills.
What is a Lattice Pie Crust and Why Choose It?
At its heart, a lattice pie crust is a decorative top crust created by weaving strips of pie dough together over a fruit filling before baking. This technique forms a beautiful, open, crisscross pattern that not only looks professional but also serves a practical purpose. The openings in the weave allow steam to escape during baking, preventing the crust from becoming soggy and ensuring your fruit filling cooks perfectly without bubbling over excessively.
Beyond its functional benefits, the lattice crust elevates the visual appeal of any pie. It adds a rustic elegance and a touch of artisanal craftsmanship that plain pie tops can’t quite match. Each pie becomes a unique masterpiece, reflecting the care and effort put into its creation. Plus, the contrast of the golden-brown crust with the vibrant, bubbling fruit filling peeking through is simply irresistible.
Essential Tools and Ingredients for Your Lattice Pie
Crafting a beautiful woven lattice topping is achievable for any double-crust pie (meaning a pie with a bottom crust and a top crust). Having the right tools and ingredients readily available will make the process smooth and enjoyable. Here’s what you’ll need to get started:
- Pie Crust Dough: While store-bought pie crusts can certainly be used, a homemade, flaky pie crust is strongly preferred for its superior flavor and texture, and it handles better during the weaving process. The rich butter and perfect flakiness of a homemade butter pie crust recipe truly make a difference in the final result. You’ll need enough dough for two crusts: one for the bottom and one for the lattice top.
- All-Purpose Flour: Essential for dusting your work surface and rolling pin. This prevents the delicate pie dough from sticking, ensuring a smooth rolling and cutting process.
- Rolling Pin: A sturdy rolling pin is crucial for evenly flattening your pie dough to the perfect thickness. Consistency in dough thickness is key for uniform baking and a professional-looking lattice.
- Ruler (Optional but Recommended): For precise and uniform strips. While not strictly necessary, a ruler helps immensely in cutting perfectly straight and evenly wide strips, which contributes to a neater, more symmetrical lattice pattern.
- Pizza Cutter, Pastry Wheel, or Sharp Knife: Any of these tools will work perfectly for cutting your pie dough into neat, straight strips. A pizza cutter or pastry wheel often makes the task quicker and cleaner, but a sharp chef’s knife is also highly effective.
- Large Egg: For creating an egg wash. This is a crucial ingredient for achieving that gorgeous, golden-brown, shiny finish on your baked pie crust.
- Pastry Brush: Used to apply the egg wash evenly over the lattice crust. A good quality pastry brush ensures a smooth, consistent coating for a beautiful sheen.
- Optional: Coarse Sugar: A sprinkle of coarse sugar on top of the egg wash adds a delightful sparkle and extra crunch to your finished pie, enhancing both its appearance and texture.
Step-by-Step Guide: How to Weave a Perfect Lattice Pie Crust
Follow these instructions carefully to create a stunning woven lattice that will make your pie truly stand out. Remember, patience and a light touch are your best friends when working with pie dough.
1. Start with Chilled Pie Crust Dough
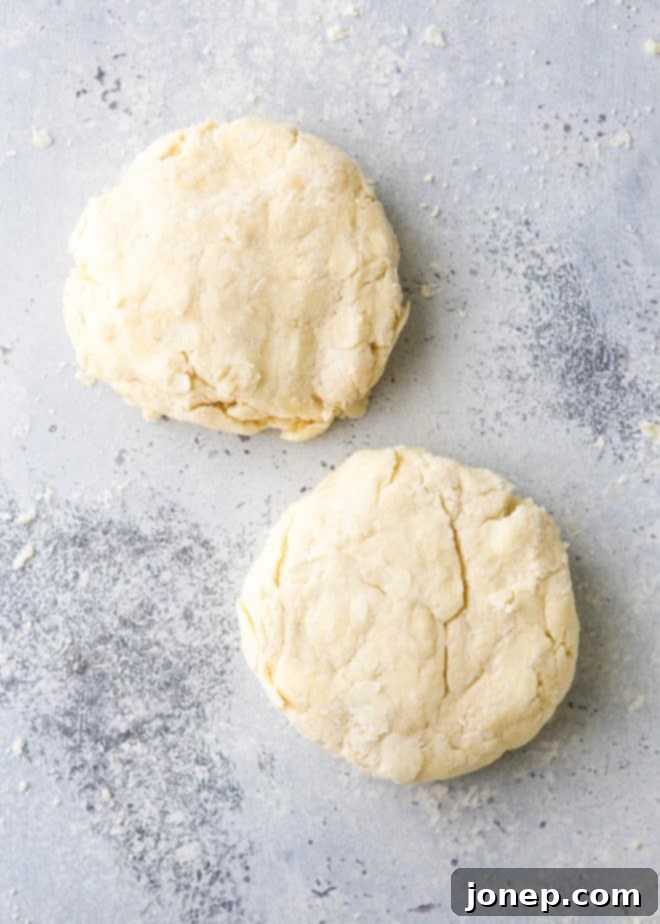
This is a foundational step for success. Your pie dough, especially the portion intended for the lattice, must be well-chilled. Allow it to rest in the refrigerator for at least 2 hours, or even overnight. Chilling firms up the butter in the dough, making it easier to handle, roll, and cut without sticking or becoming too soft. It also allows the gluten to relax, which results in a tender, flaky crust rather than a tough one.
2. Prepare the Rest of the Pie
Before you begin the lattice work, ensure your pie’s base is ready. Roll out one portion of your chilled pie dough on a lightly floured surface and carefully transfer it to your pie baking dish. Gently press it into place and trim any excess. Next, prepare your pie filling according to your chosen recipe’s instructions and pour it into the bottom crust. The lattice topper is the very last decorative step before baking.
3. Roll Out Pie Crust for Lattice Strips
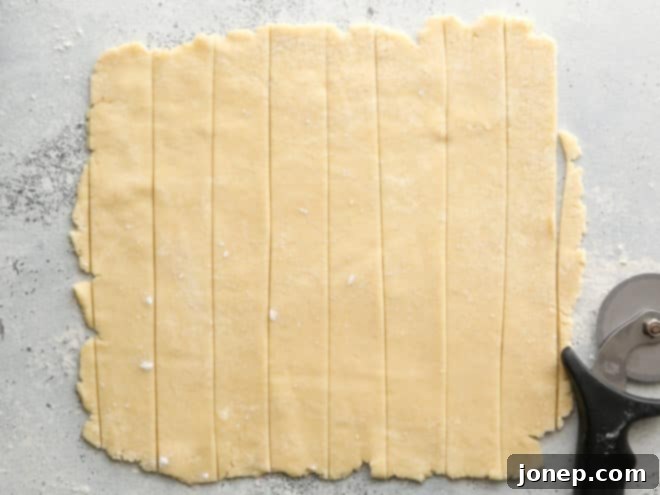
Take the second portion of your chilled pie dough from the refrigerator. On a lightly floured surface, use your rolling pin to roll it out to an even thickness of approximately ¼-inch. Dust your work surface with flour as needed to prevent sticking, but avoid using too much, which can make the dough tough. You have two main options for shape: roll the dough into a large circle about 12 inches in diameter, or, as often preferred for ease of cutting straight strips, roll it into a rough rectangle, as shown in the image above. Aim for a consistent thickness across the entire sheet of dough.
4. Cut into Lattice Strips
Now, it’s time to cut your rolled-out dough into strips. While the exact number and width depend on your desired aesthetic, a good starting point is 8-10 total strips, each about 1 to 2 inches wide. Thicker strips tend to hold their shape better during baking, offering a more robust look. In the accompanying photos, 8 strips, each 1.5 inches wide, were used. Use a ruler and a pizza cutter, pastry wheel, or sharp knife to ensure your strips are as straight and uniform in width as possible. Precision here contributes significantly to a neat final weave.
5. Lay Vertical Strips on Top of the Pie
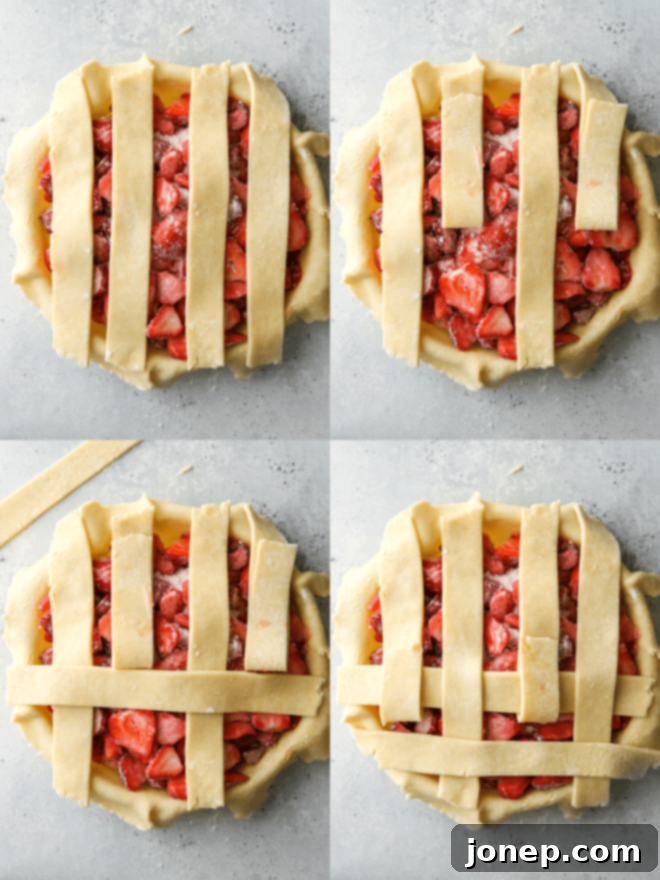
Carefully transfer half of your cut pie crust strips onto your prepared pie, laying them vertically. Space them evenly apart, ensuring the longer strips are positioned towards the center of the pie, gradually shortening towards the edges. Do not press them down yet; they should lay loosely on top of the filling.
6. Begin the Weave: First Horizontal Strip
To start the iconic woven pattern, gently fold back every other vertical strip (e.g., strips 1, 3, 5, etc.) halfway towards the center of the pie. Now, carefully place one of your horizontal strips across the pie, resting it over the unfolded vertical strips and beneath the folded-back ones. Once in place, gently unfold the folded vertical strips back down, so they lay flat again, covering the new horizontal strip. This creates your first ‘over-under’ sequence.
7. Continue Weaving: Second Horizontal Strip
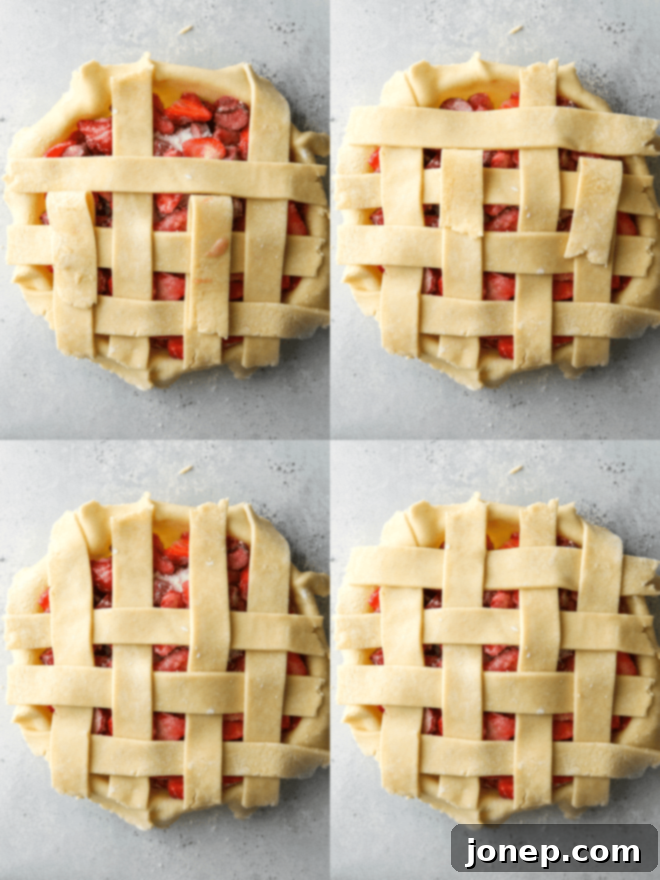
Next, you’ll repeat the weaving process, but this time, fold back the *opposite* set of vertical strips (e.g., strips 2, 4, 6, etc.) halfway. Take your second horizontal strip and lay it across the pie, parallel to the first horizontal strip, ensuring it goes over the newly unfolded vertical strips and under the folded-back ones. Gently lay the folded vertical strips back down. Make sure all horizontal strips are spaced evenly for a consistent pattern.
8. Complete the Weave on the Other Side
Now, turn your attention to the other side of the pie and continue the weaving pattern. Again, fold every other vertical strip back towards the center of the pie. Place another horizontal strip across, ensuring it’s evenly spaced. Lay the folded vertical strips back down. Then, fold the *opposite* set of vertical strips back, place your final horizontal strip, and lay all strips flat again. If your design involves more than 8 strips, simply repeat this alternating folding and placing process until all horizontal strips are incorporated. You’ve now completed the main lattice weave!
9. Trim Excess Dough and Fold Over
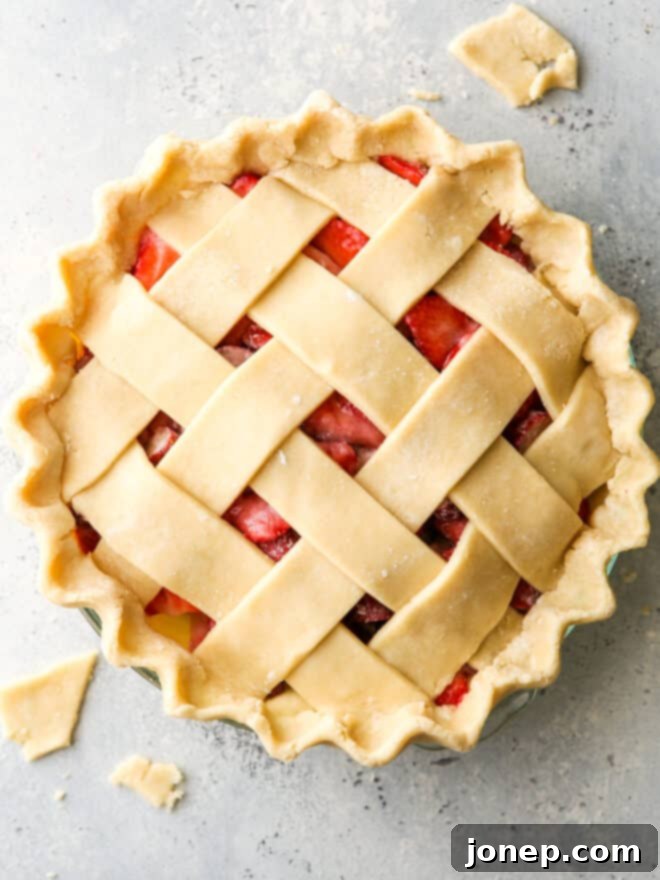
Once your lattice is complete, you’ll likely have some overhanging dough. Using a sharp knife or kitchen shears, carefully trim any excess pie crust dough, leaving about a 1-inch overhang around the entire circumference of the pie (a little longer is fine). Now, take the trimmed edge of the bottom pie crust and the lattice strips together. You can either fold them underneath themselves, tucking them neatly into the pie dish, or fold them up towards the center of the pie, creating a slightly raised edge. This step seals the top and bottom crusts together, preventing the filling from leaking out.
10. Crimp Edges of the Pie as Desired
With the edges folded, it’s time to crimp for that classic pie finish. To create traditional crimped edges, use one thumb to press the dough against the index finger and thumb of your other hand, forming a triangular or wavy pattern. Repeat this process all around the circumference of the pie, ensuring the bottom and top crusts are firmly sealed. There are many ways to crimp; feel free to experiment with different patterns using a fork or your fingers for a unique look.
11. Brush with Egg Wash for a Golden Sheen
Do not skip this vital step! In a small bowl, whisk together one large egg with one tablespoon of water until well combined. Using a pastry brush, gently and evenly coat the entire lattice pie crust with this egg wash. This magical mixture is what gives your pie its beautiful, glossy, golden-brown finish as it bakes. Without it, your crust will appear dull and pale. For an extra touch of sparkle and crunch, sprinkle a small amount of coarse sugar over the egg wash before baking.
12. Bake to Golden Perfection
Finally, it’s time to bake your gorgeous lattice-topped pie! Follow your specific pie recipe’s instructions for baking time and temperature. Generally, pies are baked until the crust is a rich golden brown, and the fruit filling in the center is visibly bubbling, indicating it’s thoroughly cooked. If the edges begin to brown too quickly, you can loosely cover them with aluminum foil to prevent burning. Allow the pie to cool completely on a wire rack before slicing, allowing the filling to set properly.
Pies That Shine with a Lattice Topping
A lattice pie crust is incredibly versatile and pairs wonderfully with a variety of fruit fillings. Here are some delectable pie recipes that would be absolutely stunning with your newly mastered lattice design:
- Strawberry Rhubarb Pie: (pictured in this tutorial) The tartness of rhubarb combined with sweet strawberries creates a classic spring and summer dessert. A lattice top allows the vibrant red and pink hues of the filling to peek through, making it even more appealing.
- Black and Blueberry Pie: This rich, dark berry pie is a favorite, and the lattice crust provides a beautiful contrast to the deep purples and blues of the fruit. It’s perfect for summer gatherings.
- Sweet Cherry Pie: A timeless classic, a sweet cherry pie with a lattice top is elegant and inviting. The bright red cherries look particularly enticing through the woven crust.
- Cranberry Blueberry Pie: A fantastic choice, especially for holidays, this pie balances the tartness of cranberries with the sweetness of blueberries. The lattice crust adds a sophisticated touch to this festive dessert.
Recommended Baking Tools for Your Pie Adventures
Having the right equipment can significantly enhance your baking experience and results. Here are some of our top recommendations for tools that will make your lattice pie crust journey even smoother:
These affiliate links connect you to products we trust and use in our own kitchens, helping you equip yours for success. From a sturdy rolling pin that ensures even dough thickness to a precise pastry wheel for perfect strips, these tools are invaluable.
This tutorial was originally published in June 2015. It has since been thoroughly updated and improved with enhanced photos and more detailed instructions to provide the best possible guide for creating your perfect lattice pie crust.

How to Make a Lattice Pie Crust
Pin Recipe
Leave a Review
Ingredients
- 1 pie dough
- Flour , for dusting
- 1 large egg + 1 tablespoon water , for egg wash
Equipment
Instructions
-
Prepare pie dough. It should rest in the fridge at least 2 hours before using.
-
Roll out the bottom pie crust on a floured surface and transfer to pie baking dish, then prepare filling according to your recipe’s instructions.
-
Use a rolling pin to roll out the second pie crust to about ¼-inch thick, dusting your work surface with flour as needed to prevent sticking. Roll the pie dough out into a circle about 12 inches in diameter, or you can roll it into a rough rectangle (my preferred method).
-
Use a pizza cutter to cut pie dough into strips. I recommend 8-10 total strips about 1-2 inches wide, but it’s ultimately up to the look you want; thicker strips will hold their shape better during baking.
-
Lay a vertical set of strips on top of pie, spaced evenly, placing longer strips in the center. Fold every other vertical strip back halfway, and add one horizontal strip. Unfold strips so they lay flat again on top of the new strip of dough.
-
Fold the opposite every other vertical strip back, add a second horizontal strip. Make sure horizontal strips are spaced evenly. Lay vertical strips back on top of new strip.
-
Now repeat on the other side. Fold every other vertical strip back to the center and lay another horizontal. Lay them back down, fold the opposite every other vertical strip back, and place the final horizontal strip. Lay all strips flat. (If you have more than 8 strips in your weave, you’ll have more strips to work with but the process will be the same.)
-
Trim excess pie dough and fold over, then crimp the edges as desired. Brush with egg wash.
-
Bake pie according to recipe instructions, typically until crust is golden brown and fruit filling is bubbling in the center.
Video
