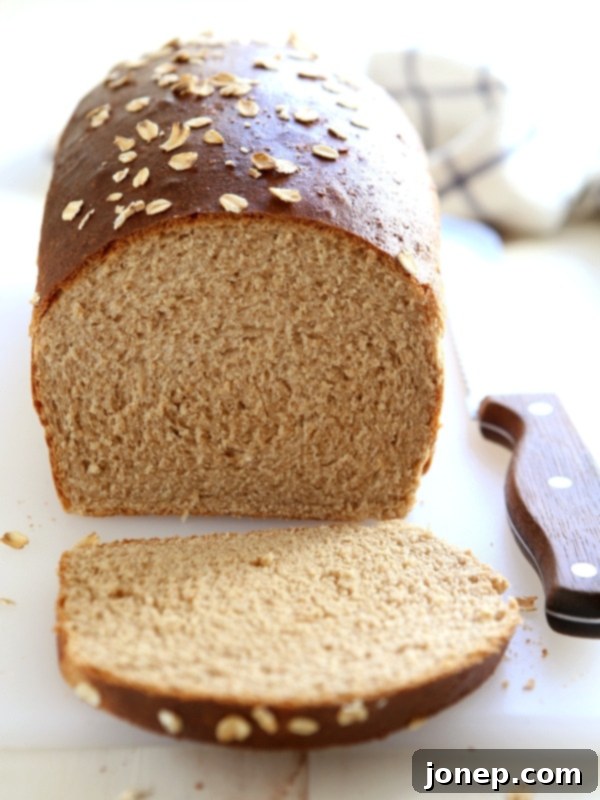
Bake Your Own Delicious Honey Whole Wheat and Oat Sandwich Bread: The Ultimate Homemade Recipe
There’s an undeniable magic that happens when you bake bread from scratch. The comforting aroma that fills your kitchen, the satisfying warmth of a freshly baked loaf, and the unparalleled taste of wholesome, homemade goodness – it’s an experience that transcends the ordinary. This recipe for Honey Whole Wheat and Oat Sandwich Bread is designed to bring that magic into your home. It’s a delightful blend of light and hearty textures, packed with the nutritional benefits of 100% whole wheat flour, the subtle chewiness of rolled oats, and the natural sweetness of honey. Prepare to elevate your sandwich game and bid farewell to bland, preservative-laden store-bought options.
The Journey from Empty Shelves to Abundant Homemade Loaves
My passion for baking this particular bread was ignited by a peculiar predicament: the chronic inconsistency of grocery store supplies in my small rural town. It was a regular occurrence to find the bread aisles completely depleted, sometimes for days or even weeks. Each weekly shopping trip became a silent gamble – will there be bread today? This constant uncertainty and the sheer frustration of having to go without a basic staple finally pushed me to seek a more reliable, and ultimately, more satisfying solution.
The decision was clear: it was time to move beyond the limitations of store-bought bread and embrace the rewarding world of home baking. And so, I did. The first bite of this homemade honey whole wheat and oat sandwich bread was a revelation. Its tender crumb, robust flavor, and incredible freshness instantly made commercial bread a distant memory. I was left wondering why I hadn’t embarked on this culinary adventure much, much sooner. This wasn’t just about avoiding empty shelves; it was about discovering a profound sense of self-sufficiency and the joy of crafting something truly delicious and wholesome.
Now, our family enjoys an endless supply of delicious, nutritious bread without a single trip to the store. The benefits extend far beyond convenience. This bread is remarkably better for us, free from the mysterious preservatives and unpronounceable ingredients that often populate store-bought labels. Our homemade loaf is crafted with integrity, featuring simple, pure components: whole wheat flour, hearty rolled oats, a touch of golden honey, creamy butter, fresh milk, water, active yeast, and a pinch of salt. It’s a testament to the unparalleled quality and satisfaction that only homemade can deliver. This control over ingredients means we can enjoy every slice with confidence, knowing it’s nourishing our bodies with wholesome goodness.
Why This Whole Wheat and Oat Bread Stands Out: Flavor, Texture, and Health
The idea of baking with 100% whole wheat flour often conjures images of dense, heavy bread. However, this recipe is a game-changer, achieving a light and tender texture while retaining all the hearty goodness of whole grains. The secret lies in the careful balance of ingredients. Milk, butter, and honey are incorporated not just for their delightful flavors, but for their magical tenderizing properties. They work in harmony to enrich the dough, preventing it from becoming dry and ensuring a wonderfully soft crumb that’s perfect for any sandwich.
Beyond its incredible texture, this whole wheat and oat bread boasts significant nutritional advantages. Whole wheat flour is a powerhouse of dietary fiber, essential vitamins (like B vitamins), and minerals (such as iron and magnesium), all crucial for a healthy diet. The addition of old-fashioned rolled oats further boosts the fiber content and introduces a pleasant chewiness and a subtle, earthy note to the loaf. Honey acts as a natural sweetener, contributing to the bread’s golden hue and also aiding in its tender structure. Compared to highly processed white bread, this homemade option offers sustained energy, supports digestive health, and keeps you feeling fuller for longer. It’s truly a wholesome foundation for any meal.
Essential Tips for Baking a Perfect Whole Wheat Loaf
While the process of baking bread can seem complex, following a few fundamental guidelines will ensure your Honey Whole Wheat and Oat Sandwich Bread turns out perfectly every time. Patience and attention to detail during the kneading and rising stages are paramount.
1. The Art of Kneading for Optimal Gluten Development
Kneading is the critical step where gluten, the protein network within the flour, develops. This network traps the carbon dioxide produced by the yeast, giving the bread its characteristic airy structure and satisfying chew. Whole wheat flour, with its higher bran content, can sometimes inhibit gluten development compared to white flour. Therefore, dedicated kneading is even more vital here. Whether you opt for the convenience of a stand mixer with a dough hook (aim for 7-8 minutes of mixing) or prefer the therapeutic rhythm of hand-kneading (around 15 minutes), ensure you continue until the dough transforms into a smooth, elastic mass. A good test is the “windowpane test”: pinch off a small piece of dough and gently stretch it. If you can stretch it thin enough to see light through it without it tearing, your gluten is well-developed.
2. Mastering the Double Rise for Lightness and Flavor
The rising stages are crucial for both the texture and flavor development of your bread. The first rise, often called bulk fermentation, allows the yeast to actively ferment, producing gases and complex flavors. Place your greased dough in a warm, draft-free spot, cover it, and let it double in size. This usually takes about an hour, but keep an eye on the dough itself, not just the clock, as ambient temperature affects rise time. The second rise, after shaping the dough into a loaf, is equally important for achieving that final, beautiful dome and a soft, airy interior. Again, let it double in the loaf pan, which typically takes another hour. Rushing either rise will result in a denser, less flavorful bread.
3. Achieving the Ideal Dough Consistency: A Gentle Touch
One of the most common mistakes in bread baking is adding too much flour, especially when working with whole wheat. The exact amount of flour can vary due to factors like humidity and the specific brand of flour. When adding the remaining whole wheat flour after the initial mix, do so gradually, adding 2 tablespoons at a time. The goal is a dough that is still slightly sticky to the touch but cleanly pulls away from the sides of your mixing bowl. Resist the urge to add more flour than necessary just to make it less sticky; a slightly wetter dough often yields a moister, more tender loaf. Trust the feel of the dough rather than rigidly sticking to the exact upper limit of the flour measurement.
Unleashing the Versatility of Your Homemade Loaf
The beauty of this honey whole wheat and oat bread recipe lies not only in its delightful taste and health benefits but also in its incredible versatility. Imagine waking up to the irresistible aroma of this bread toasting, ready to be topped with your favorite fruit preserves, a dollop of creamy natural peanut butter, or fresh avocado slices. For lunch, it forms the perfect sturdy base for a classic BLT, a hearty vegetarian sandwich piled high with crisp veggies, or a sophisticated chicken salad creation. It also pairs wonderfully with a warm bowl of soup on a chilly evening, or as dippers for your favorite dips and spreads.
Having a fresh, wholesome loaf readily available transforms everyday meals into something special. It empowers you to enjoy countless sandwiches and slices of toast, whenever the craving strikes, all while being confident in the quality and natural goodness of what you’re eating. This loaf is a celebration of simple, pure ingredients and the joy of baking. And if you ever find yourself craving an even more robust and rustic texture, remember my 100% whole wheat bread recipe, which offers a denser, lower-fat alternative that is equally scrumptious for specific uses.
Get Started: Your Homemade Bread Recipe Awaits!
Ready to experience the unparalleled taste and satisfaction of baking your own Honey Whole Wheat and Oat Sandwich Bread? Below you’ll find the detailed recipe, carefully crafted to guide you through each step. Gather your ingredients, clear your schedule for a few hours of therapeutic baking, and prepare to be amazed by the delicious results. This isn’t just a recipe; it’s an invitation to a more wholesome, flavorful, and deeply satisfying culinary journey.

Honey Whole Wheat and Oat Sandwich Bread
Pin Recipe
Leave a Review
Ingredients
- 1 cup water (250 ml)
- 1 cup milk (250 ml)
- ¼ cup unsalted butter (56 grams)
- 1⁄4 cup honey (80 grams)
- 3 – 3½ cups whole wheat flour (340-395 grams)
- 1 cup old fashioned rolled oats , plus extra for sprinkling (100 grams)
- 1 packet active dry yeast (2¼ teaspoons)
- 1 teaspoon salt
- 1 large egg + 1 teaspoon water , for egg wash
Instructions
-
In a small saucepan over low heat warm the water, milk, butter and honey until butter is melted and mixture is smooth. Cool for a few minutes, or until 120-130°F.
-
In the bowl of a stand mixer fitted with a dough hook, or in a large bowl if you plan to mix by hand, combine 2 cups of the whole wheat flour, oats, yeast and salt. Add the milk mixture and mix until combined. Add the remaining whole wheat flour 2 tablespoons at a time until the dough is still sticky but clears the side of the bowl. You may not need all 3 ½ cups flour, or it’s possible you’ll need a bit more.
-
Continue to mix or knead by hand until smooth and elastic (7-8 minutes with a mixer, 15 minutes by hand). Place dough in a grease bowl, cover and let rise in a warm place until doubled, about 1 hour.
-
Gently punch down dough and knead a few times. Roll dough out on a lightly floured surface into a rectangle 9 inches wide. Starting with a short end, roll up the dough. Place seem side-down in a greased 9×5-inch loaf pan. Cover with plastic and let rise until doubled again, about 1 hour.
-
Preheat oven to 400°F. Brush top of loaf with egg wash and sprinkle with oats, if desired. Bake until crust is dark golden brown and loaf sounds hollow when tapped, about 45-50 minutes. Remove from pan and let cool for at least 20 minutes before slicing.
Notes
Recipe inspired by Smitten Kitchen and White on Rice Couple.
