The Best Homemade Apple Fritters: A Step-by-Step Guide to Fall’s Favorite Treat
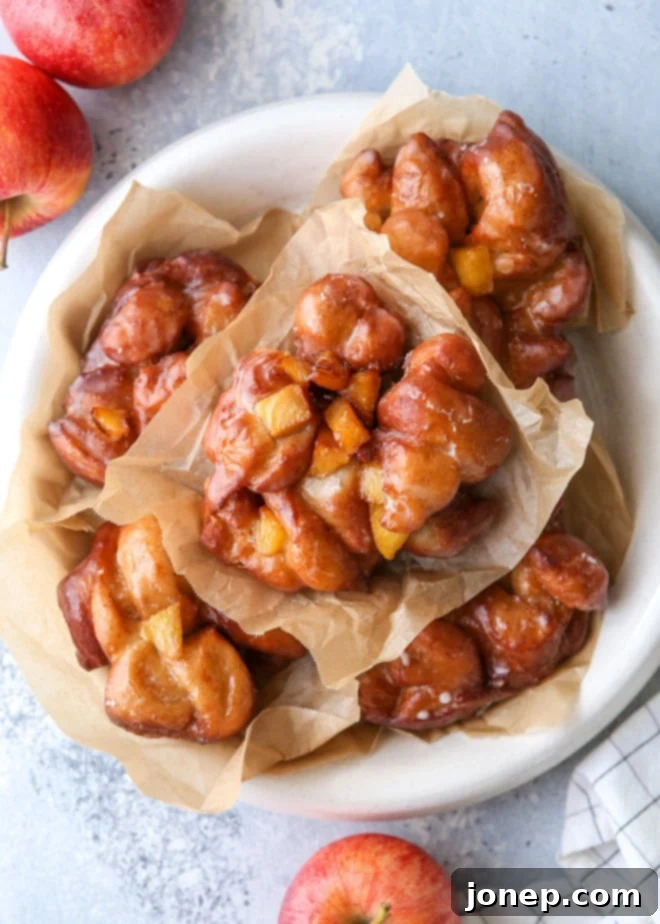
There’s an undeniable magic that sweeps through the kitchen as autumn arrives, bringing with it the comforting aroma of cinnamon and apples. And when that enchanting scent emanates from a fresh batch of gloriously glazed homemade apple fritters, you know you’re in for an extraordinary indulgence. These aren’t just any fritters; they are crafted with a delicate, yeast-risen dough, generously studded with tender, cinnamon-spiced apple chunks, and lovingly coated in a luscious maple glaze that sets into a satisfying, crisp shell. Forget the trip to your local doughnut shop – this detailed recipe empowers you to create the ultimate fall treat right in your own home, a culinary endeavor that’s far more achievable and rewarding than you might initially think.
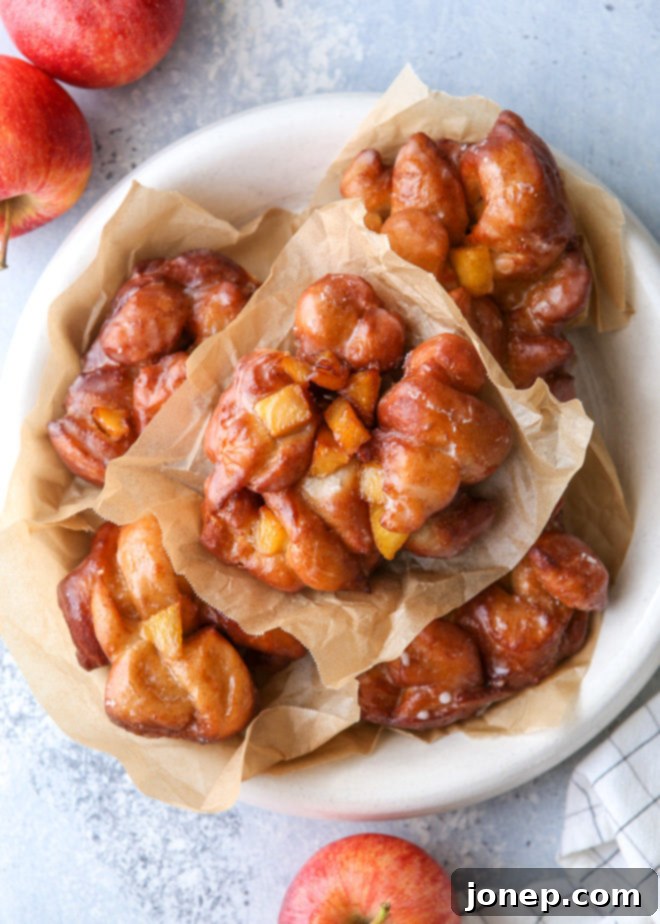
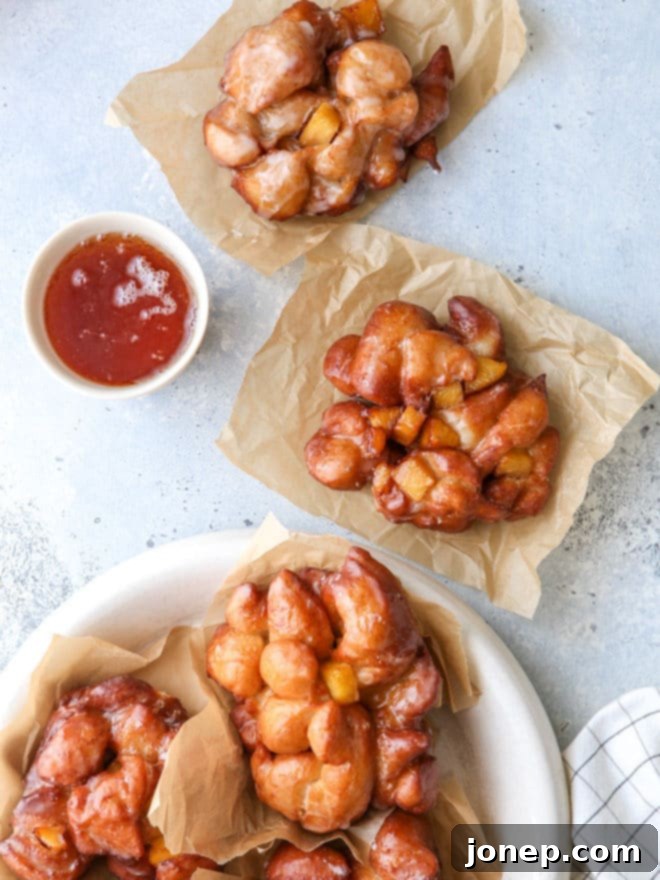
For me, apple fritters have always been a cherished delight, particularly during the vibrant transition into fall. Their irresistible charm lies in the harmonious blend of textures: a soft, pillowy interior, beautifully contrasted by a slightly crisp, golden-brown exterior. This unique structure boasts a myriad of nooks and crannies, each one a perfect hiding spot for the sweet, sticky maple glaze. Every bite offers a burst of warm, aromatic cinnamon and succulent apple pieces, creating a symphony of flavors that perfectly encapsulates the essence of autumnal comfort. It’s a nostalgic dessert that instantly transports you to cozy evenings, pumpkin patches, and festive gatherings with loved ones.
If you, like me, are a dedicated fritter enthusiast, prepare to be utterly captivated when you experience frying a batch in your own kitchen. The sheer freshness and unparalleled deliciousness are truly in a league of their own. I can honestly say, they’re so incredibly good, they might just bring a tear of pure joy to your eye (they certainly did to mine!). Seriously, they’re that good. This recipe is a definitive must-make, yielding a generous batch of these delightful treats. It’s perfect for sharing the warmth and deliciousness with friends, family, or even treating yourself to a few days of pure bliss. You deserve it!
Table of Contents
- A Special Note About This Recipe: Yeast Choices Explained
- The Three Delicious Components of These Fritters
- Essential Ingredients You’ll Need for Apple Fritters
- Your Step-by-Step Guide: How to Make Apple Fritters
- Apple Fritter Recipe FAQs
- More Delightful Fall Apple Recipes
- Get the Full Recipe
A Special Note About This Recipe: Yeast Choices Explained
This recipe, in its original form, was first published as a sourdough apple fritter recipe, specifically featuring Red Star Yeast’s Platinum Instant Sourdough. This unique product is a testament to baking innovation, expertly combining the robust leavening power of instant yeast with the nuanced, tangy flavor notes characteristic of sourdough culture. It offers a convenient way to infuse a sourdough-like complexity into your baking without the need for maintaining a traditional sourdough starter. I remain a passionate advocate for this product and highly recommend it if you have access to it, as it delivers an exceptional depth of flavor.
However, to ensure this delightful recipe is accessible to every home baker, I have meticulously re-worded and adapted the instructions to seamlessly integrate traditional active-dry yeast. This adjustment means you can achieve equally stunning results with a more commonly available ingredient. Whether you choose the distinctive sourdough-infused instant yeast or classic active-dry yeast, your homemade apple fritters are guaranteed to be phenomenal. The fundamental elements—the tender dough, the succulent cinnamon-spiced apples, and the delectable maple glaze—remain consistent, ensuring a truly delicious outcome that will delight anyone fortunate enough to try them. If you opt for active-dry yeast, remember that proper activation in warm liquid is a crucial first step, as detailed thoroughly in the instructions below, to ensure a perfect rise and fluffy texture.
The Three Delicious Components of These Fritters
While the prospect of crafting homemade fritters might initially appear complex, this recipe thoughtfully breaks down into three distinct, yet interconnected, components. Each part is meticulously designed to contribute to the overall perfection of the fritter, culminating in a dessert experience that is truly unforgettable and deeply satisfying:
- Soft and Tender Dough: The very soul of any outstanding fritter lies in its dough. For these apple fritters, I’ve chosen to adapt my tried-and-true yeast-raised doughnut recipe as the fundamental base. This isn’t your average bread dough; it’s an enriched yeast dough. What makes it “enriched”? It’s generously fortified with luxurious ingredients such as full-fat milk, farm-fresh eggs, creamy unsalted butter, and granulated sugar. These additions are not merely for flavor; they fundamentally transform the dough’s texture, making it incredibly soft, remarkably tender, and exquisitely rich. This creates a slightly sweet, yielding canvas that perfectly complements the robust apple filling. The active yeast ensures a light, airy crumb that expands beautifully during frying, delivering that coveted textural contrast between a delicately crisp exterior and a melt-in-your-mouth fluffy interior.
- Soft Caramelized Apples: An apple fritter, by definition, celebrates its star fruit. However, we’re not simply incorporating raw apples into this dough. Instead, we take the crucial step of gently cooking fresh, diced apples over the stove. They simmer in a delightful medley of butter, a touch of granulated sugar, and fragrant ground cinnamon. This pre-cooking step serves several vital purposes: it softens the apples to a perfect tender bite, preventing them from being too firm in the finished fritter. More importantly, it allows their natural sugars to delicately caramelize, which intensifies their inherent sweetness and deeply infuses them with the warm, comforting spice of cinnamon. This process also extracts some moisture, ensuring the apples don’t make the delicate dough soggy and are perfectly cooked through by the time the fritters emerge from the hot oil.
- Quick Maple Glaze: The final, magnificent flourish that elevates these fritters from merely “great” to unequivocally “divine” is the wonderfully simple yet profoundly flavorful maple glaze. This exquisite topping is swiftly prepared by whisking together fine powdered sugar, authentic pure maple syrup (resist the urge to use artificial substitutes – the real thing makes all the difference!), a hint of fragrant vanilla extract, and a subtle pinch of salt. This thin, pourable glaze is designed to adhere beautifully to the fritters. When the warm, freshly fried fritters are immersed in this glaze, it forms a glossy, transparent coating that, upon setting, transforms into a delicate, crisp, and wonderfully shiny shell. This glaze introduces an additional layer of sweetness and a distinct, earthy maple aroma that harmonizes impeccably with the cinnamon-spiced apples, rendering each bite utterly irresistible and truly complete.
The true genius of this recipe, and what makes these homemade apple fritters so unique, lies in how these individual components unite. The soft, perfectly risen dough is intentionally chopped into uneven pieces, then lovingly folded together with the warmly spiced, tender apple chunks. This seemingly haphazard process is actually quite intentional, creating a beautifully rustic, irregularly shaped “disk” that is then deep-fried to a golden, puffy perfection. Once out of the oil, these golden nuggets are immediately dunked into the prepared maple glaze. While the process of combining the dough and apples might appear a little unconventional compared to more traditional doughnut preparations, I assure you it’s not difficult. In fact, the “messiness” is part of its charm, as the irregular surfaces provide more opportunities for a crispy texture and ample absorption of that glorious glaze. You absolutely have the skills to master this, and I promise you, the exquisite results are profoundly worth every moment of effort!
Essential Ingredients You’ll Need for Apple Fritters
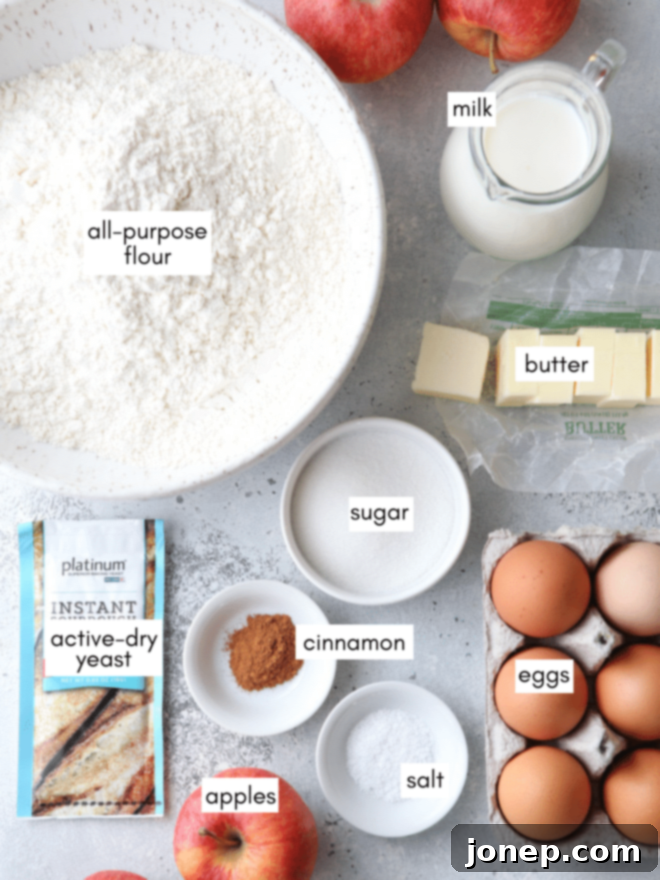
Embarking on your apple fritter journey begins with gathering a selection of high-quality ingredients. Most of these are likely already staples in your pantry, but the fresh components like apples and yeast are key to the ultimate outcome. Remember, the quality of your ingredients directly influences the flavor and texture of your finished fritters, so choose wisely!
Here’s a general overview of the key ingredients you’ll be needing for the enriched dough, the luscious cinnamon apple filling, and the irresistible maple glaze. For precise quantities and a comprehensive breakdown of the entire recipe, please refer to the fully detailed recipe card below. And don’t forget a generous amount of vegetable oil for frying – it’s absolutely crucial for achieving that signature golden crispness and fluffy interior!
Your Step-by-Step Guide: How to Make Apple Fritters
Crafting apple fritters from scratch is a deeply satisfying culinary adventure. Although the process involves several distinct stages, each step is straightforward and designed to be enjoyable. By following these instructions diligently, you will soon be savoring warm, freshly glazed fritters, straight from the heart of your own kitchen, filling your home with an irresistible aroma.
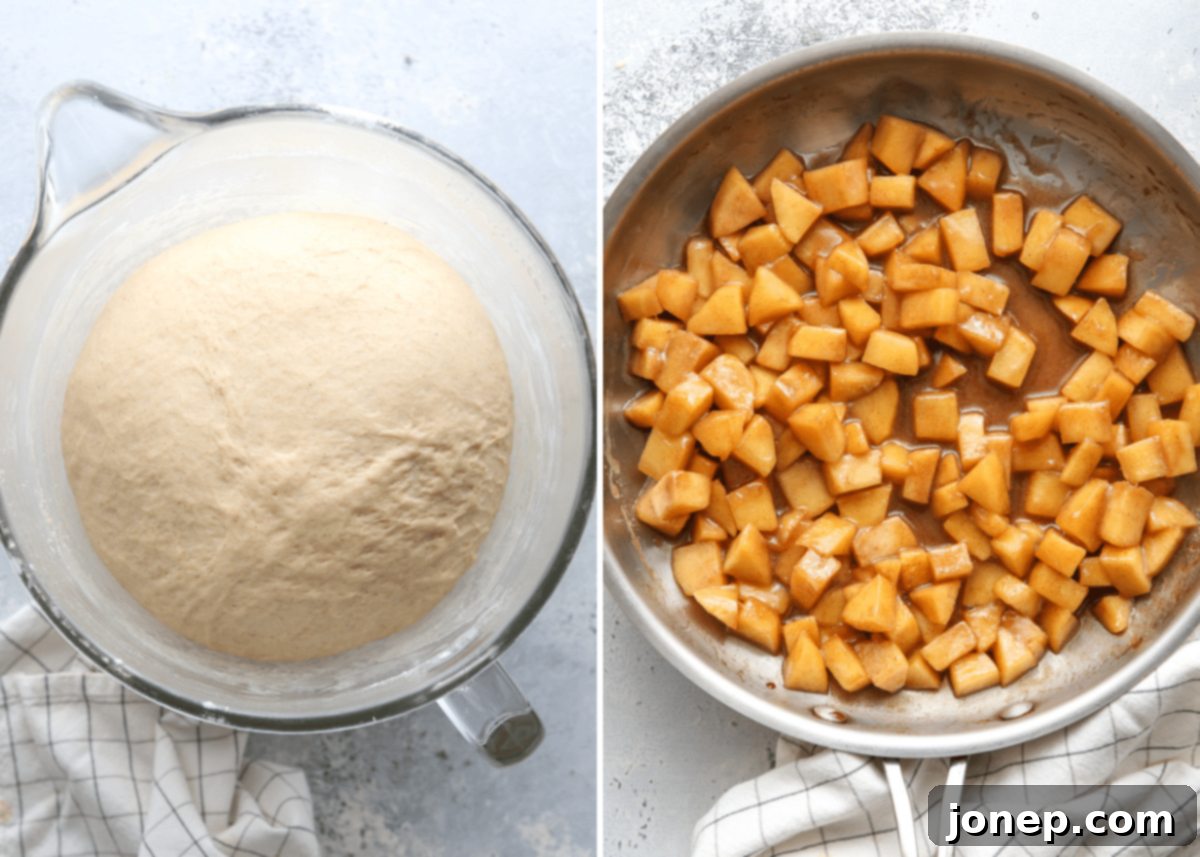
- Prepare the Dough and Let It Rise: Begin by gently warming your milk and melting the butter in a small saucepan over medium-low heat. It’s crucial that the mixture reaches a temperature between 120-130°F (49-54°C) – it should feel warm to the touch but not hot enough to scald. This temperature is ideal for activating your yeast without killing it. In a large mixing bowl, or the bowl of your stand mixer fitted with a dough hook, combine 2 cups of the all-purpose flour with the active-dry yeast, salt, and granulated sugar. Pour in the warm milk mixture and crack in the eggs. Mix on low speed until the ingredients come together to form a wet, shaggy dough. Gradually add the remaining flour, a quarter cup at a time, while continuing to knead on medium-low speed. Continue kneading until the dough gathers together and clears the sides of the bowl, though it should still remain slightly tacky to the touch at the very bottom. Avoid the temptation to add too much flour, as an overly stiff dough will result in dry and tough fritters. Knead for an additional 5-7 minutes until the dough is smooth, elastic, and, when gently pulled, can stretch for several inches before tearing. Cover the bowl tightly with plastic wrap and place it in a warm spot to rise. Let it rise undisturbed until it has visibly doubled in size, a process that typically takes about 1 hour, depending on the warmth of your environment.
- Cook the Apples: While your dough is undergoing its first leisurely rise, shift your focus to preparing the incredibly flavorful apple filling. In a medium-sized skillet, melt three tablespoons of butter over medium heat. Add your peeled, cored, and finely chopped apples (aim for small, even pieces for better distribution), along with a quarter cup of granulated sugar and half a teaspoon of ground cinnamon. Stir all the ingredients together thoroughly until the sugar dissolves and the apples are beautifully coated. Continue to cook this mixture for approximately 5-7 minutes, stirring periodically. The goal is for the apples to soften slightly, retaining a pleasant bite, while their natural juices release and thicken into a light, glossy syrup. Be careful not to overcook them into an apple sauce consistency. Once they’ve reached this tender-crisp stage, remove the skillet from the heat and set the cinnamon apples aside to cool completely. This cooling step is important to prevent them from heating up and potentially affecting the dough when they are combined.
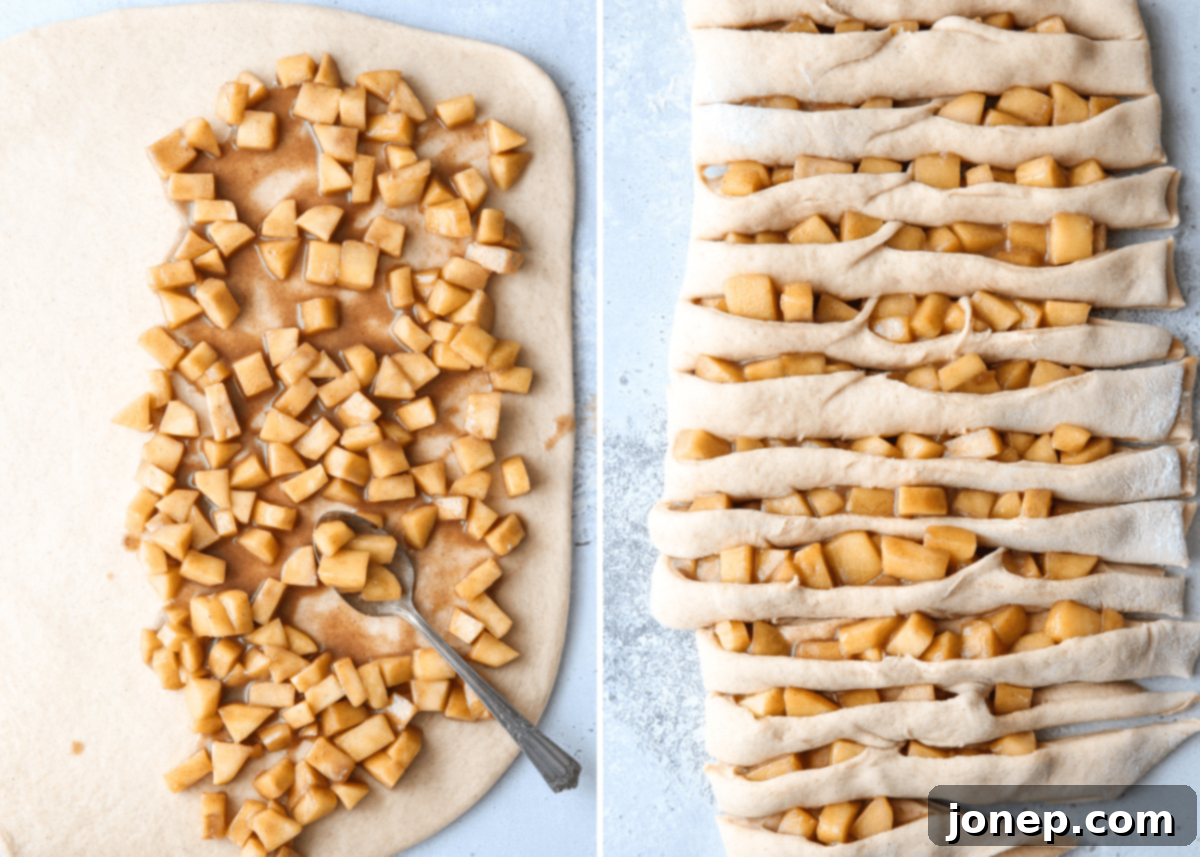
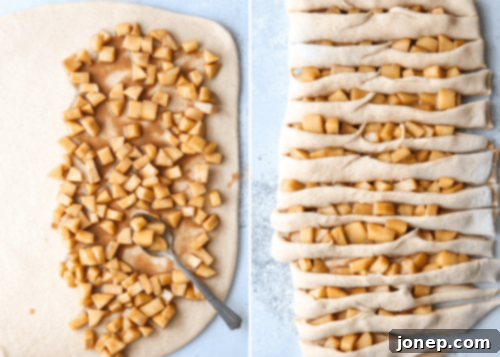
- Roll Out the Dough and Top with Apples: Once your dough has majestically doubled in size, gently punch it down to release the accumulated gases. Turn the dough out onto a lightly floured surface and reshape it into a smooth ball. Allow it to rest for about 10 minutes; this brief pause helps the gluten relax, making the dough much easier to roll out evenly. Using a rolling pin, roll the dough into a large rectangle. Precision isn’t paramount, but aim for dimensions roughly around 12×15 inches. Next, evenly spread the cooled, cinnamon-spiced apples over one half of the dough lengthwise, making sure to leave an approximate one-inch border clear around the edges. Then, carefully fold the other half of the dough over the apple-covered portion, creating a layered rectangle with the apples tucked inside.


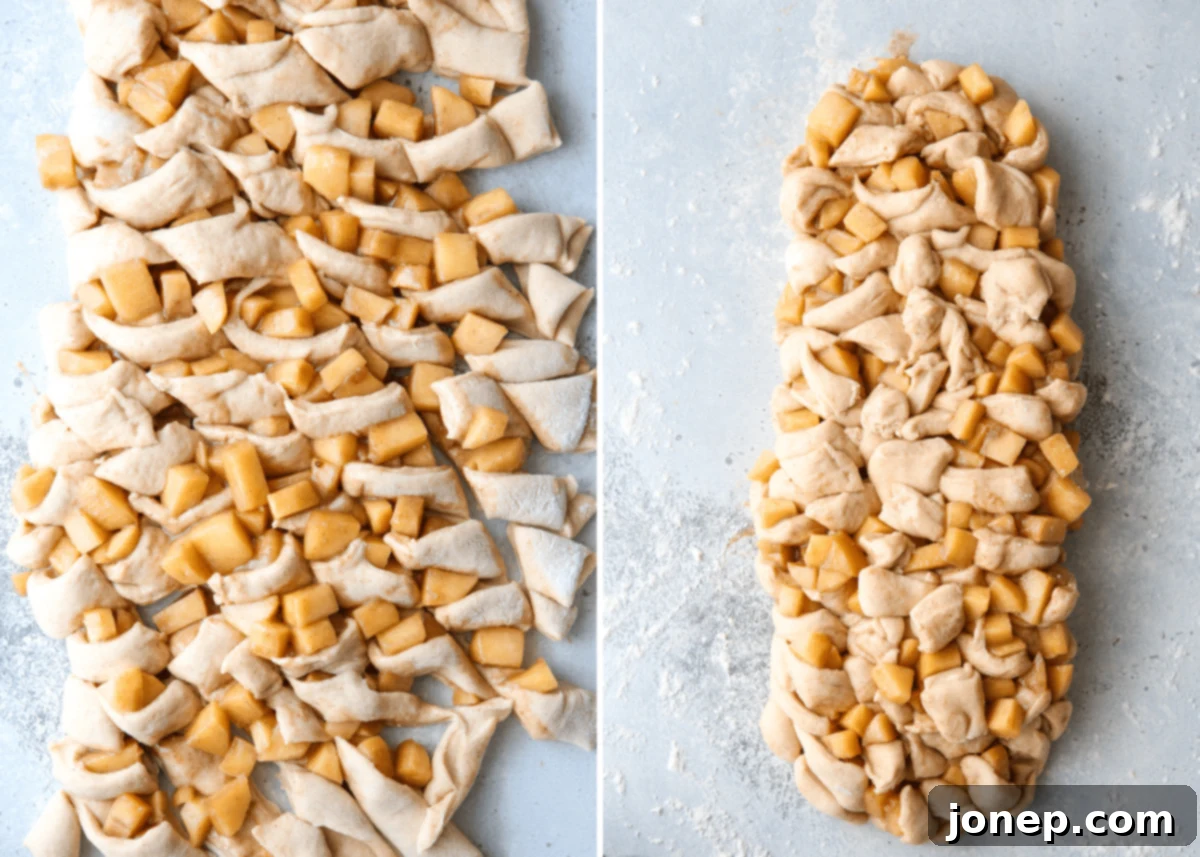
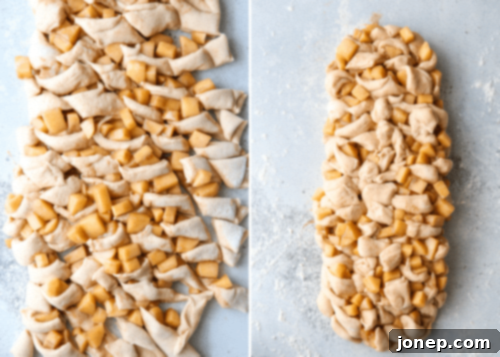
- Cut and Shape: Now, prepare for the delightfully “messy” stage that gives fritters their iconic, rustic charm! Grab a bench scraper (or a sharp pizza wheel if you prefer). Begin by cutting the apple-filled dough into strips, each approximately 1 inch wide. Once you have your strips, make another series of cuts at either a perpendicular or a slanted angle across these strips. The key here is not perfect uniformity, but rather to create a medley of uneven, sticky chunks of dough and apples. This seemingly haphazard cutting technique is precisely what creates those wonderful, irregular nooks and crannies that will crisp up beautifully when fried and eagerly absorb the luscious maple glaze, contributing significantly to the fritters’ unique texture and appeal.

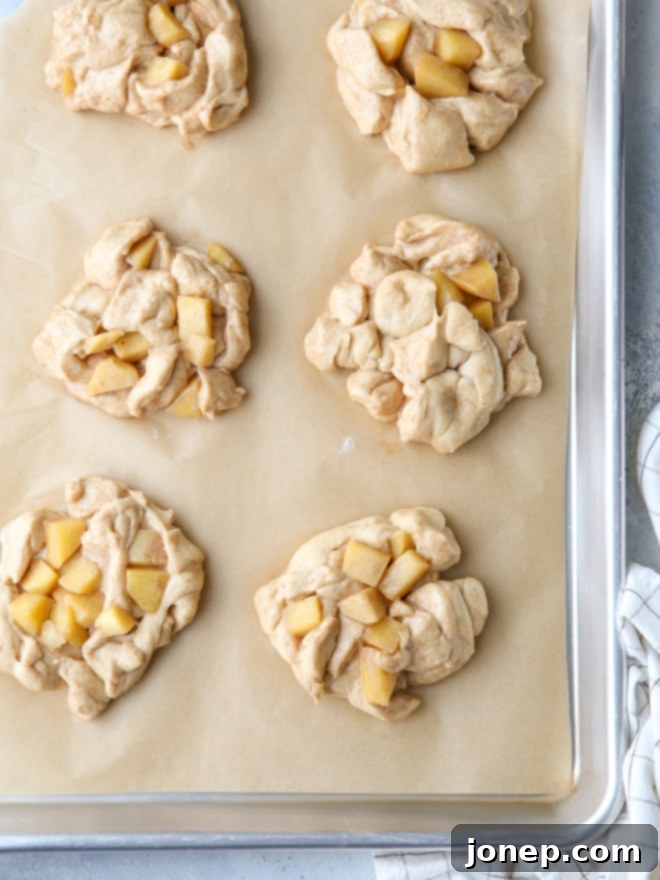
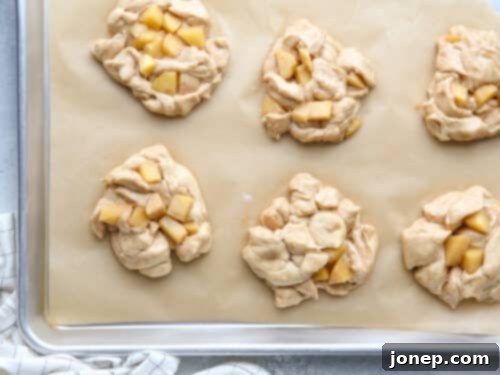
- Shape into Fritters and Rise Again: Once all your dough and apple chunks are cut, gently gather them back together into a single, cohesive row. Next, use your bench scraper to divide this mixture into roughly 15 equal portions. Take each individual portion and, using your hands, firmly yet gently squish and press the dough and apple chunks together. This step is critically important to ensure that all the components stick together securely and don’t fall apart during the frying process. Once compressed, flatten and shape each portion slightly into a rustic disk. Arrange these shaped fritters on sheet pans that you’ve lined with parchment paper, making sure to leave a little space between each fritter. Loosely cover them with plastic wrap and allow them to rise again in a warm place for approximately 30 minutes, or until they appear noticeably puffy and light. This crucial second rise will contribute significantly to their tender, airy texture.

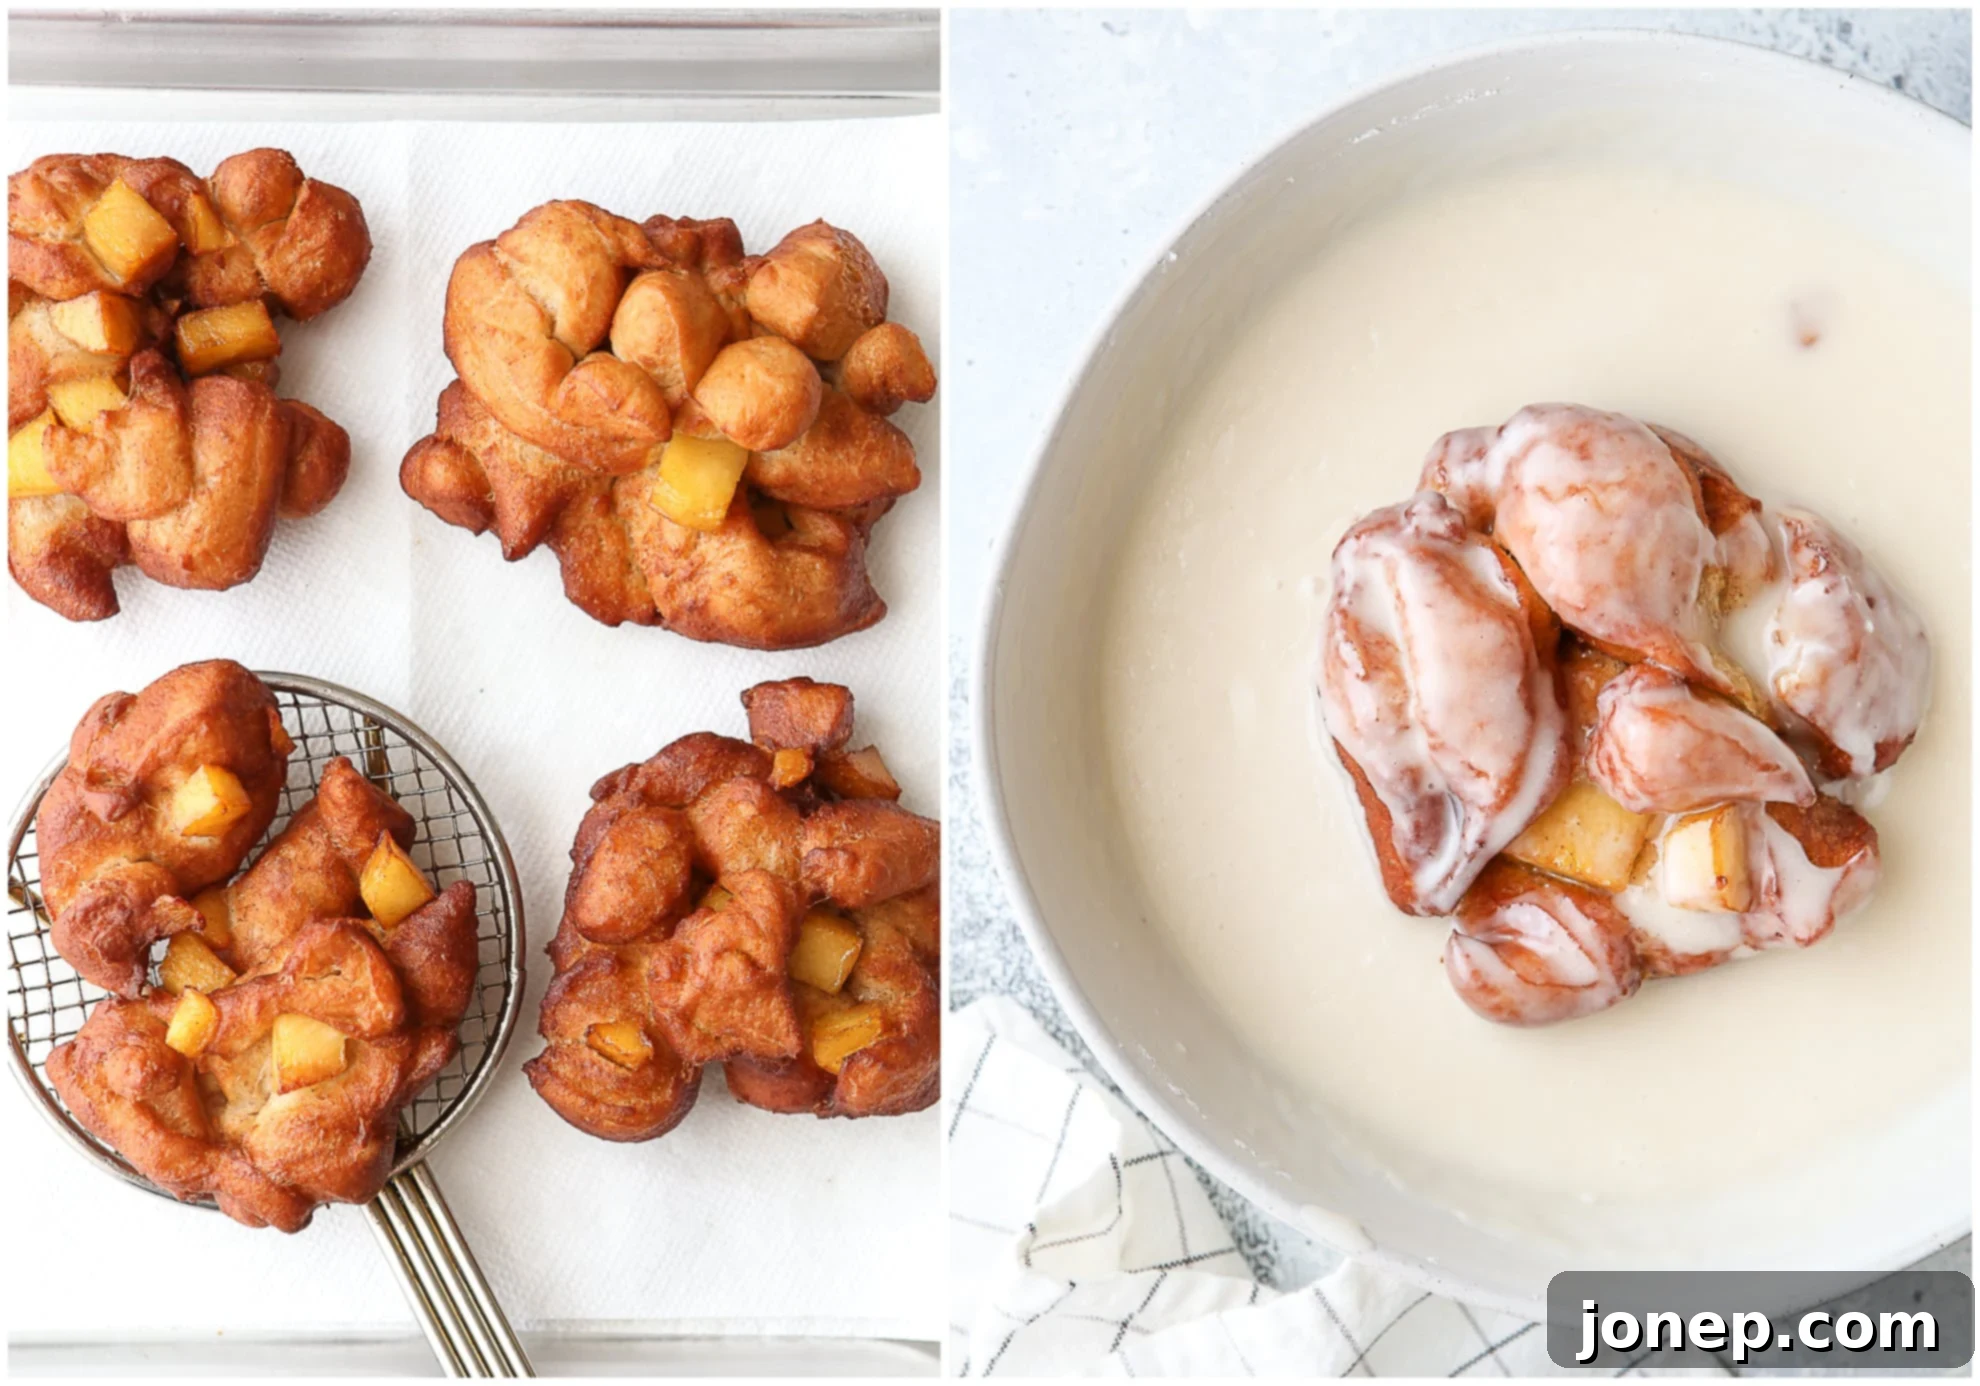
- Fry the Apple Fritters: As your shaped fritters are enjoying their second rise, it’s time to prepare your deep-frying station. Pour vegetable oil into a heavy-bottomed pot, such as a sturdy Dutch oven, ensuring the oil is at least 3 inches deep. Carefully insert a reliable candy/deep-fry thermometer into the oil. Place the pot over medium-high heat and allow the oil to gradually heat up to a steady 375°F (190°C). This can take 15-20 minutes, so be patient. Maintaining this precise temperature is absolutely paramount for perfectly cooked fritters – if the oil is too cool, your fritters will absorb excessive oil and become greasy; if it’s too hot, they will brown rapidly on the outside while remaining raw in the center. Once the oil is at temperature, carefully lower 2-3 fritters at a time into the hot oil, ensuring you don’t overcrowd the pot, which would cause the oil temperature to drop too quickly. Fry for a few minutes on each side until they are beautifully puffed up and achieve a rich, golden-brown color. Using a slotted spoon or spider strainer, carefully remove the cooked fritters from the oil and transfer them to a baking sheet lined with several layers of paper towels to drain any excess oil.
- Dip Fritters in the Maple Glaze: While your fritters are frying and still delightfully warm, swiftly prepare your maple glaze. In a medium bowl, combine the powdered sugar, pure maple syrup, vanilla extract, and a pinch of salt. Pour in the boiling water and whisk vigorously until all the ingredients are thoroughly combined and the glaze is completely smooth. The glaze should have a relatively thin consistency, allowing it to evenly coat the warm fritters without becoming overly thick. Immediately after removing the warm fritters from the oil and allowing them a moment to drain, drop them into the prepared glaze. Gently flip them over with a fork or tongs to ensure every single surface is generously coated with that luscious, sweet maple goodness.

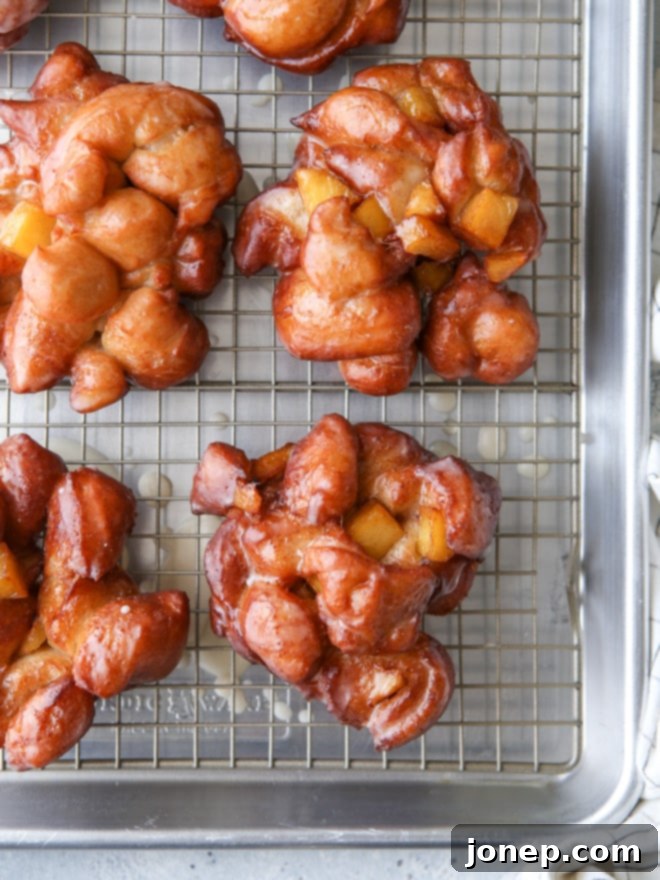
- Let the Fritters Set: Once each fritter has received its glorious coating of maple glaze, transfer them to a wire cooling rack. Position this rack over a sheet pan; the sheet pan will dutifully catch any excess glaze drips, making your cleanup significantly easier. Allow the glaze just a few minutes to firm up and set into that delightful, crisp, shiny shell. This brief waiting period can be the hardest part, but trust the process – it’s essential for achieving the perfect texture and presentation!
- Enjoy! These homemade apple fritters are, without a doubt, at their absolute peak when devoured immediately, while they are still wonderfully warm and the fresh glaze is perfectly set. The incredible combination of a warm, tender yeast dough, soft cinnamon apples, and a crisp maple glaze creates an experience that truly shines when enjoyed straight from your kitchen. While there are methods for storing leftovers (which you can find in our FAQs section), nothing quite compares to that first bite of a fresh, hot fritter. It’s pure, unadulterated bliss!

baking tip: Deep Frying Tips for Success
Deep frying can sometimes feel like a daunting task, but with a few essential tips and careful attention to detail, you can achieve perfectly golden, crisp, and delicious apple fritters safely and effectively every time. Master these techniques for the best possible results:
- Choose the Right Pot: Always use a heavy-bottomed pot, such as a sturdy Dutch oven. Its substantial construction helps to distribute heat evenly and, more importantly, maintain a consistent oil temperature, which is absolutely crucial for successful frying.
- Proper Oil Depth: Ensure your pot contains at least 3 inches of cooking oil. This adequate depth allows the fritters to float freely and cook evenly without resting on the bottom or sticking to each other, promoting uniform browning.
- Temperature Control is Key: Investing in a reliable thermometer (either a candy thermometer or a dedicated deep-fry thermometer is ideal) is non-negotiable. Knowing the exact temperature of your oil is the most critical factor for achieving perfectly cooked and non-greasy fritters.
- Maintain 375°F (190°C): Aim to fry your fritters at a consistent 375°F (190°C). If the oil temperature is too cool, your fritters will absorb excess oil, resulting in a greasy texture. Conversely, if the oil is too hot, they will brown too quickly on the outside, leaving the interior undercooked. Adjust your burner’s heat as needed to maintain this optimal temperature throughout the frying process.
- Fry in Small Batches: Avoid the common mistake of overcrowding the pot. Fry only 2-3 fritters at a time, depending on the specific size of your pot. Crowding will cause a significant and rapid drop in the oil temperature, leading to undercooked, greasy, or unevenly browned results. Patience here pays off!
- Safety First: Prioritize safety in the kitchen when deep frying. Wear an apron to protect your clothing from any potential oil splatters. Use a long-handled slotted spoon or a spider strainer to carefully lower, flip, and remove the fritters from the hot oil. Always keep children and pets at a safe distance from the frying area.
- Responsible Oil Disposal: Once you’ve finished frying, turn off the heat and allow the oil to cool completely to room temperature. Never, under any circumstances, pour hot oil down the drain, as it can cause significant plumbing issues. Once cool, carefully pour the used oil through a funnel into a sturdy, sealable container (like its original bottle). Dispose of it properly according to your local waste disposal guidelines. Alternatively, if the oil is relatively clean, you can filter it and save it for future frying sessions.
Apple Fritter Recipe FAQs
For crafting the perfect apple fritter, you’ll want to select apples that possess a firm texture, are capable of holding their shape beautifully during the cooking process, and offer a delightful balance of tartness. Excellent choices include varieties like Granny Smith, which is highly prized for its crisp texture and appealing tart flavor. Other fantastic apple varieties that perform exceptionally well in fritters include Jonagold, Jonathan, Gala, Honeycrisp, and Pink Lady / Cripps Pink. These specific varieties will soften just enough to be tender without disintegrating into a watery mush, ensuring you get those wonderfully distinct apple chunks in every single bite of your fritter.
While the unparalleled taste of these fritters truly shines brightest when they are served fresh and warm, you can certainly prepare several components in advance to significantly streamline your baking process. The cooked cinnamon apples, for instance, can be prepared up to 2-3 days ahead of time. Simply store them in an airtight container in the refrigerator. For the dough, you have a couple of convenient options: you can either allow the dough to complete its bulk rise (the first rise), then gently punch it down and refrigerate it overnight, or you can even go as far as shaping the individual fritters and letting them undergo their final rise in the fridge overnight. If you choose to refrigerate the dough or shaped fritters, ensure they are tightly covered with plastic wrap to prevent them from drying out. When you’re ready to fry, simply remove the dough or shaped fritters from the refrigerator and allow them to come to room temperature for approximately 30-60 minutes before proceeding with the frying step. This brings them back to an optimal temperature for proper frying and ensures a light, airy texture. This forward planning allows you to enjoy a fresh batch of homemade fritters without all the extensive work on the day you plan to serve them!
I highly recommend adhering to the deep-frying instructions provided for a truly authentic and traditional apple fritter experience. Frying is precisely what imparts their signature crisp exterior and wonderfully tender, airy interior, which is so characteristic of a classic fritter. However, if deep frying is simply not an option or preference for you, it is indeed possible to bake them. To bake, arrange the shaped fritters on a sheet pan that has been lined with parchment paper. Bake them in a preheated oven at 375°F (190°C) for approximately 15-20 minutes, or until they have visibly puffed up and achieved a lovely golden-brown hue. Once baked, you can still generously drizzle the prepared maple glaze over the warm fritters. It’s important to note that when baked, the texture will be considerably softer and more akin to a cake or muffin, lacking the distinct crispy crust and airy lightness of their fried counterparts. Despite this textural difference, they will still be a delicious, apple-filled treat!
If you find that your dough isn’t rising as expected, there are a few common factors to investigate. First, always check the expiration date on your yeast; old or inactive yeast is the most frequent culprit. Second, ensure that the temperature of your milk and butter mixture was correct when added to the yeast. Temperatures exceeding 130°F (54°C) will kill the yeast, while a mixture that is too cold will fail to activate it effectively. The ideal range is 120-130°F (49-54°C). Lastly, confirm that your rising environment is sufficiently warm and draft-free, ideally between 75-85°F (24-29°C). If you’ve addressed all these points and the dough still isn’t rising, you might need to start over with a fresh packet of yeast and pay extra attention to the liquid temperature.
While these homemade apple fritters are undeniably best enjoyed immediately after frying, any leftovers can be stored. Place them in an airtight container at room temperature, where they will keep well for up to 2-3 days. To best reheat and attempt to restore some of their delightful, fresh-from-the-fryer crispness and warmth, I recommend using a toaster oven or a regular oven. Preheat your oven to 300°F (150°C) and warm the fritters for about 5-10 minutes. This method helps to re-crisp the exterior slightly. It’s best to avoid reheating them in the microwave, as this tends to make them soft and somewhat soggy, diminishing their appealing texture. While the glaze might not be as perfectly crisp upon reheating, the warm, spiced apple flavors will still be wonderfully delicious.
More Delightful Fall Apple Recipes
If you’re anything like me, the eagerly anticipated arrival of fall heralds the peak of apple season, offering an endless array of delicious desserts just waiting to be created. After you’ve successfully mastered these incredible homemade apple fritters, why not continue your culinary journey and explore even more delightful ways to celebrate this versatile and beloved fruit? Here are some other cherished fall apple recipes that are sure to become instant family favorites, bringing warmth and joy to your autumn table:
Get the Full Recipe
Feeling inspired and ready to create these utterly incredible homemade apple fritters? You’ll find all the precise measurements, detailed step-by-step instructions, and comprehensive nutritional information conveniently laid out in the complete recipe card directly below. Happy baking and even happier eating!
Apple Fritters
Pin Recipe
Leave a Review
Ingredients
Dough:
- 1 cup (227 grams) milk , whole or 2% preferred
- ⅓ cup (68 grams) butter
- 3½-4 cups (455-520 grams) all-purpose flour , as needed
- 1 packet (7 grams) active-dry yeast
- ½ teaspoon ground cinnamon
- ½ teaspoon salt
- ¼ cup (50 grams) granulated sugar
- 2 large eggs
- Vegetable oil , as needed for frying
Cinnamon apples:
- 3 tablespoons (42 grams) butter
- 4 cups (450 grams) apples , peeled, cored, and chopped small (about 4 medium apples)
- ¼ cup (50 grams) granulated sugar
- ½ teaspoon ground cinnamon
Maple glaze:
- 4 cups (450 grams) powdered sugar
- 1 tablespoon pure maple syrup
- ½ teaspoon vanilla extract
- ¼ teaspoon salt
- ½ cup (113 grams) boiling water
Equipment
Instructions
Prepare dough:
-
Heat milk and butter in a small saucepan over medium low heat until butter is melted. Let cool about 5 minutes (if mixture is steaming, it’s too hot) until 120-130°F.
-
In a large bowl, or the bowl of a stand mixer fitted with a dough hook, combine 2 cups flour, yeast, salt, and sugar. Add warm milk mixture and eggs and mix until it forms a wet dough.
-
Add remaining flour ¼ cup at a time while kneading on medium-low speed until dough clears the sides of the bowl but still sticks slightly at the bottom. It should feel tacky to the touch. You may not need all 4 cups of the flour, do not add excess flour or your fritters will be dry and tough.
-
Continue to knead as needed until dough is smooth and elastic, and when pulled it should stretch for several inches before breaking. If it breaks sooner, keep kneading. Cover bowl with plastic wrap and place somewhere warm to rise until doubled, about 1 hour.
Prepare cinnamon apples:
-
While dough is resting, melt butter in a medium skillet over medium heat. Add apples, sugar and cinnamon and stir until sugar is dissolved.
-
Cook for 5-7 minutes until apples are softened and juices are thickened. Set aside to cool slightly.
Assemble fritters:
-
Gently punch down the dough and reshape into a ball. Let rest for about 10 minutes.
-
On a lightly floured surface, roll dough to a large rectangle (roughly 12×15 inches but no need to be exact.
-
Spread cinnamon apples over one half of the dough lengthwise, leaving a one inch border. Fold the other half of the dough over the apples. Use a bench scraper (or a pizza wheel) to cut the dough and apples in strips about 1 inch wide.

-
Cut the dough and apples again at a perpendicular or slanted angle. The goal is lots of uneven chunks of dough. Gather the dough chunks and apples back into a row.

-
Use the bench scraper to divide the row into 15 even portions. Use your hands to smash the dough and apples of each portion together so that it will all stick and hold (if they aren’t stuck together, they’ll come apart during frying). Flatten and shape into a disk. Place on sheet pans lined with parchment paper.

-
Cover with plastic wrap and let rise for another 30 minutes.
Fry fritters:
-
While prepped fritters are rising, add vegetable oil to a heavy bottom pot (like a dutch oven) to at least 3 inches deep and insert candy/deep fry thermometer. Set over medium high heat and heat to 375°F. This may take 15-20 minutes.
-
Once oil is hot, fry 2-3 fritters at a time (depending on size of pot) for a few minutes on each side until golden brown. Remove fritters from oil with a slotted spoon and transfer to a sheet pan lined with paper towels.
Dip in glaze:
-
While oil is heating, prepare glaze. Combine powdered sugar, maple syrup, salt, vanilla and boiling water in a medium bowl and whisk until smooth. Glaze will be thin.
-
Dip warm fritters in glaze, flipping them over to make sure they are completely covered. Transfer to a wire rack set over a sheet pan to set up.
-
Enjoy apple fritters while they are warm! And they are best the day they’re made, but will keep in an airtight container at room temperature for several days.
This recipe was originally published in October 2019 in partnership with Red Star Yeast, a brand I still use and love! Thank you for supporting collaborations with brands I believe in, which allows me to continue to bring you fresh new content. All opinions are always my own.
