Ultimate Soft & Chewy Zucchini Chocolate Chip Cookies with Walnuts: Your Perfect Late Summer & Fall Treat!
As the vibrant days of summer gradually give way to the cozy embrace of fall, our kitchens often become a hub of seasonal baking. These incredible Zucchini Chocolate Chip Cookies, featuring chopped walnuts and a delicate hint of cinnamon, offer a delightful and unique twist on a beloved classic. They boast an irresistibly soft and chewy texture, bursting with rich, comforting flavors that make them an ideal treat for this beautiful transition period.

Are you, like many of us, finding yourself in delicious denial that September is already here and summer’s golden days are nearing their end? Fear not! The abundance of late-summer produce is still going strong, and there’s no better time to make the most of it. If your garden, or your latest farmer’s market haul, has left you with an overflowing bounty of zucchini, you’re in the perfect place. We’ve all been there – a sudden surplus of this versatile squash leaves us wondering about the most creative and delicious ways to enjoy it all.
And that, my friends, is precisely where these Zucchini Chocolate Chip Cookies come into play! They are the ultimate, most scrumptious answer to your zucchini dilemma. Imagine your favorite classic buttery chocolate chip cookie, but with a delightful and unexpected garden twist: finely shredded zucchini seamlessly incorporated into every single bite. This seemingly simple addition works wonders, infusing these cookies with an unmatched tenderness and a wonderfully moist, chewy texture. The harmonious inclusion of crunchy walnuts and a subtle pinch of warm cinnamon elevates the flavor profile, transforming them into the quintessential treat for bridging the gap between the last lingering warmth of summer and the crisp, inviting air of autumn.
What’s more, these cookies are so universally appealing that even my famously veggie-averse children gave them an enthusiastic two thumbs up! It’s a fantastic way to sneak a little extra nutrition into a treat, proving that healthy can be utterly delicious and undeniably fun.
Table of Contents
- Essential Ingredients for Your Zucchini Cookies
- Step-by-Step: How to Make Zucchini Chocolate Chip Cookies
- The Secret to Perfect Cookies: My Best Baking Tips
- Customizing Your Zucchini Chocolate Chip Cookies
- Storage and Freezing for Freshness
- More Delicious Zucchini Recipes
- Get the Full Recipe
Essential Ingredients for Your Zucchini Cookies
Creating these delightful cookies starts with a selection of common baking staples, plus our star ingredient: zucchini! Each component plays a crucial role in achieving the perfect flavor and texture. Here’s what you’ll need:
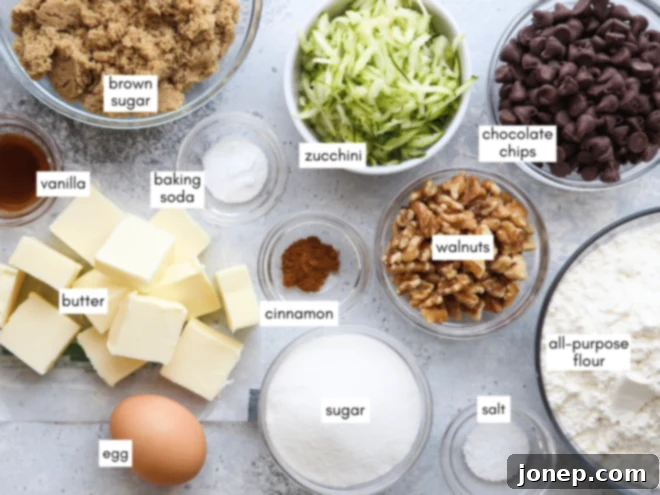
You’ll find the precise measurements in the recipe card below, but here’s a quick overview of why each ingredient is important:
- Salted Butter: Softened to room temperature, it’s crucial for achieving that light, creamy base when combined with sugars. The salt balances the sweetness.
- Granulated Sugar & Brown Sugar: A blend of both creates the perfect balance of crisp edges and a soft, chewy interior. Brown sugar adds moisture and a wonderful caramel note.
- Large Egg: Binds the ingredients together and adds richness and structure.
- Vanilla Extract: Essential for enhancing all the other flavors, giving the cookies a warm, inviting aroma.
- Shredded Zucchini: Our secret ingredient! It adds incredible moisture, ensuring a tender crumb without making the cookies taste “vegetable-like.” Remember to squeeze out excess liquid!
- All-Purpose Flour: Provides the structure for the cookies. Proper measurement is key!
- Baking Soda: Our leavening agent, helping the cookies to rise and achieve that signature soft texture.
- Salt: A pinch enhances all the flavors and balances the sweetness.
- Ground Cinnamon: This subtle spice perfectly complements the zucchini and chocolate, adding warmth and depth ideal for a late-summer or fall treat.
- Semi-Sweet Chocolate Chips: The classic pairing! They melt beautifully and provide bursts of chocolatey goodness.
- Chopped Walnuts (Optional): Adds a delightful crunch and nutty flavor that pairs wonderfully with the other ingredients. Feel free to omit if you prefer nut-free, or substitute with pecans.
Step-by-Step: How to Make Zucchini Chocolate Chip Cookies
Baking these cookies is a straightforward process, but a few key techniques will ensure they turn out perfectly every time. Follow these steps for wonderfully soft and flavorful zucchini chocolate chip cookies:
- Prepare the Zucchini: The first and most critical step is to shred your zucchini. A box grater works perfectly for this. Once shredded, transfer the zucchini to a clean, large paper towel or a thin tea towel. Wrap it up and squeeze out as much excess liquid as humanly possible. This step is vital! Too much moisture from the zucchini will result in flat, soggy, and misshapen cookies, which we definitely want to avoid. You’ll be surprised how much liquid comes out!

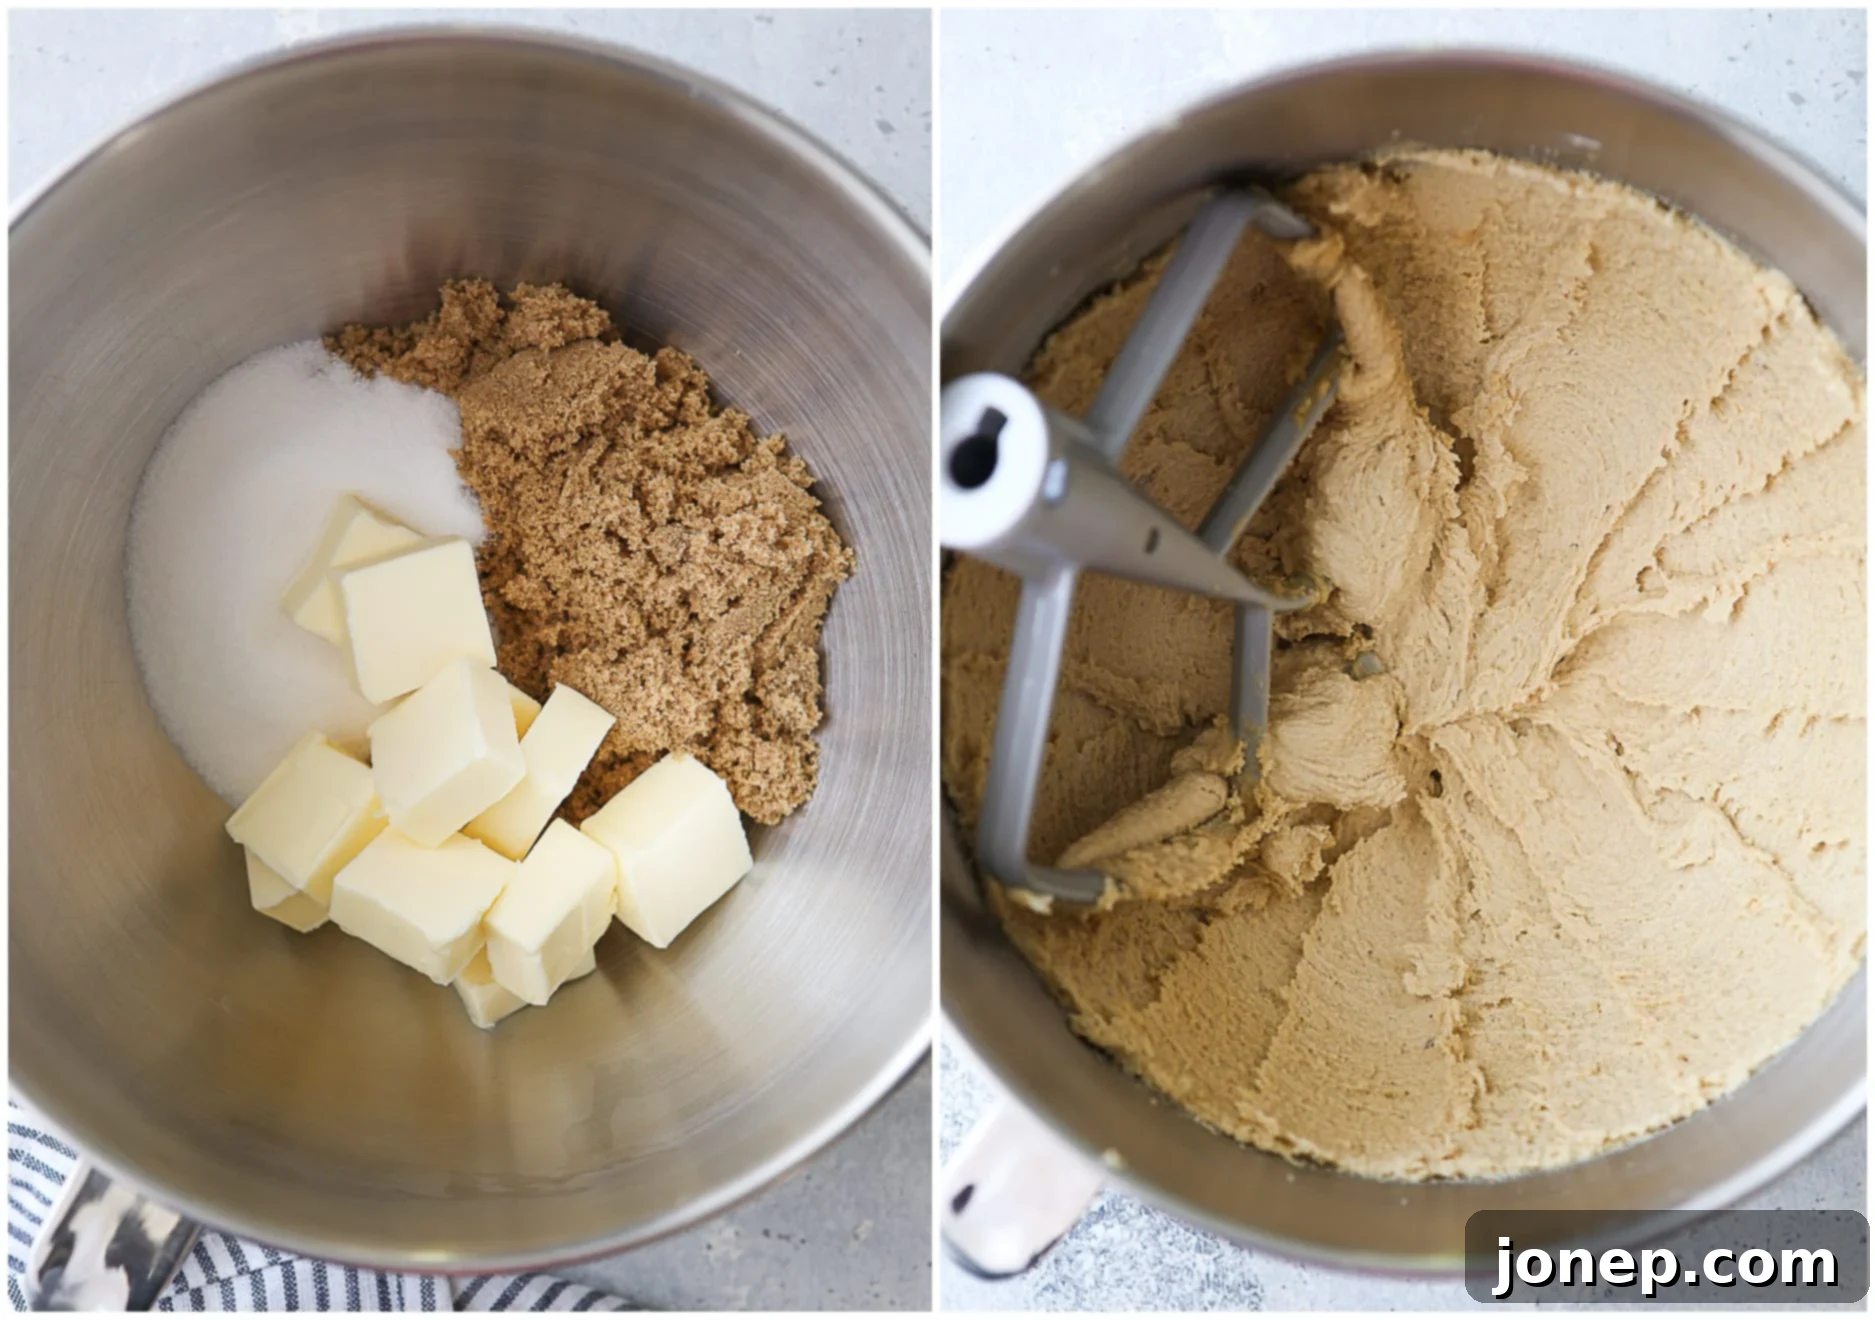
Ensure you squeeze out all excess liquid from the shredded zucchini for the best cookie texture. - Cream Butter and Sugars: In the bowl of your electric mixer (stand mixer with a paddle attachment is ideal), combine the softened butter with both granulated sugar and brown sugar. Beat on high speed for a full 3-5 minutes. This creaming process is essential: you’re incorporating air into the mixture, which will give your cookies a light, fluffy texture. Stop the mixer once or twice to scrape down the sides of the bowl with a spatula, ensuring everything is thoroughly combined. The mixture should become noticeably pale in color, significantly increased in volume, and have a fluffy, light consistency that sticks to the sides of the bowl.

Creaming butter and sugar correctly is vital for soft, airy cookies. - Incorporate Wet Ingredients: Add the large egg, vanilla extract, and the thoroughly squeezed shredded zucchini to the creamed mixture. Add them one at a time, mixing briefly after each addition until just combined. Remember to scrape down the sides of the bowl as needed to ensure all ingredients are evenly incorporated.
- Add Dry Ingredients: In a separate bowl, whisk together the all-purpose flour, baking soda, salt, and ground cinnamon. Gradually add these dry ingredients to the wet mixture, mixing on low speed until just barely combined. You should still see a few streaks of flour remaining – do not overmix at this stage, as it can lead to tough cookies.
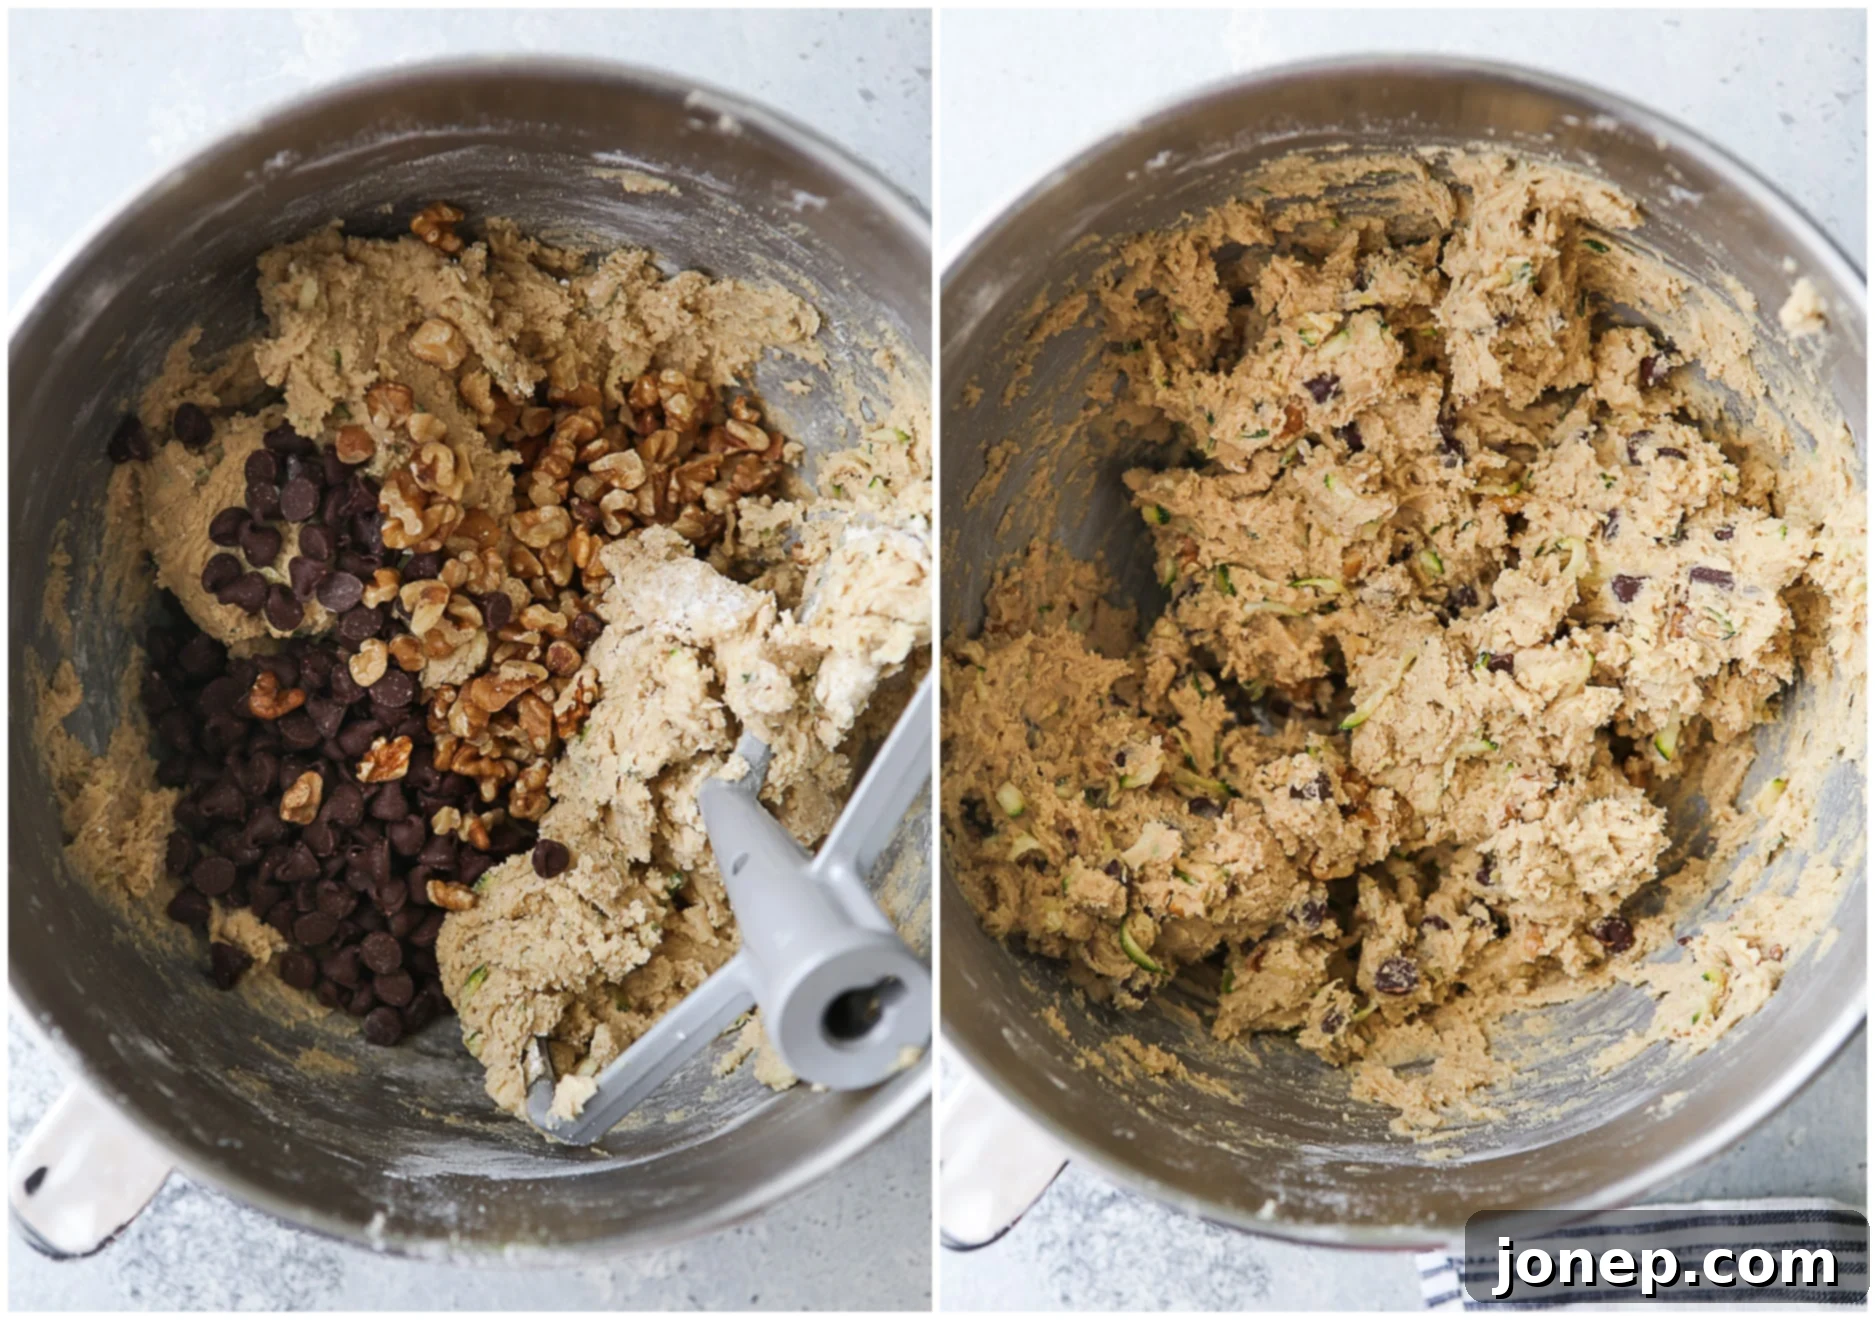
- Stir in Mix-ins: Gently fold in your semi-sweet chocolate chips and chopped walnuts (if using). Mix only until they are evenly distributed throughout the dough. Overmixing once the flour and mix-ins are added can develop the gluten too much, resulting in a less tender cookie.

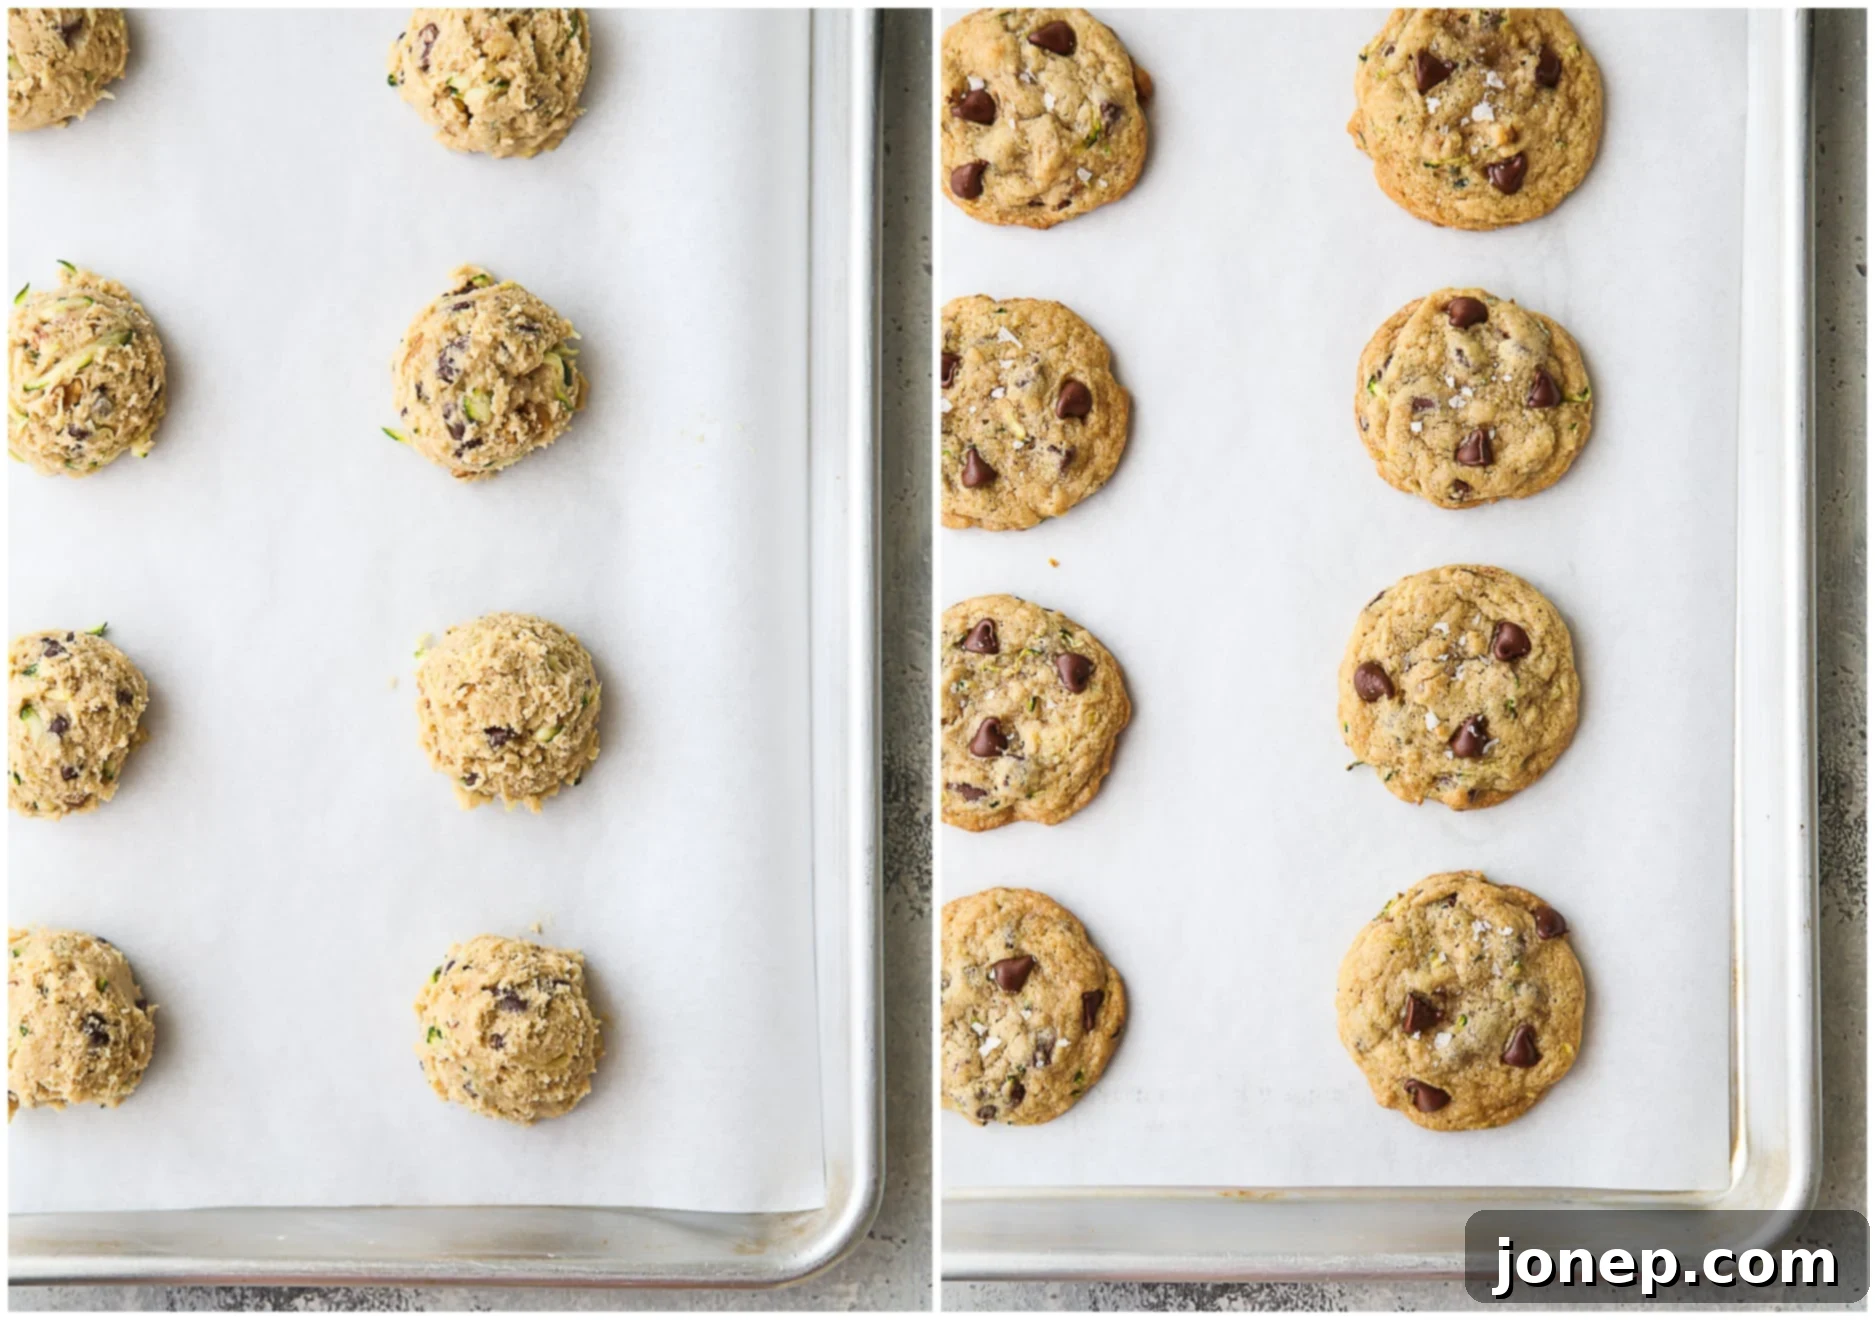
Gently fold in chocolate chips and walnuts until just combined. - Portion and Place on Sheet Pan: Drop rounded tablespoons of cookie dough onto a baking sheet lined with parchment paper. I highly recommend using a cookie scoop (a #40 scoop works perfectly) for consistent size, which helps with even baking. Arrange about 8 cookies per sheet, spacing them approximately 4 inches apart to prevent them from merging as they spread. For an extra visually appealing cookie, you can press a few additional chocolate chips or walnut pieces onto the tops of the dough balls before baking.

Evenly space cookie dough on a parchment-lined baking sheet. - Bake to Perfection: Preheat your oven to 375°F (190°C). Bake the cookies for 9-11 minutes. They are ready when the edges are just beginning to turn a light golden brown, and the tops appear set and dry, but still look slightly underdone in the very center. This ensures they remain wonderfully soft and chewy. Do not overbake!
- Cool and Enjoy: Once baked, remove the sheet pan from the oven and let the cookies cool on the pan for 5 minutes. This allows them to firm up slightly before you move them. Then, carefully transfer them to a wire rack to cool completely. The wait is the hardest part, but entirely worth it!
- Indulge! Now, you’ve earned it. Savor every delicious, soft, and chocolatey bite of your homemade zucchini chocolate chip cookies.

baking tip:The Importance of Creaming Butter and Sugar When Making Cookies
When you beat butter and sugar together in a cookie recipe, you’re not merely combining ingredients; you’re engaging in a fundamental process called “creaming.” This vital step aerates the dough by creating thousands of tiny air pockets. These air pockets are what expand in the heat of the oven, giving your cookies their desirable light and fluffy texture, and contributing to a beautiful rise. If this step isn’t done correctly, your cookies risk ending up dense, flat, and unappealing. Nobody wants a sad, flat cookie!
To ensure you’re creaming the right way and achieve perfect cookies every time, here are a few critical points to remember:
- Butter Temperature is Key: Ensure your butter is at a cool room temperature, meaning it’s soft enough to leave an indent when pressed but not at all greasy or melted. If it’s too warm, it won’t hold air effectively.
- Use an Electric Mixer: While possible by hand, an electric stand mixer or hand mixer makes this process infinitely easier and more consistent, allowing you to achieve the necessary aeration.
- Beat for Sufficient Time: Don’t rush it! Beat the butter and sugars for a full 3-5 minutes. You’re looking for a mixture that is light, fluffy, and significantly paler in color than when you started.
- Scrape the Bowl Religiously: It’s crucial to scrape down the sides and bottom of the mixing bowl at least 1-2 times during the creaming process, and then again after adding the eggs. This ensures all ingredients are uniformly mixed and prevents pockets of uncreamed butter or unmixed sugar.
- Cold Eggs (Optional but Recommended): While many recipes call for room temperature eggs, using cold eggs can help bring the temperature of the butter back down slightly after it’s been creamed with sugar. This can help prevent the butter from getting too warm and potentially causing cookies to spread too much in the oven.

The Secret to Perfect Cookies: My Best Baking Tips
Achieving consistently delicious cookies involves more than just following a recipe; it’s about understanding a few fundamental baking principles. Here are my tried-and-true tips to elevate your cookie game, ensuring every batch of zucchini chocolate chip cookies is a masterpiece:
- Start with Butter at the Right Temperature: This cannot be stressed enough! Your butter should be soft enough that a gentle press with your finger leaves a clear indent, but it should not be shiny, oily, or melty in the slightest. If your butter is too warm, it will not properly cream with the sugar, leading to cookies that spread excessively and become greasy or flat. Plan ahead and let it sit out for about an hour before baking.
- Choose the Right Mixer Attachment: If you’re using a stand mixer, the paddle attachment is your best friend for creaming butter and sugar. Its design effectively incorporates air without overworking the gluten in the flour later on.
- Measure Flour Correctly: The most common mistake in baking! All of my recipes, including this one, are meticulously tested using the “spoon and level” method. This involves lightly spooning flour into your measuring cup until it’s overflowing, then leveling off the excess with a straight edge (like the back of a knife). For the absolute greatest accuracy and professional-level results, I highly recommend using a kitchen scale to weigh your ingredients, especially flour, in grams. This eliminates variability and guarantees consistent outcomes. Learn more about measuring flour correctly here.
- Invest in Pre-Cut Parchment Sheets: For effortless baking and cleanup, pre-cut parchment sheets are a game-changer. They fit standard baking sheets perfectly, prevent sticking, and make transferring cookies a breeze.
- Shape Imperfect Cookies Right After Baking: Don’t fret if a few of your cookies come out of the oven looking a little wonky. While they’re still hot and pliable, use a spatula or the back of a spoon to gently push and press their edges back into a perfectly round shape. This quick trick can magically transform slightly misshapen cookies into picture-perfect ones. Discover more tips for baking beautiful cookies.
- Garnish with Flaky Sea Salt: For an extra touch of gourmet sophistication and a truly irresistible flavor profile, sprinkle a tiny pinch of flaky sea salt over your warm cookies immediately after they come out of the oven. The delicate crunch and the contrast of sweet and salty notes will elevate your cookies to a whole new level.
Customizing Your Zucchini Chocolate Chip Cookies
While this recipe for zucchini chocolate chip cookies is perfect as is, it’s also wonderfully versatile! Feel free to get creative and tailor them to your personal preferences or what you have on hand:
- Chocolate Varieties: Instead of semi-sweet, try milk chocolate, dark chocolate, or even white chocolate chips. A mix of different chocolates can also be delightful.
- Nutty Additions: If walnuts aren’t your favorite, pecans, almonds, or even macadamia nuts would be fantastic. Lightly toasting them beforehand can enhance their flavor.
- Spice It Up: Enhance the warm fall flavors by adding a touch of nutmeg, ginger, or even a pinch of allspice along with the cinnamon.
- Dried Fruits: For an extra layer of chewiness and sweetness, consider adding a handful of dried cranberries, raisins, or chopped dried apricots.
- Coconut: Shredded coconut could add a tropical twist and texture.
Storage and Freezing for Freshness
One of the best things about homemade cookies is enjoying them fresh, but these zucchini chocolate chip cookies are also excellent for make-ahead convenience. Here’s how to store them to maintain their deliciousness:
- Storing Baked Cookies: These cookies are undeniably at their peak the day they are baked. However, you can store leftover baked cookies in an airtight container at room temperature for up to 3-4 days. For optimal freshness, place a slice of bread in the container with the cookies; it will absorb excess moisture and keep them softer for longer.
- Storing Cookie Dough in the Fridge: The unbaked cookie dough can be stored in an airtight container in the refrigerator for at least a week, and sometimes even longer. This allows you to bake fresh cookies whenever a craving strikes! Just scoop and bake as directed, adding a minute or two to the baking time if the dough is very cold.
- Freezing Cookie Dough for Longer Storage: Cookie dough freezes exceptionally well, making it perfect for meal prep or unexpected guests.
- Pre-portioned Dough: Scoop the cookie dough into individual balls (using your cookie scoop) and place them on a parchment-lined baking sheet. Freeze until solid (about 1-2 hours). Once frozen, transfer the solid dough balls to a freezer-safe zip-top bag or airtight container. They will keep well in the freezer for up to 3 months.
- Baking from Frozen: When ready to bake, there’s no need to thaw! Simply arrange the frozen dough balls on a prepared baking sheet and bake as usual, adding an additional 2-4 minutes to the baking time. This method ensures you always have fresh-baked cookies on demand. Learn more about freezing cookie dough.
More Delicious Zucchini Recipes
If you still have zucchini to spare, don’t stop at cookies! Here are some other fantastic ways to incorporate this versatile vegetable into your cooking and baking:
Get the Full Recipe
Ready to bake a batch of these amazing Zucchini Chocolate Chip Cookies? Here’s the complete recipe card with all the measurements and detailed instructions you need for a perfect bake every time. Happy baking!

Zucchini Chocolate Chip Cookies
Pin Recipe
Leave a Review
Ingredients
- ¾ cup (170 grams) salted butter , softened to room temperature
- ½ cup (100 grams) granulated sugar
- 1 cup (213 grams) packed light or dark brown sugar
- 1 large egg
- 2 teaspoons vanilla extract
- 1 cup (130 grams) shredded zucchini , squeezed of excess liquid, see Notes (about ½ medium zucchini)
- 2 ½ cup (330 grams) all-purpose flour
- 1 teaspoon baking soda
- 1 teaspoon salt
- ⅛-¼ teaspoon ground cinnamon
- 1 cup (170 grams) semi-sweet chocolate chips
- ½ cup (56 grams) chopped walnuts , optional
Instructions
-
Preheat your oven to 375°F (190°C). Line a large baking sheet with parchment paper for easy cleanup and to prevent sticking.
-
In the bowl of an electric mixer (using the paddle attachment), beat the softened butter, granulated sugar, and brown sugar together on high speed for 3-5 minutes, until the mixture is light, fluffy, and significantly paler in color. Remember to stop and scrape down the sides of the bowl once or twice during this process to ensure even creaming.
-
Add the large egg, vanilla extract, and the thoroughly squeezed shredded zucchini to the creamed butter and sugar. Beat briefly after each addition, scraping down the bowl as needed to fully incorporate.
-
In a separate bowl, whisk together the all-purpose flour, baking soda, salt, and ground cinnamon. Gradually add these dry ingredients to the wet mixture, mixing on low speed until just barely combined, leaving a few streaks of flour visible. Then, add the chocolate chips and chopped walnuts (if using) and mix briefly until they are just incorporated into the dough. Be careful not to overmix.
-
Using a #40 (1½ Tbsp) cookie scoop or by rounded tablespoons, portion out the cookie dough. Roll each portion gently into a round ball and place them onto your prepared baking sheet, spacing them evenly about 4 inches apart to allow for spreading during baking.
-
Bake for 9-11 minutes. The cookies are done when their edges are lightly golden, and the centers appear set but still slightly soft. Avoid overbaking to maintain a soft and chewy texture.
-
Once baked, remove the cookies from the oven and let them cool on the baking sheet for 5 minutes. This allows them to firm up. Then, carefully transfer them to a wire rack to cool completely before serving and enjoying.
Notes
- For the best cookie texture and to prevent sogginess, it is absolutely essential to squeeze out as much excess water from the shredded zucchini as possible using a paper towel or a clean tea towel before adding it to your cookie dough.
- Accurate flour measurement is crucial for proper cookie consistency. Always use the spoon and level method (lightly spoon flour into your measuring cup and level off with a knife) or, for the most precise results, use a kitchen scale to weigh your flour in grams.
- This cookie dough is very flexible! You can store the unbaked dough in an airtight container in the fridge for at least a week, baking fresh cookies whenever you desire. The dough also freezes beautifully for longer storage; portion it into balls and freeze, then bake from frozen, adding a couple of minutes to the baking time.
Disclosure: This recipe was created in partnership with Go Bold With Butter. Thank you for supporting partnerships with brands I love and believe in, which make Completely Delicious possible. All opinions are always 100% my own. To learn more about Go Bold With Butter, you can visit their website. You can also find them on facebook, instagram, and pinterest.
