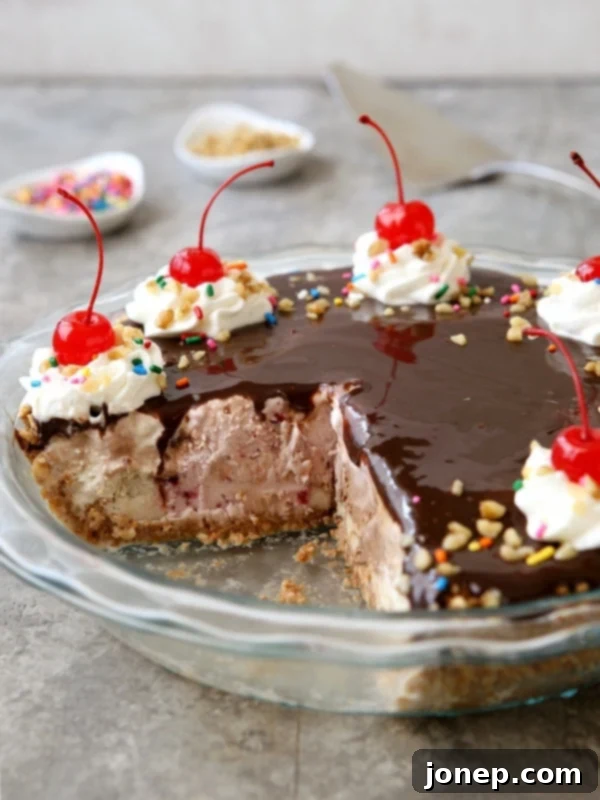
Ultimate Banana Split Ice Cream Pie: A Frozen Delight for Sharing
Imagine all the delightful elements of a classic banana split – sweet ripe bananas, rich creamy ice cream, luscious chocolate fudge sauce, fluffy whipped cream, crunchy nuts, playful sprinkles, and a vibrant cherry on top – all artfully layered and piled high, not in a boat, but nestled within a delectable waffle cone crust. This isn’t just any dessert; it’s the most fun, innovative, and utterly shareable banana split experience you’ll ever encounter in pie form!
In our humble opinion, the true essence of a banana split lies in the joy of sharing. Whether you’re marking a special anniversary, embarking on a memorable road trip with loved ones, or simply enjoying a late-night outing with dear friends, the tradition often involves visiting a beloved diner, ordering a colossal banana split, grabbing a handful of spoons, and diving in together. It’s a communal experience, a moment of shared sweetness that creates lasting memories.
So, what could possibly be a better way to recreate that magical, shared banana split experience right in the comfort of your own home? The answer, unequivocally, is this incredible Banana Split Ice Cream Pie. It transforms a beloved diner classic into a convenient, show-stopping dessert that’s perfectly portioned for a crowd and effortlessly elegant. This pie takes all the nostalgic flavors and textures you adore and presents them in an exciting new format, making it easier than ever to gather around and indulge.
The Unmissable Foundation: Our Signature Waffle Cone Crust
While the beauty of this ice cream pie lies in its customizability, there’s one foundational element that is an absolute *must*: the waffle cone crust. This isn’t just any crust; it’s the secret ingredient that elevates this dessert from great to truly unforgettable. Imagine a giant, delicious waffle cone, perfectly formed to hold all your favorite fillings. The distinct sweet, buttery, and slightly crispy flavor of the waffle cone adds an unparalleled depth and texture that a traditional graham cracker or cookie crust simply can’t replicate. It provides that authentic ice cream parlor feel, right down to the last bite.
Creating this irresistible crust is surprisingly simple. You’ll combine finely crushed waffle cone crumbs with a touch of light or dark brown sugar for added sweetness and depth, a pinch of salt to balance the flavors, and rich melted unsalted butter to bind it all together. Once mixed, this fragrant crumb mixture is pressed firmly into a 9-inch pie dish, forming a sturdy and flavorful base. Chilling the crust for at least an hour is crucial; it allows the butter to solidify, setting the crust and ensuring it holds up beautifully under the layers of cold ice cream and toppings. This initial chill is key to preventing a soggy crust and ensuring every slice is perfect.
Customizing Your Banana Split Dream Pie
Once your magical waffle cone crust is perfectly chilled and ready, the real fun begins: assembling your personalized banana split masterpiece! This recipe offers incredible flexibility, encouraging you to unleash your creativity and tailor the pie to your exact preferences. While the classic combination is always a winner, don’t hesitate to experiment with different ice cream flavors and an array of delicious toppings.
Our classic rendition features sweet, ripe banana slices lining the bottom of the crust, followed by generous scoops of chocolate, vanilla, and strawberry ice cream, artfully layered for that iconic banana split look. These are then generously drizzled with rich chocolate fudge sauce, adorned with billows of homemade whipped cream, a scattering of chopped nuts (pecans or walnuts are fantastic!), a rainbow of sprinkles, and of course, those bright, cheerful maraschino cherries. It’s a timeless combination that evokes pure nostalgia and satisfies every sweet craving.
Endless Topping Possibilities for Your Ultimate Frozen Treat
But why stop at the classics when you can make this pie uniquely yours? The world of toppings is vast and exciting! Consider adding a swirl of gooey caramel sauce for an extra layer of sweetness, dollops of marshmallow fluff for a chewy, sweet texture, or bright, tangy pineapple chunks for a tropical twist. Strawberry preserves can add a delightful fruity tartness, while various candies like chopped peanut butter cups, crushed cookies, or chocolate chips can introduce even more crunch and flavor. For nut lovers, toasted almonds, cashews, or even macadamias can provide a different kind of richness. Feel free to incorporate different fruit compotes, or even a different type of chocolate sauce like white chocolate or a dark chocolate ganache. The beauty of this recipe is its adaptability – truly, whatever sweet delight you can conjure up, you can add it to this pie. Make it exactly how you want it, ensuring every bite is a customized burst of flavor and texture!
Beyond the Ordinary: Why This Pie is a Must-Try
Just when you thought banana splits couldn’t possibly get any more fun or exciting, this innovative ice cream pie enters the scene to prove you delightfully wrong. It’s a dessert that transcends the typical, offering a novel way to enjoy a beloved classic. This pie isn’t just about combining ingredients; it’s about crafting an experience. It’s perfect for summer gatherings, birthday celebrations, or simply as a special weeknight treat that brings smiles to everyone’s faces. The make-ahead nature of the pie is another huge advantage, allowing you to prepare it in advance and simply pull it from the freezer when dessert time arrives, minimizing stress and maximizing enjoyment. Get ready, because your friends and family are truly going to go absolutely nuts for this incredible creation!
Making Your Perfect Pie: A Step-by-Step Guide for Success
Achieving the perfect Banana Split Ice Cream Pie is all about careful layering and chilling. The process is straightforward, but following these steps ensures a dessert that is not only delicious but also holds its shape beautifully for presentation. Let’s walk through it.
Preparing the Irresistible Waffle Cone Crust
Start by preparing your pie dish. A standard 9-inch pie dish works perfectly. In a spacious bowl, combine your crushed waffle cone crumbs. Aim for a fine crumb consistency, which can be achieved by pulsing whole cones in a food processor or placing them in a Ziploc bag and crushing them with a rolling pin. Mix these crumbs with the light or dark brown sugar, a pinch of salt to enhance the flavors, and the melted unsalted butter. Stir until the crumbs are evenly moistened and resemble wet sand. This mixture is then firmly pressed into the bottom and up the sides of your pie dish. Use the back of a spoon or your fingers to create an even, compact layer. Once pressed, place the crust in the refrigerator to chill for a minimum of 1 hour. This crucial step allows the butter to firm up, creating a stable, crisp crust that won’t crumble when sliced.
Layering the Creamy Goodness
While your crust is chilling, remove your pints of ice cream from the freezer and let them sit at room temperature for approximately 10 minutes. This slight softening makes them much easier to scoop and spread evenly without becoming too melted. Once the crust is firm, arrange an even layer of thinly sliced bananas over the bottom. Next, begin scooping the softened ice cream over the bananas. We recommend alternating between chocolate, strawberry, and vanilla flavors to create visually appealing layers and ensure a balanced flavor profile in every bite. Don’t worry about perfect scoops; just try to distribute the flavors. Use a spatula or the back of a spoon to gently spread and even out the top layer of ice cream. Once all the ice cream is in place, return the pie to the freezer for at least 1 hour. This re-freezing step is essential to set the ice cream layers and prevent them from melting together when you add the next topping.
The Finishing Touch: Fudge and Final Freeze
After the ice cream layers have set, retrieve your pie from the freezer. Evenly pour the chocolate fudge sauce over the top. You can warm the fudge sauce slightly if it’s too thick, but ensure it’s not hot, as that will melt your ice cream. Use a spatula to gently spread it to the edges, creating a smooth, glossy layer. Immediately return the pie to the freezer for another 15 minutes. This quick freeze allows the fudge to firm up slightly, preventing it from running into the whipped cream and other toppings, ensuring clean layers when you finally serve it.
Decorating and Serving Your Masterpiece
Finally, it’s time for the grand finale! Remove the pie from the freezer and adorn it with generous dollops of freshly whipped cream, a sprinkle of your favorite chopped nuts, a vibrant dash of rainbow sprinkles, and those iconic maraschino cherries. For the neatest slices, use a sharp knife that has been dipped in hot water and wiped clean between each cut. This technique helps the knife glide through the frozen layers, creating perfectly defined portions. Serve immediately and watch the smiles erupt!
Tips for Success and Storage
- Softening Ice Cream: Don’t rush this step. Allowing the ice cream to soften slightly (about 10-15 minutes at room temperature) makes it much easier to work with, ensuring smooth layers without having to battle rock-hard pints.
- Preventing Banana Browning: To keep your banana slices looking fresh, you can toss them gently in a tiny bit of lemon juice before layering them in the pie. This helps prevent oxidation and browning.
- Chilling is Key: Each chilling and freezing step is vital. Don’t skip them! They ensure the pie sets properly, preventing a messy outcome and allowing for clean, beautiful slices.
- Slicing Like a Pro: The hot knife trick is a game-changer for frozen desserts. Reheat and wipe the knife after each slice for the cleanest cuts.
- Storage: Store any leftover pie in an airtight container in the freezer for up to 2 days. For longer storage, you can wrap individual slices tightly in plastic wrap and then foil to prevent freezer burn, extending its life for up to a week.
- Crust Variations: If waffle cones are unavailable, a classic graham cracker crust or even crushed vanilla wafer cookies can serve as a delicious alternative, though the waffle cone provides a unique flavor.

Banana Split Ice Cream Pie
Pin Recipe
Leave a Review
Ingredients
For the crust:
- 2 cups crushed waffle cone crumbs (300 grams, about 10 cones)
- ¼ cup light or dark brown sugar (55 grams)
- Pinch of salt
- 6 tablespoons unsalted butter , melted (85 grams)
To assemble:
- 1-2 bananas , sliced
- 1 pint chocolate ice cream
- 1 pint strawberry ice cream
- 1 pint vanilla ice cream
- 1 cup chocolate fudge sauce (300 grams)
- Whipped cream
- Maraschino cherries
- Chopped nuts
- Rainbow sprinkles
Instructions
-
In a large bowl combine the waffle cone crumbs, sugar, salt and butter. Press evenly into a 9-inch pie dish. Chill for 1 hour.
-
Let ice cream sit at room temperature for about 10 minutes to soften.
-
Line the bottom of the prepared pie crust with sliced bananas. Scoop the ice cream over the top, alternating flavors. Use a spatula to even out the top. Freeze for 1 hour.
-
Pour chocolate fudge sauce over the top of the pie and freeze for another 15 minutes until firm.
-
Top with whipped cream, nuts, sprinkles and maraschino cherries. Use a hot knife to slice pie, wiping it clean between each cut.
-
Store leftovers in the freezer for up to 2 days.
