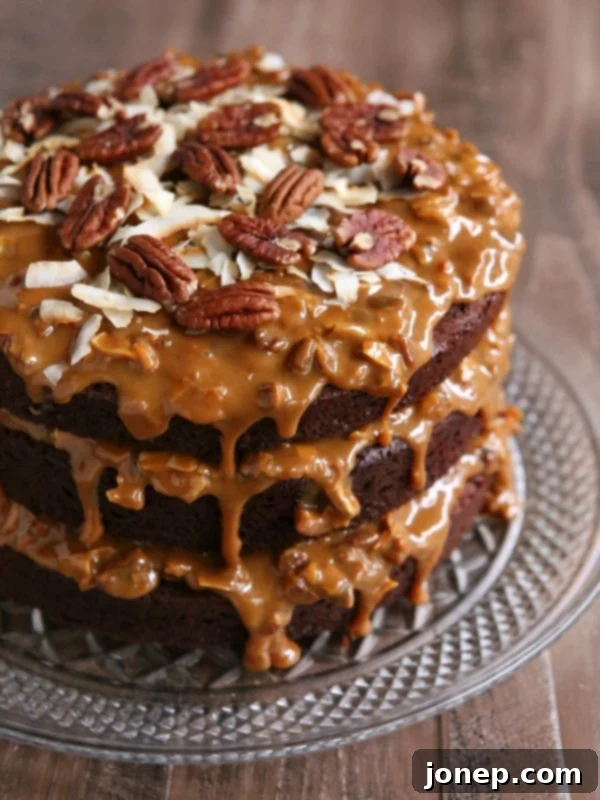
The Ultimate Decadent Chocolate Cola Cake with Gooey Dulce de Leche, Toasted Coconut, and Crunchy Pecan Icing
Prepare to be absolutely captivated by this showstopping cake, a true masterpiece that promises to steal the spotlight at any gathering. Imagine three towering layers of an incredibly moist and rich chocolate cola cake, each bite offering a unique, subtle tang from the cola that beautifully complements the deep cocoa notes. This exquisite foundation is then generously enrobed in a dreamy, golden dulce de leche icing, a caramel-like delight that drips seductively down the sides. To complete this symphony of flavors and textures, the icing is lavishly studded with perfectly toasted coconut flakes, adding a chewy, tropical sweetness, and crunchy chopped pecans, providing an earthy, satisfying contrast. This isn’t just a dessert; it’s an unforgettable culinary experience.
Just this week, we celebrated another year of my husband’s life—a little older, perhaps a touch wiser, and definitely deserving of something extraordinary. While most of our celebrations tend to be low-key, I simply couldn’t let this milestone pass without creating a truly spectacular cake. Because, let’s be honest, what’s a birthday without a magnificent cake to mark the occasion? It’s the centerpiece of joy, the sweet culmination of another year, and a perfect excuse to indulge in something truly special.
While some express their affection through elaborate surprise parties or perfectly chosen thoughtful gifts, my love language often manifests in sky-high, show-stopping cakes that are truly worthy of the moment. And let me assure you, this particular chocolate cola cake fits that description for any occasion, big or small. Despite its undeniably impressive appearance, you’ll be delighted to discover just how surprisingly simple it is to assemble. There’s no need for intricate frosting techniques or complicated decorations. Once the moist cake layers are baked and cooled, the final assembly of this beautiful dessert takes mere minutes, making it a perfect choice even for those who might feel intimidated by layer cakes.
Why This Chocolate Cola Cake is a Must-Try
If the idea of a simple yet elegant dessert hasn’t already got you heading to the kitchen, oven preheating and ingredients at the ready, let me delve deeper into the captivating elements that make this chocolate cola cake truly special:
- Three Layers of Unique Chocolate Cola Cake: The foundation is built upon three tender, chocolate-infused cake layers. The addition of cola isn’t just a gimmick; it subtly enhances the chocolate flavor, adding moisture and an intriguing, barely-there tang that elevates it beyond a standard chocolate cake. It’s a playful twist that makes each bite memorable and distinct.
- Gooey Dulce de Leche Interlayer & Drizzle: Between each luscious cake layer, and artfully cascading down the sides, is a generous amount of sweet, caramelized dulce de leche. This thick, sticky, and utterly delicious caramel sauce binds the layers together while adding an incredible depth of flavor and a wonderfully gooey texture. You can opt for convenience with canned dulce de leche or elevate your cake even further by making it from scratch (we’ll show you how below!).
- Toasted Coconut & Pecan Icing: The dulce de leche isn’t just plain; it’s enthusiastically mixed with two powerhouses of flavor and texture: perfectly toasted coconut flakes and finely chopped pecans. The toasted coconut provides a fragrant, slightly chewy element with a hint of tropical sweetness, while the pecans add a satisfying crunch and a rich, nutty complement to the sweet caramel and chocolate. This combination truly sets the icing apart, making it utterly irresistible.
The result is a cake that is exceptionally rich, intensely chocolaty, wonderfully gooey, and packed with delightful textural contrasts. It’s nothing short of heaven. Think of it as a German chocolate cake, but with a unique, exciting twist that many claim is even better. My husband, for whom this special cake was baked, absolutely adored it!
How to Make Homemade Dulce de Leche: A Simple Guide
While high-quality store-bought dulce de leche is perfectly acceptable for this recipe and will still yield a fantastic cake, crafting your own homemade version adds an extra layer of love and depth of flavor. The process is surprisingly straightforward and incredibly rewarding, transforming humble sweetened condensed milk into a rich, golden, caramel-like sauce that tastes far superior to anything from a can. Here’s how you can achieve that perfectly caramelized goodness right in your own kitchen:
- Prepare for Baking: Begin by pouring one or two cans of sweetened condensed milk into a heatproof glass baking dish. It’s important to choose a dish that can withstand sustained heat, like a Pyrex or ceramic dish. Cover the dish very tightly with aluminum foil. This seal is crucial to prevent evaporation and ensure a creamy consistency.
- Create a Water Bath: Place this smaller, foil-covered baking dish inside a larger baking dish. Then, carefully fill the larger pan with hot water, ensuring the water level reaches approximately halfway up the sides of the smaller dish. This water bath (bain-marie) creates a gentle, even cooking environment, preventing the milk from scorching and encouraging slow caramelization.
- Bake to Perfection: Bake the setup in a preheated oven at a moderate temperature (typically around 350°F or 175°C) for about 2 hours. During this time, the sweetened condensed milk will gradually transform into a deep, luscious caramel color. It’s a good idea to stir the milk once or twice during baking, especially after the first hour, to ensure even caramelization.
- Cool and Finish: Once the dulce de leche has achieved that beautiful, rich caramel hue, carefully remove the inner dish from the water bath (it will be hot!). Remove the foil cover and transfer the warm, caramelized milk to a mixing bowl. Whisk it vigorously until it becomes completely smooth and creamy. Any small lumps will disappear as you whisk.
- Storage and Usage: Allow the homemade dulce de leche to cool completely to room temperature before incorporating it into your cake icing. If you’re not using it immediately, it can be stored in an airtight container in the refrigerator for up to a week. Just be sure to warm it gently in the microwave or over a double boiler until it’s pourable again before using.
Making your own dulce de leche adds a touch of artisanal charm to your chocolate cola cake, promising an even more profound depth of flavor that your guests will surely notice and appreciate.

Chocolate Cola Cake with Dulce de Leche, Coconut and Pecan Icing
Pin Recipe
Leave a Review
Ingredients
For the cake:
- ⅔ cup hot black coffee (157 ml)
- ½ cup unsweetened cocoa powder (43 grams)
- ⅔ cup cola drink, such as Coke or Dr. Pepper (157 ml)
- 2 ¾ cup cake flour (332 grams)
- 1 ¼ teaspoon baking soda
- ¼ teaspoon cinnamon
- 1 ¾ cup vegetable oil (415 ml)
- 2 cups sugar (400 grams)
- 3 large eggs
- 1 ½ teaspoon vanilla
For the icing:
- 2 (14-ounce) cans dulce de leche (400 grams)
- 1 cup chopped pecans (112 grams)
- 1 cup shaved coconut , sweetened or unsweetened (95 grams)
Instructions
To make the cake:
-
Preheat oven to 350° F. Butter three 8-inch cake pans and line the bottoms with parchment paper. Butter the parchment paper, then dust the pans with flour.
-
In a small bowl, whisk together the hot coffee and cocoa until smooth. Stir in the cola drink and set aside to cool. In another bowl, sift together the cake flour, baking soda and cinnamon.
-
In the bowl of a stand mixer fitted with a paddle attachment, mix the oil and sugar until well combined. Add the eggs one at a time, mixing after each. Add the vanilla. Add the flour mixture in 3 additions, alternating with the chocolate cola mixture, and ending with the dry ingredients.
-
Pour batter into prepared cake pans and bake until a toothpick inserted into the center comes out clean, 25-30 minutes. Cool in the pan for 10 minutes before removing to a wire rack to cool completely.
To make the icing:
-
Preheat oven to 350° F. On an ungreased sheet pan, spread the shaved coconut and chopped pecans side-by-side. Toast in the oven until coconut just starts to turn golden brown, stirring coconut once, about 2-3 minutes. Watch carefully to make sure it doesn’t burn.
-
Put the dulce de leche in a bowl and microwave 1-2 minutes, stirring every 30 seconds, until it is warm and pourable.
-
In a large bowl, combine the dulce de leche, toasted coconut and pecans.
To build the cake:
-
Place one cake layer on a platter or cake stand and spoon ⅓ of the icing on top. Repeat with the remaining cake layers and icing, allowing the icing to drip down the sides.
-
Chill in the fridge for at least one hour to set before serving.
-
Store the cake in the fridge for up to three days.
Notes
Tips for Perfecting Your Chocolate Cola Cake
- Achieve Moist Cake Layers: Do not overmix the batter. Mix just until ingredients are combined to ensure a tender crumb. The cola helps with moisture, but gentle handling is key.
- Even Cake Baking: Make sure your cake pans are properly prepared with butter and parchment paper, and dusted with flour. This prevents sticking and ensures your beautiful layers come out cleanly.
- Cooling is Crucial: Allow the cake layers to cool completely on a wire rack before attempting to frost them. A warm cake will melt the delicious dulce de leche icing, leading to a messy (though still tasty!) disaster.
- Don’t Skip the Toasting: Toasting the coconut and pecans is a game-changer. It intensifies their flavors and adds that irresistible crunch that balances the gooey icing. Watch them carefully, as they can burn quickly!
- Serving Temperature: While the cake needs to chill to set the icing, allowing it to sit at room temperature for about 15-30 minutes before serving can enhance the flavors and soften the cake layers slightly, making for an even more enjoyable experience.
Make Ahead and Storage
This chocolate cola cake is an excellent make-ahead dessert, which makes it ideal for entertaining. The flavors often deepen and meld beautifully overnight.
- Storing the Cake: Once assembled, the cake should be stored in an airtight container in the refrigerator for up to three days. This keeps the cake fresh and prevents the icing from becoming too soft.
- Freezing Cake Layers: If you want to get a head start, the baked and cooled cake layers can be wrapped tightly in plastic wrap and then aluminum foil, and frozen for up to 1 month. Thaw them in the refrigerator overnight before assembling.
- Freezing Dulce de Leche: Homemade dulce de leche can also be frozen in an airtight container for several months. Thaw in the refrigerator and gently warm before using.
This chocolate cola cake with its irresistible dulce de leche, coconut, and pecan icing is more than just a recipe; it’s a celebration in itself. Whether you’re marking a birthday, holiday, or simply indulging a craving for something truly extraordinary, this cake promises to deliver a smile with every single forkful. Enjoy the process of baking and the sheer delight of tasting this unique and utterly decadent creation!
Recipe first posted in January 2012. Pictures have been updated and improvements to the recipe have been made for an even more delicious experience.
