Fluffy & Flavorful Savory Scones: The Ultimate Cheddar, Bacon & Scallion Recipe
Prepare yourself for an extraordinary treat with these savory scones! Infused with the irresistible combination of sharp cheddar cheese, fresh scallions, crispy bacon, aromatic garlic, and a hint of black pepper, each bite is a burst of rich, delicious flavor. You’ll be amazed by how incredibly light, buttery, and perfectly flaky these homemade scones turn out. Best of all, this impressive recipe comes together quickly, taking only about 30 minutes from start to finish!

My journey into the world of savory baked goods began at a charming local bakery. I had always associated scones with sweetness, but one taste of their savory scone transformed my perspective entirely. It was so incredibly good that I found myself craving it constantly, realizing I had to find a way to replicate that magic in my own kitchen.
Inspired by their delectable creation, I took my trusted classic sweet scone recipe and adapted it with the most beloved savory ingredients. The result? A fantastic savory scone recipe featuring the classic trio of cheese, green onions, and bacon. To elevate the flavor profile even further, I incorporated a generous touch of garlic powder and freshly ground black pepper, ensuring every morsel is packed with bold, satisfying taste.

Table of Contents
- Why You Should Bake Savory Scones More Often
- Essential Ingredients for Savory Scones
- Step-by-Step Instructions for Perfect Savory Scones
- Tips for Perfect Savory Scones Every Time
- Flavor Variations and Mix-in Options
- How to Make Savory Scones in Advance
- Delicious Serving Suggestions
- More Delightful Biscuit and Scone Recipes
- Get the Full Savory Scone Recipe
Why You Should Bake Savory Scones More Often
Scones, especially savory ones, are truly underrated! They are not only incredibly versatile but also one of my absolute favorite things to bake. Here are several compelling reasons why I’m confident you’ll fall in love with them, too:
- They are unbelievably tender and delicious, offering a delightful contrast to traditional sweet pastries. Serving these savory scones to guests consistently makes a huge impact, leaving everyone impressed and satisfied.
- You’ll only need about 30 minutes to make them. This recipe is genuinely quick and straightforward, making it perfect for busy mornings or when you need a delicious snack in a flash.
- You can easily prep them ahead of time and bake them fresh whenever a craving strikes or guests arrive. This convenience makes them a fantastic option for planned meals or spontaneous treats.
- These savory delights are perfect for both special occasions, like holiday brunches or elegant tea parties, and for those lazy weekend mornings at home when you want something comforting and homemade.
- Beyond breakfast or brunch, savory scones make an excellent accompaniment to soups, stews, or even as a unique dinner roll. Their rich flavor adds a special touch to any meal.
The next time you’re planning a holiday feast, a special brunch, or simply want to elevate your everyday breakfast, I truly hope you’ll consider this easy savory scone recipe. But why wait for a special occasion? These scones are so good, you should probably bake them as soon as possible!
Essential Ingredients for Savory Scones
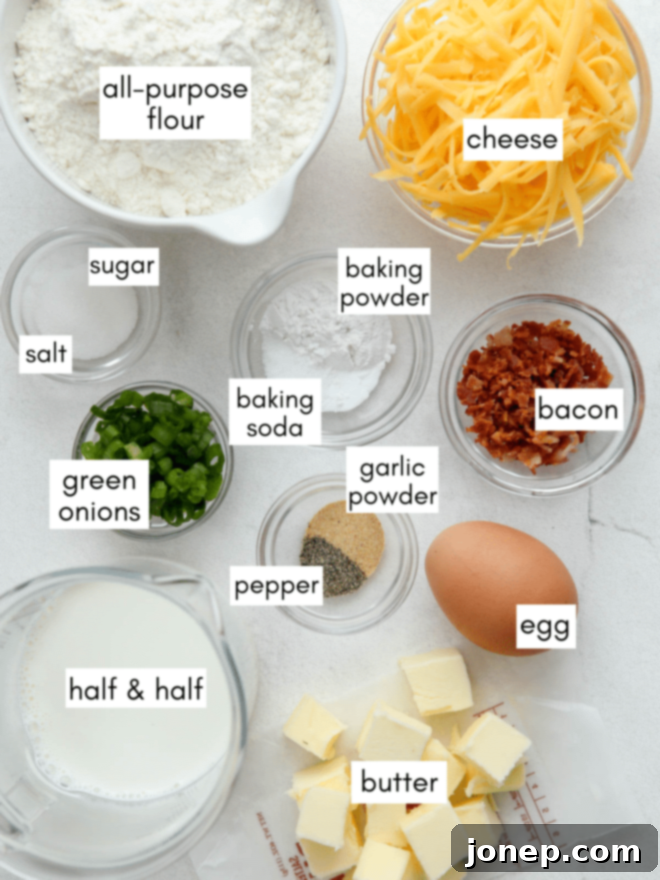
Crafting perfect savory scones requires a few key ingredients, each playing a crucial role in achieving that desirable light, flaky, and flavorful texture. Here’s a detailed look at what you’ll need:

- All-purpose flour: The foundation of our scones, providing structure and body. Measure it correctly for the best results, preferably by weight.
- Cold Butter: This is the secret to flaky scones! Cold, cubed butter creates pockets of steam in the oven, leading to those signature tender layers. Make sure it’s as cold as possible.
- Baking powder and baking soda: These leavening agents work together to give the scones their beautiful lift and airy texture, ensuring they are tall and fluffy.
- Salt, black pepper, and garlic powder: These seasonings are vital for the savory depth of flavor. Don’t skimp on them, as they perfectly complement the cheese and bacon.
- Half and half: My preferred choice for its perfect balance of richness and moisture, contributing to a tender crumb. However, buttermilk or even heavy cream can be used as substitutes, each yielding slightly different textures.
- Large Egg: Acts as a binder, adding richness and helping with the overall structure and golden crust of the scones.
- Cheddar Cheese: The star of our savory mix-ins! Use a good quality sharp cheddar for the best flavor. Shred it yourself for superior melting and texture compared to pre-shredded varieties.
- Green Onions (Scallions): These add a delicate oniony flavor and a touch of freshness that brightens up the rich ingredients.
- Bacon: Crispy, crumbled bacon brings a smoky, salty, and utterly delicious element to these scones. While optional for a vegetarian version, it’s highly recommended for an unparalleled flavor experience.
Step-by-Step Instructions for Perfect Savory Scones
Follow these easy steps to create incredible homemade savory scones that are sure to impress:
- Prepare your workspace: Preheat your oven to 400°F (200°C) and line a half or quarter-sheet pan with parchment paper. This prevents sticking and ensures easy cleanup.
- Combine dry ingredients: In a large mixing bowl, whisk together the all-purpose flour, baking powder, granulated sugar (just a touch for balance), baking soda, salt, garlic powder, and black pepper. Ensuring these are well combined guarantees even flavor distribution.
- Cut butter into dry ingredients: Add the very cold, cubed unsalted butter to the dry mixture. Using a pastry cutter, a fork, or even your fingertips, quickly work the butter into the flour until it resembles coarse crumbs with some pea-sized pieces of butter remaining. This is crucial for flakiness!
- Add savory mix-ins: Gently toss in the shredded cheddar cheese, thinly sliced scallions, and crumbled crispy bacon (if using). Distribute them evenly throughout the flour and butter mixture.
- Prepare liquid ingredients: In a separate small bowl, whisk together the cold half and half with the large egg. This ensures the liquids are well combined before adding to the dry ingredients.
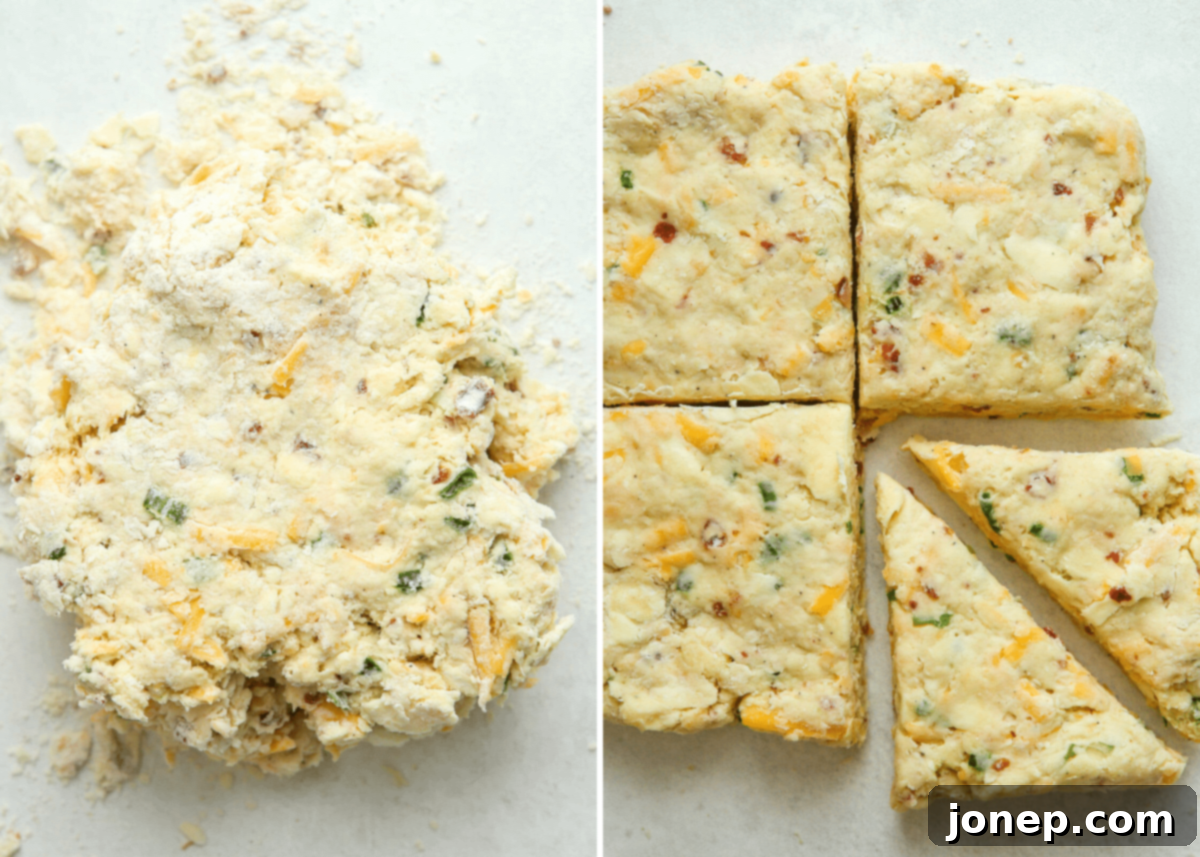
- Combine dough: Pour the liquid mixture over the flour and mix-in ingredients. Use a spatula to gently bring the dough together. It will appear dry and shaggy at first, but continue to gently mix and then use your hands to press and form it into a cohesive dough. Avoid overmixing, as this can lead to tough scones.
- Create flaky layers with the “fold and flatten method”: Turn the dough out onto a lightly floured surface. Gently flatten the dough with your hands to about 1-2 inches thick. Then, fold one half of the dough over on top of the other half, much like closing a book. Flatten it again to 1-2 inches thick and repeat this fold and flatten process two more times (for a total of 3-4 folds). This step is my secret for incredibly light and flaky scones, creating multiple layers of butter within the dough. Do not skip it!

- Shape and slice into triangles: After the folds, gently form the dough into an approximate 6-inch square, about 1-inch tall. Using a bench scraper or a sharp knife, cut the large square into 4 smaller squares. Then, cut each small square diagonally into 2 triangles, yielding 8 total scones. You can gently reshape the edges of the triangles with your hands if needed for a neater appearance.
- Freeze (optional but recommended): Arrange the shaped scones on your prepared baking sheet. Lightly brush the tops of the scones with a little extra half and half. For the best rise and flakiness, place the entire baking sheet with scones into the freezer for at least 15 minutes while your oven finishes preheating. This ensures the butter remains very cold, which is key to creating steam and lift during baking.

- Bake to golden perfection: Transfer the baking sheet to your preheated 400°F (200°C) oven and bake for 17-20 minutes, or until the tops and bottoms are beautifully golden brown. The internal temperature should be around 200°F (93°C).
- Serve and enjoy: These savory scones are absolutely best enjoyed warm, fresh from the oven. You can brush them with a little melted butter and sprinkle with coarse salt for an extra touch of indulgence. Store any leftovers in an airtight container at room temperature for 1-3 days.
Baking Tip: Why Scone and Biscuit Ingredients Need to Stay Cold
A fundamental secret to achieving tall, soft, and exquisitely flaky biscuits and scones lies in the little bits of cold butter embedded within the dough. As these cold butter pieces melt in the hot oven, they release steam, which creates incredible pockets and layers, giving scones their signature rise and delicate texture.
If the butter becomes too warm and incorporates completely into the dry ingredients before baking, those crucial pockets of steam will be lost, resulting in a denser, less flaky scone. To ensure the best results every time, always start with very cold butter and cold dairy (like half and half or buttermilk). Work the dough quickly and efficiently to prevent the butter from warming up. If your kitchen is particularly warm, or if you’re taking your time, consider freezing your shaped scones on the baking sheet for 15-20 minutes before baking. This extra step guarantees the butter is perfectly chilled, maximizing flakiness and lift. For more expert tips to master your baking, check out our dedicated Baking Tips section.
Tips for Perfect Savory Scones Every Time
Achieving bakery-quality savory scones at home is easier than you think when you follow a few simple guidelines:
- Keep everything cold: This cannot be stressed enough! Use very cold butter, chilled half-and-half (or your chosen dairy), and even chill your mixing bowl or pastry cutter if your kitchen is warm. Cold ingredients are the cornerstone of flaky scones.
- Don’t overmix the dough: Overworking the dough develops the gluten, leading to tough scones. Mix just until the ingredients come together and no dry streaks of flour remain. A shaggy dough is a good sign!
- Measure flour accurately: Too much flour can make your scones dry and dense. Weighing your flour (using grams) is the most precise method. If you’re scooping, lightly spoon flour into your measuring cup and level it off.
- The “Fold and Flatten” method is key: This technique, explained in the instructions, creates layers of butter that steam and separate during baking, resulting in those desirable flaky layers. Don’t skip it!
- Preheat your oven thoroughly: A hot oven ensures the scones rise quickly and evenly, creating a tender interior and a crisp, golden exterior.
- Freeze before baking (optional but recommended): A quick chill in the freezer for 15 minutes before baking helps solidify the butter, preventing it from melting too quickly and ensuring maximum lift and flakiness.
- Handle dough gently: When shaping and cutting, use a light touch. Excessive pressure can compress the layers you’ve worked to create.
Flavor Variations and Mix-in Options
While the cheddar, bacon, and scallion combination is a timeless classic, these savory scones are incredibly versatile! Feel free to experiment with different ingredients to create your own signature flavors:
- Cheese galore: Don’t limit yourself to just cheddar! You can use any kind of shreddable cheese. Firmer varieties like Gouda, Swiss, Parmesan, Gruyère, or even a spicy pepper jack will be easier to work with and add distinct flavor profiles. Consider a blend of two cheeses for added complexity.
- Herbaceous delights: Fresh herbs elevate savory flavors beautifully. Add other aromatic herbs such as finely chopped chives, fresh rosemary, thyme, or sage. They can be mixed directly into the dough or sprinkled on top before baking.
- Protein power-ups: Feel free to leave out the bacon for a delicious vegetarian option, or replace it with other cooked meats. Diced ham, cooked and crumbled sausage, or even shredded cooked chicken would make excellent additions. For a smoky flavor without bacon, try a pinch of smoked paprika.
- Vegetable medley: Finely diced sun-dried tomatoes, caramelized onions, roasted red peppers, or even blanched spinach (well-squeezed to remove excess water) can add color, texture, and flavor. Just be sure to keep the additions relatively dry to avoid making the dough too wet.
- Spice it up: A pinch of cayenne pepper, smoked paprika, or a dash of chili flakes can add a wonderful kick to your savory scones.
How to Make Savory Scones in Advance
One of the best features of this savory scone recipe is how well they freeze, both unbaked and baked. This makes them perfect for meal prepping or having a quick, delicious treat on hand whenever you need it!
To freeze unbaked scones: This is my absolute preferred method, especially for special occasions! After shaping your scones, arrange them in a single layer on a parchment-lined baking sheet. Cover the entire sheet pan tightly with plastic wrap and place it in the freezer. Once completely frozen (after a few hours), you can transfer the solid scones to a freezer-safe bag or airtight container for long-term storage (up to 1-2 months). When you’re ready to bake, simply place the frozen scones directly on a prepared baking sheet (no need to thaw!) and bake as directed, adding an extra 3-5 minutes to the bake time as needed. They will bake up just as fresh and flaky!
To freeze baked scones: Allow the baked scones to cool completely. Then, arrange them in a single layer in an airtight container or a large freezer-safe ziplock bag. Freeze for up to 1 month. To serve, thaw the scones at room temperature for a few hours. For optimal taste and texture, warm them in a 350°F (175°C) oven for about 10 minutes before serving. This revives their warmth and tenderness.
Delicious Serving Suggestions
These savory scones are incredibly versatile and can be enjoyed in many ways. Here are some ideas to make them even more irresistible:
- Breakfast & Brunch: Serve them alongside scrambled eggs, a fresh fruit salad, or your favorite breakfast sausage. They’re perfect with a cup of coffee or tea.
- With Soups & Stews: Their rich, savory flavor makes them an excellent companion to a hearty bowl of chili, tomato soup, or a creamy potato chowder. Use them to soak up every last drop!
- As a Side Dish: Replace traditional dinner rolls with these flavorful scones to add an exciting twist to any meal, especially roasted chicken or pot roast.
- Simple & Perfect: Enjoy them plain, or with a smear of plain butter, a dollop of cream cheese, or even a spicy jam or chutney for a delightful contrast.
- Gourmet Sandwich Base: Slice them in half and use them as a unique base for mini breakfast sandwiches with egg and ham, or for a sophisticated afternoon tea sandwich with cucumber and dill cream cheese.
More Delightful Biscuit and Scone Recipes
If you’ve fallen in love with these savory scones, you’ll definitely want to explore more of our beloved biscuit and scone recipes. Each one offers a unique and delicious baking adventure:

Get the Full Savory Scone Recipe

Savory Scones with Cheddar, Bacon & Scallions
8
scones
10 minutes
20 minutes
15 minutes
30 minutes
Pin Recipe
Leave a Review
Ingredients
For the Savory Scones:
-
2 cups
(260 grams)
all-purpose flour -
2 teaspoons
baking powder -
1 teaspoon
granulated sugar -
¼ teaspoon
baking soda -
½ teaspoons
salt -
½ teaspoon
garlic powder -
¼ teaspoon
ground black pepper -
6 tablespoons
(85 grams)
cold unsalted butter , cubed -
1 cup
(85 grams)
shredded cheddar cheese -
2
scallions/green onions , thinly sliced -
2 slices
bacon , fried till crispy and crumbled (optional) -
½ cup
(114 grams)
cold half and half , see Notes -
1 large
egg -
Additional half and half , for brushing -
Melted butter and additional coarse salt , for adding to baked scones (optional)
Prevent your screen from going dark
Equipment
Instructions
-
Preheat oven to 400°F (200°C) and line a half or quarter-sheet pan with parchment paper. This ensures easy removal and prevents sticking.
-
In a large bowl, combine the flour, baking powder, sugar, baking soda, salt, garlic powder, and black pepper. Whisk these dry ingredients together thoroughly. Add the very cold, cubed butter and cut it into the dry ingredients using a pastry blender or a knife until the butter pieces are about the size of small peas.
-
Toss in the shredded cheddar cheese, sliced scallions, and crispy crumbled bacon (if you are using it). Ensure they are evenly distributed throughout the flour and butter mixture.
-
In a separate small bowl, whisk together the cold half and half and the egg. Pour this liquid mixture over the flour ingredients in the large bowl. Using a spatula, gently mix until the dough just starts to come together. Turn the mixture out onto a lightly floured counter and use your hands to quickly finish forming a uniform dough. It will be quite dry and shaggy initially but will come together with minimal effort. Be careful not to overmix.
-
Gently pat the dough to about 1-2 inches thick. Fold one half of the dough over onto the other half (like closing a book). Flatten again to 1-2 inches thick and repeat this fold and flattening process two more times (for a total of 3-4 folds). This crucial step creates flaky layers – don’t skip it!
-
Form the dough into an approximate 6-inch square, about 1-inch tall. Using a sharp knife or bench scraper, cut the large square into 4 smaller squares, and then cut each small square diagonally into 2 triangles. You should have 8 total scones. Feel free to reshape the triangles a bit with your hands to achieve straighter edges. Arrange the triangles on the prepared sheet pan and lightly brush the tops with a little more half and half.
-
(Optional but recommended) Place the sheet pan with the scones in the freezer for 15 minutes while the oven finishes preheating. This step ensures the butter in the dough stays nice and cold, which will create the most impressive rise and flakiness in the oven.
-
Bake the scones for 17-20 minutes, or until their tops and bottoms are beautifully golden brown and they are cooked through. Serve warm or at room temperature. For an extra touch of indulgence, brush them with melted butter and sprinkle with a little coarse salt right after baking.
-
Scones are truly at their best when served the day they are baked, enjoying that fresh-from-the-oven warmth and flakiness.
Notes
- I find that half and half offers the ideal richness for these scones, balancing flavor and texture perfectly. However, you can also substitute it with buttermilk for a tangier scone or heavy cream for a richer, denser result.
- Versatile Substitutions and Mix-in Options:
- Cheese Choices: While cheddar is wonderful, feel free to use any kind of shreddable cheese you love. Firmer varieties like Gouda, Swiss, Gruyère, or Parmesan will incorporate more easily into the dough.
- Fresh Herbs: Enhance the savory profile by adding other fresh herbs like finely chopped chives, fragrant rosemary, earthy thyme, or aromatic sage.
- Bacon Alternatives: For a delicious vegetarian option, simply leave out the bacon. Alternatively, you can replace it with diced cooked ham, crumbled sausage, or sun-dried tomatoes for different flavor dimensions.
- Tips for Making Scones in Advance:
- To freeze unbaked scones: This is a fantastic method for fresh-baked scones on demand! After shaping, place them on a parchment-lined sheet pan, cover tightly with plastic wrap, and freeze until solid. Once frozen, transfer to a freezer-safe bag or container (they can keep for 1-2 months). Bake directly from frozen, adding a few extra minutes to the bake time.
- To freeze baked scones: Allow them to cool completely. Freeze in a single layer in an airtight container or ziplock bag. Thaw at room temperature for a few hours, then warm in a 350°F (175°C) oven for about 10 minutes before serving to restore their warmth and tenderness.
Carbohydrates: 26g,
Protein: 9g,
Fat: 18g,
Saturated Fat: 10g,
Polyunsaturated Fat: 1g,
Monounsaturated Fat: 5g,
Trans Fat: 0.4g,
Cholesterol: 69mg,
Sodium: 330mg,
Potassium: 199mg,
Fiber: 1g,
Sugar: 1g,
Vitamin A: 524IU,
Vitamin C: 1mg,
Calcium: 173mg,
Iron: 2mg
American
Breakfast, Brunch, Snack
Annalise Sandberg
Have you tried this recipe?
I’d love to hear about it! Leave a rating and review below, or take a photo and tag it on Instagram @completelydelicious with #completelydelicious.


