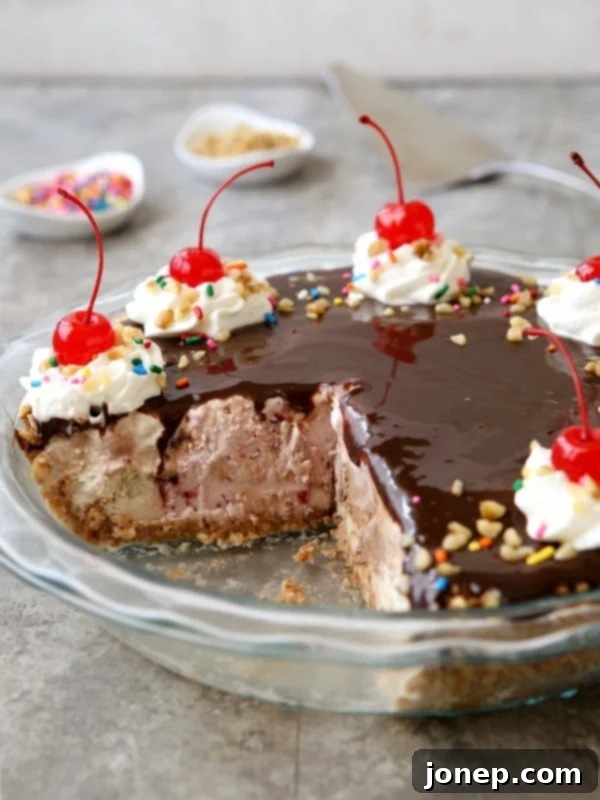
Ultimate No-Bake Banana Split Ice Cream Pie with Waffle Cone Crust
Imagine all the classic joy of a banana split, but in an effortlessly shareable, incredibly fun pie format. This Banana Split Ice Cream Pie takes creamy scoops of ice cream, sweet sliced bananas, decadent chocolate fudge sauce, fluffy whipped cream, crunchy nuts, playful sprinkles, and vibrant cherries, all nestled into a delightful waffle cone crust. It’s a spectacular dessert that promises to be the highlight of any gathering, offering a nostalgic trip with every satisfying spoonful.
Traditional banana splits are often synonymous with shared experiences – a celebratory treat after a long week, a delightful indulgence during a family road trip, or a late-night diner adventure with friends. They invite camaraderie, with multiple spoons digging into a towering sundae. But what if you could bring that same communal joy and excitement into your own home, in a format that’s even easier to prepare and serve?
This Banana Split Ice Cream Pie is the answer. It transforms the beloved dessert into a convenient, sliceable treat, making it perfect for sharing at home without the fuss of individual sundaes. It captures all the signature flavors and textures you adore, presented in an elegant yet playful pie form that will undoubtedly impress your guests.
Why Choose a Banana Split Ice Cream Pie?
Beyond its undeniable deliciousness, this ice cream pie offers several advantages over a traditional banana split. Firstly, it’s a no-bake dessert, meaning no oven required – a huge plus, especially during warm weather when you want to keep your kitchen cool. Secondly, it’s significantly easier to serve to a crowd. Instead of assembling individual sundaes, you simply slice and serve, just like a regular pie. This makes it an ideal choice for birthday parties, summer barbecues, potlucks, or any occasion where you need a show-stopping dessert that feeds many.
Furthermore, the pie format allows for a more cohesive and less messy eating experience. Each slice delivers a balanced combination of all the wonderful elements, ensuring every bite is as perfect as the last. It’s a truly versatile dessert that brings smiles to faces of all ages, from children captivated by the sprinkles to adults reminiscing about classic diner treats.
The Irresistible Waffle Cone Crust: A Must-Have Foundation
The foundation of this incredible dessert is its unique and utterly delightful waffle cone crust. This isn’t just any pie crust; it’s designed to taste like one giant, delicious waffle cone, providing that perfect crisp counterpoint to the creamy ice cream layers. It’s an absolute must-have element that truly elevates the pie from a simple ice cream cake to a distinctive Banana Split Ice Cream Pie.
Making the crust is surprisingly simple. You’ll crush waffle cones – a food processor makes this quick and easy, but a zip-top bag and a rolling pin work just as well for a fun, hands-on activity. These crumbs are then combined with brown sugar, a pinch of salt, and melted butter. The brown sugar adds a subtle caramel note that complements the waffle cone flavor beautifully, while the melted butter binds everything together. Once pressed firmly into a pie dish and chilled, it creates a sturdy, flavorful base that won’t get soggy, holding up beautifully to the layers of ice cream and toppings.
The texture of the waffle cone crust is key. It provides a satisfying crunch with every bite, mimicking the experience of eating a classic ice cream cone. This textural contrast with the smooth, cold ice cream and soft bananas is what makes this pie so special and incredibly addictive.
Crafting Your Perfect Banana Split Pie
One of the best aspects of this recipe is its versatility. While the waffle cone crust is essential, the fillings and toppings can be customized to your heart’s content. Here’s how to build your ideal frozen masterpiece:
Choosing Your Ice Cream Flavors
For a truly classic banana split experience, the traditional trio of chocolate, vanilla, and strawberry ice cream is highly recommended. The distinct flavors complement each other beautifully, creating a harmonious blend that defines the dessert. However, don’t feel limited! This is your pie, so feel free to experiment. You could use:
- **Chocolate Peanut Butter:** For a rich and nutty twist.
- **Coffee or Mocha:** For a sophisticated flavor profile.
- **Mint Chip:** For a refreshing cool contrast.
- **Cherry or Pistachio:** To add unique fruit or nutty notes.
- **Neapolitan:** For an even easier traditional setup.
Ensure your ice cream has softened slightly at room temperature for about 10-15 minutes before scooping. This makes it much easier to spread evenly in the pie crust, preventing gaps and ensuring a smooth, beautiful layered appearance.
The Essential Banana Layer
No banana split is complete without fresh bananas! For this pie, thinly sliced bananas are typically arranged at the bottom of the waffle cone crust before the ice cream layers are added. This initial layer ensures you get that authentic banana flavor in every single slice. Choose ripe but firm bananas to avoid them becoming too mushy. If you’re concerned about browning, a quick toss in a tiny bit of lemon juice can help, though the freezing process generally mitigates this.
A World of Topping Possibilities
The fun of a banana split lies in its generous toppings, and this pie is no exception. While the recipe calls for classic toppings, feel free to go wild with your favorites:
- **Classic Chocolate Fudge Sauce:** A warm, rich fudge sauce drizzled over cold ice cream is a match made in heaven.
- **Whipped Cream:** Piled high, it adds a light, airy texture and creamy sweetness. You can make homemade whipped cream for the freshest taste.
- **Maraschino Cherries:** The quintessential banana split garnish, adding a pop of color and a sweet, slightly tart flavor.
- **Chopped Nuts:** Pecans, walnuts, or peanuts add a delightful crunch and nutty flavor.
- **Rainbow Sprinkles:** Essential for that playful, festive look, especially appealing to kids and the young at heart.
- **Caramel Sauce:** A luscious addition for those who love a buttery, sweet drizzle.
- **Marshmallow Fluff:** For a gooey, sweet, and wonderfully sticky topping.
- **Pineapple Chunks:** Canned pineapple, well-drained, adds a tropical sweetness.
- **Strawberry Preserves or Sauce:** An extra burst of fruity goodness.
- **Crushed Cookies:** Oreo crumbs, graham cracker crumbs, or shortbread pieces for added texture.
- **Shredded Coconut:** Toasted or untoasted, for a tropical flair.
- **Mini Chocolate Chips or M&Ms:** For more chocolatey goodness and pops of color.
Layering your toppings thoughtfully can also enhance the pie’s visual appeal, making it as much a feast for the eyes as it is for the palate.
Step-by-Step Assembly Guide
Creating this magnificent pie is simpler than you might think. With a little planning, you’ll have a dessert that looks professionally made. The key steps involve preparing the crust, softening the ice cream, layering the components, and allowing sufficient freezing time.
First, the waffle cone crust needs to be assembled and chilled. This sets it firmly, preventing it from crumbling when you add the wet ingredients. While the crust is chilling, you can prepare your bananas and get your ice creams out to soften. This brief softening period is crucial for achieving smooth, even layers of ice cream without a struggle.
Once the crust is ready, the layering begins. Fresh banana slices form the first layer, followed by alternating scoops of your chosen ice creams. Don’t be afraid to press them down gently with a spatula to eliminate air pockets and create a flat surface. Each layer adds to the visual appeal and flavor complexity of the pie. After freezing the ice cream layers, the warm fudge sauce is poured over, which will quickly set into a delicious, firm layer when returned to the freezer. This ensures the fudge maintains its integrity when sliced, rather than running everywhere. Finally, the pie is adorned with its festive toppings just before serving, making it look as spectacular as it tastes.
Make-Ahead and Storage Tips
This Banana Split Ice Cream Pie is an ideal make-ahead dessert, perfect for busy hosts. You can assemble the entire pie, excluding the final whipped cream and delicate toppings, up to 2 days in advance. Simply cover it tightly with plastic wrap and store it in the freezer. When you’re ready to serve, remove it from the freezer about 10-15 minutes beforehand to allow it to soften slightly, then add the whipped cream, nuts, sprinkles, and cherries.
For storing leftovers, ensure the pie is tightly wrapped in plastic wrap or placed in an airtight freezer-safe container. This prevents freezer burn and helps maintain its delicious texture and flavor. Stored properly, the pie will remain fresh and enjoyable for up to 2 days, making it perfect for indulging in a sweet treat long after your gathering.
Serving Suggestions for a Spectacular Dessert
This ice cream pie is naturally a showstopper on its own, but a few serving tips can elevate the experience even further. When it’s time to slice, a hot knife works wonders. Dip a sharp knife in hot water and wipe it clean between each cut to get perfectly clean, crisp slices. This prevents the ice cream from tearing and keeps your slices looking neat and appealing.
Serve each slice on a chilled dessert plate to help prevent it from melting too quickly. While the pie is already loaded with toppings, you could offer additional small bowls of extra fudge sauce, sprinkles, or nuts on the side for guests who wish to add more. This pie is perfect for summer gatherings, birthday celebrations, or any time you want to bring a burst of fun and flavor to your table. Your friends and family are truly going to go nuts for this incredible Banana Split Ice Cream Pie!

Banana Split Ice Cream Pie
Pin Recipe
Leave a Review
Ingredients
For the crust:
- 2 cups crushed waffle cone crumbs (300 grams, about 10 cones)
- ¼ cup light or dark brown sugar (55 grams)
- Pinch of salt
- 6 tablespoons unsalted butter , melted (85 grams)
To assemble:
- 1-2 bananas , sliced
- 1 pint chocolate ice cream
- 1 pint strawberry ice cream
- 1 pint vanilla ice cream
- 1 cup chocolate fudge sauce (300 grams)
- Whipped cream
- Maraschino cherries
- Chopped nuts
- Rainbow sprinkles
Instructions
-
In a large bowl combine the waffle cone crumbs, sugar, salt and butter. Press evenly into a 9-inch pie dish. Chill for 1 hour.
-
Let ice cream sit at room temperature for about 10 minutes to soften.
-
Line the bottom of the prepared pie crust with sliced bananas. Scoop the ice cream over the top, alternating flavors. Use a spatula to even out the top. Freeze for 1 hour.
-
Pour chocolate fudge sauce over the top of the pie and freeze for another 15 minutes until firm.
-
Top with whipped cream, nuts, sprinkles and maraschino cherries. Use a hot knife to slice pie, wiping it clean between each cut.
-
Store leftovers in the freezer for up to 2 days.
