Homemade Buttermilk Ranch Sandwich Bread: Your Ultimate Savory Loaf
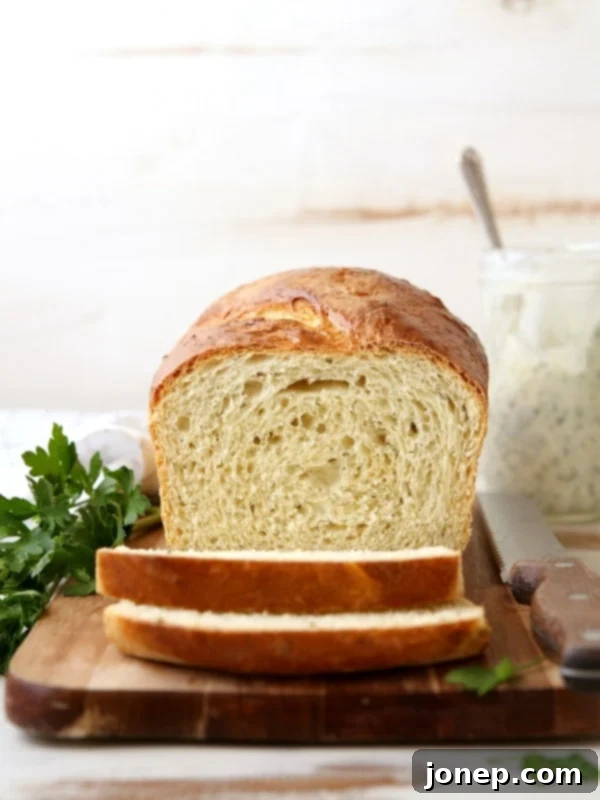
This buttermilk ranch sandwich bread is a delightful creation, offering a light, tender texture and a burst of savory flavor from fresh buttermilk, aromatic garlic, and a medley of vibrant herbs. It’s truly a game-changer for your everyday sandwiches and beyond.
This recipe was developed in partnership with Red Star Yeast.
After a refreshing summer hiatus, my kitchen cravings have shifted. The warmer months are fantastic for light, fresh meals, and while grilled pizza made a delightful appearance, serious bread baking took a backseat. But now, as mid-September arrives with its crisp air and shorter days, a different kind of culinary comfort calls. My thoughts turn to cozy soups, hearty casseroles, and the rich warmth of hot chocolate. And, of course, the irresistible aroma of freshly baked bread filling the house.
There’s something uniquely comforting about kneading dough and watching it transform into a golden, fragrant loaf. It’s a culinary therapy, a mindful process that rewards you with an incredibly satisfying staple. As the seasons change, so does our desire for wholesome, homemade goodness, and few things embody that better than a perfectly baked bread. This shift in season marks the perfect time to fire up the oven and dive back into the wonderful world of yeast, flour, and unforgettable flavors.
Introducing Your New Favorite: Buttermilk Ranch Sandwich Loaf
This Buttermilk Ranch Sandwich Loaf is more than just bread; it’s a carefully crafted culinary experience. Conceived with the ideal sandwich in mind, this bread takes all the beloved flavors of classic ranch dressing – which happens to be my absolute favorite – and bakes them right into a soft, golden loaf. Each slice is infused with the creamy tang of buttermilk, the pungent warmth of garlic, and the bright, herbaceous notes of fresh parsley, chives, and dill. It’s a symphony of savory flavors that truly elevates any meal.
The beauty of incorporating buttermilk isn’t just for flavor; it also contributes significantly to the bread’s incredible texture. Buttermilk reacts with baking soda (or in this case, the acid enhances the yeast activity and tenderizes the crumb), resulting in a loaf that is exceptionally light, moist, and tender. It’s a subtle yet powerful ingredient that sets this homemade sandwich bread apart from your typical white bread, giving it a richer depth and a finer crumb.
Unleashing Its Versatility: Beyond the Sandwich
I am absolutely thrilled to report that this loaf excels in countless applications. It forms the perfect foundation for a classic deli sandwich, holding up beautifully to various fillings without becoming soggy. It transforms a simple BLT into an extraordinary culinary delight, with its savory notes complementing the crispy bacon and fresh vegetables. But its utility doesn’t stop at lunch or dinner. It even elevated my morning avocado toast, adding an unexpected layer of herby goodness that made breakfast feel like a gourmet experience. The savory flavors are so harmoniously blended that every bite is a pleasure.
Beyond sandwiches and toast, this buttermilk ranch bread is an excellent companion to a warm bowl of soup, perfect for dipping and soaking up every last drop of flavorful broth. Imagine a chunky minestrone or a creamy tomato soup paired with a slice of this herb-infused goodness – pure comfort! It also makes a fantastic side dish for a casual dinner or even a sophisticated appetizer when sliced thin and served with a spread or dip. It’s like your typical homemade white bread, only infinitely better and bursting with character!
baking tip:How to help your dough rise faster in cooler weather
During the colder fall and winter months, your kitchen temperatures might drop, which can significantly slow down the rising process of your yeast dough. Don’t let chilly weather deter your baking plans! Here are a few clever suggestions to create a warmer environment and encourage your dough to rise efficiently:
- Oven Method: Briefly heat your oven to its absolute lowest setting for just a few minutes. Then, turn the oven off. Place your covered dough on the center rack and close the door. The residual warmth provides a perfect environment without over-heating.
- Microwave Method: Heat 1 cup of water in your microwave for about 2 minutes. Once the water is hot, carefully remove it and place your covered dough inside the microwave, closing the door. The steam and warmth from the water create a humid, warm micro-environment ideal for rising.
- Alternative Warm Spots: Be resourceful! I’ve successfully risen bread dough on top of a warm oven that’s in use for something else, near a running dryer machine (the warmth and vibration can help!), and even strategically placed on a chair over a heater vent. Just ensure the dough isn’t directly exposed to strong, dry heat, which could dry out the surface.
Crafting Your Perfect Loaf: Tips for Success
Making homemade bread can seem daunting at first, but with a few simple techniques and a good understanding of the process, you’ll be baking like a pro. This Buttermilk Ranch Sandwich Bread recipe is designed to be approachable, but paying attention to the details will ensure a consistently delicious result every time. For instance, the temperature of your liquids is crucial for activating the yeast properly, and kneading sufficiently develops the gluten structure, giving your bread its desired texture and chew. Don’t be afraid to get your hands a little messy; it’s all part of the fun!
Ingredients Matter: Freshness and Quality
The quality of your ingredients directly impacts the flavor of your final product. For this recipe, fresh buttermilk provides that essential tang and tenderness. When it comes to the herbs – parsley, chives, and dill – using fresh whenever possible will yield the most vibrant and aromatic ranch flavor. If fresh herbs aren’t readily available, dried herbs can be used, but remember to use about one-third of the amount, as their flavor is more concentrated. Minced fresh garlic also adds a pungent kick that’s integral to the ranch profile, so opt for fresh cloves over pre-minced jars for the best taste.
Kneading for the Ideal Texture
Kneading is a crucial step in bread making. It develops the gluten in the flour, which gives the bread its structure, elasticity, and chewy texture. Whether you’re using a stand mixer with a dough hook or kneading by hand, aim for a dough that is smooth, elastic, and no longer sticky to the touch. This process usually takes about 7-8 minutes with a mixer and a bit longer by hand. A well-kneaded dough will result in a lighter, airier loaf, while an under-kneaded dough can produce a dense, crumbly texture. Trust the process and enjoy the tactile experience!
The Art of Rising: Patience is Key
Yeast bread requires patience, and the rising (or proofing) stages are where that patience truly pays off. Allowing the dough to double in size during both its first and second rises ensures a light, airy texture and a good flavor development. Don’t rush these steps. As noted in our baking tips, finding a warm, draft-free spot is vital, especially during cooler months. A proper rise contributes to a beautiful dome and an irresistible crumb in your finished bread. This Buttermilk Ranch Sandwich Bread will thank you for giving it the time it needs to develop fully.

Buttermilk Ranch Sandwich Bread
Pin Recipe
Leave a Review
Ingredients
- 1 ⅓ cup buttermilk (330 ml)
- 3 tablespoons unsalted butter
- 4 cups all-purpose flour (480 grams)
- 1 ½ teaspoon salt
- 2 tablespoons granulated sugar
- 2 packets Red Star Platinum Yeast (4 ½ teaspoons)
- 2 cloves garlic minced
- 1 tablespoon chopped fresh dill (or 1 teaspoon dried)
- 1 tablespoon chopped fresh parsley (or 1 teaspoon dried)
- 1 tablespoon chopped fresh chives (or 1 teaspoon dried)
- 1 large egg + 1 teaspoon water , for egg wash
Instructions
-
Combine the buttermilk and butter in a small saucepan over low heat. Warm gently until the butter is completely melted. Remove from heat and allow the mixture to cool for a few minutes until it reaches a temperature between 120-130°F (49-54°C). This temperature is crucial for activating the yeast without killing it.
-
In the bowl of a stand mixer fitted with a dough hook (or a large mixing bowl if kneading by hand), add 2 ½ cups of the all-purpose flour, salt, granulated sugar, Red Star Platinum Yeast, minced garlic, and the fresh herbs (dill, parsley, and chives). Lightly whisk these dry ingredients together to ensure even distribution.
-
Pour the cooled buttermilk and butter mixture into the dry ingredients. Mix on low speed (or stir by hand) until a wet, shaggy dough forms. Gradually add the remaining flour, ¼ cup at a time, allowing each addition to incorporate before adding more. Continue until the dough begins to pull away cleanly from the sides of the bowl and no longer feels excessively sticky to the touch. The exact amount of flour may vary depending on humidity.
-
Increase the mixer speed to medium-low and continue kneading with the dough hook for 7-8 minutes, or knead vigorously by hand on a lightly floured surface for 10-12 minutes. The dough should become smooth, elastic, and spring back when gently poked.
-
Form the kneaded dough into a neat ball and place it in a lightly greased large bowl, turning once to coat. Cover the bowl tightly with plastic wrap or a clean kitchen towel. Allow the dough to rise in a warm, draft-free place until it has doubled in size, which typically takes about 1 hour.
-
Once risen, gently punch down the dough to release the air. Transfer it to a lightly floured surface and knead it a few times to bring it back into a cohesive ball. This step helps to redistribute the yeast and create an even texture.
-
Roll the dough out into a rough rectangular shape, approximately 9×15 inches. Starting from one of the 9-inch ends, tightly roll the dough into a log. Pinch the seam closed and tuck the ends underneath. Carefully place the formed dough log into a greased 9×5 inch loaf pan. Cover the pan again with plastic wrap and let it rise for a second time until doubled in size, which should take approximately 45-60 minutes.
-
While the bread is undergoing its second rise, preheat your oven to 375°F (190°C). In a small bowl, whisk together the large egg and 1 teaspoon of water to create an egg wash. Once the dough has doubled, gently brush the top of the loaf with the egg wash. Bake the bread for 30-35 minutes, or until the top is a deep golden brown and the loaf sounds hollow when tapped on the bottom.
-
Immediately remove the baked bread from the loaf pan and transfer it to a wire rack to cool completely. Allowing it to cool fully before slicing helps prevent a gummy texture. While this bread is undeniably best enjoyed on the day it’s baked, you can wrap it tightly in plastic wrap or foil and store it at room temperature for up to 3 days. For longer storage, slice and freeze for easy access to fresh-tasting bread whenever a craving strikes!
Disclosure: This recipe was developed in partnership with Red Star Yeast. Thank you for supporting partnerships with brands I love and believe in, which make Completely Delicious possible. All opinions are 100% my own, as always.
Keep in touch with Red Star Yeast on Twitter, Facebook, Pinterest and Google+. Be sure to also visit their website where you can find recipes, excellent bread baking tips, and more!
