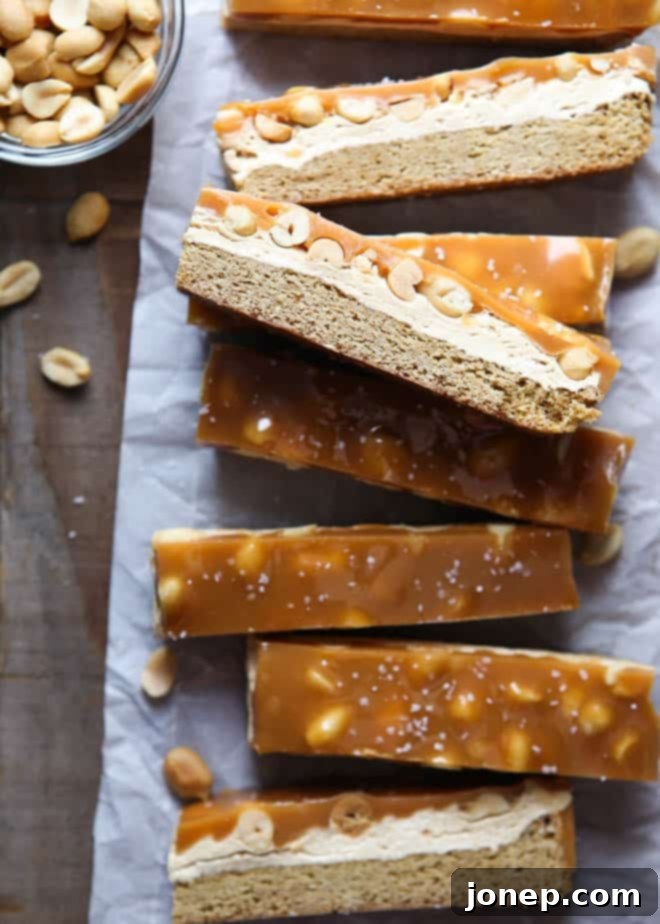
Irresistible Salted Caramel Peanut Bars: Your New Favorite Sweet & Salty Treat
There’s a special kind of magic that happens in the kitchen when you combine simple ingredients to create something truly extraordinary. For many, baking offers a comforting escape, a creative outlet, and a delicious reward. During life’s whirlwind moments, like a significant move, the solace found in a beloved recipe becomes even more profound. My family recently transitioned from the serene desert landscapes of Moab back to the bustling vibrancy of Salt Lake City. The move itself was a whirlwind – fast-paced, a little chaotic, and undeniably stressful. While we deeply miss the unique beauty of the desert, returning to city life has filled us with a quiet joy, a feeling of coming home as if we never left.
Such periods of change often bring out our coping mechanisms, and for me, stress-eating tends to be a prominent one. The last month has certainly put my waistline to the test, with comfort foods like juicy burgers, cheesy pizzas, indulgent ice cream, and decadent cookies making frequent appearances. It was amidst this flurry of packing boxes and settling in that I rediscovered a recipe that instantly became a go-to for soothing the soul: these incredible Salted Caramel Peanut Bars. They were one of the last creations I photographed in my studio before everything was packed away, and I have to confess, the irresistible combination of a chewy cookie bar meeting a classic candy bar truly hit every sweet and salty craving imaginable. I may have eaten more than my fair share, justifying each extra bite with the thought, “We can’t move into the house until when? Well, I guess I better eat another cookie bar!”
Discovering the Layers of Pure Indulgence
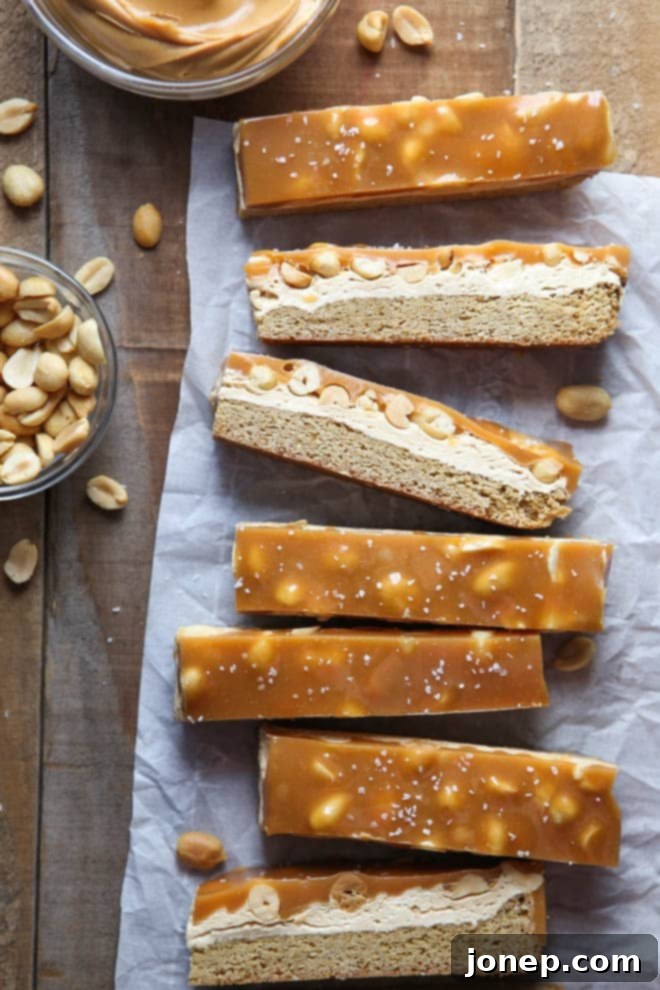
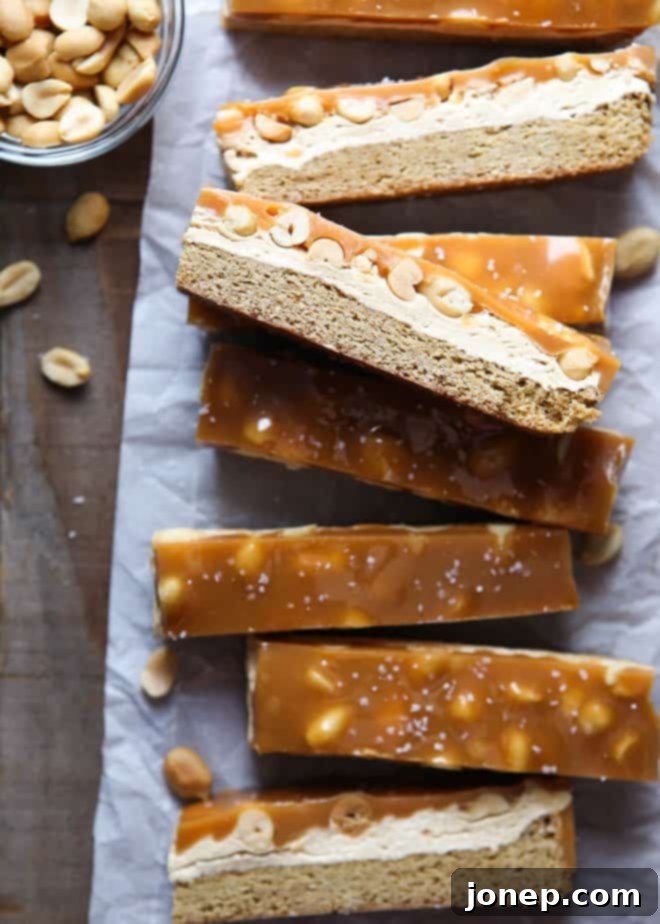
These aren’t just any ordinary dessert bars; they are a masterpiece of flavor and texture, meticulously crafted into three distinct, yet perfectly harmonious, layers. Each component plays a vital role in creating a truly unforgettable sweet and salty experience that will delight your taste buds and earn you rave reviews. Let’s delve into what makes these Salted Caramel Peanut Bars an absolute must-bake for anyone who appreciates a decadent treat that perfectly balances richness and crunch.
The Perfect Foundation: Chewy Brown Sugar Blondie Base
Every great structure needs a strong foundation, and these bars are built upon a wonderfully moist and chewy brown sugar blondie base. Unlike a traditional chocolate brownie, blondies offer a rich, buttery, and caramel-like flavor profile that perfectly complements the subsequent layers. Made with simple pantry staples like unsalted butter, light or dark brown sugar, and all-purpose flour, this base bakes up to a golden perfection, providing just the right amount of tenderness and structural integrity to hold the generous peanut butter filling and luscious caramel topping. The hint of vanilla extract and a balanced blend of baking powder and soda ensure a light yet substantial texture that’s neither too dense nor too crumbly, setting the stage for the explosion of flavors to come. This foundational layer provides the perfect chewiness that contrasts beautifully with the creamier elements above.
The Heart of the Bar: Creamy Peanut Butter Nougat Filling
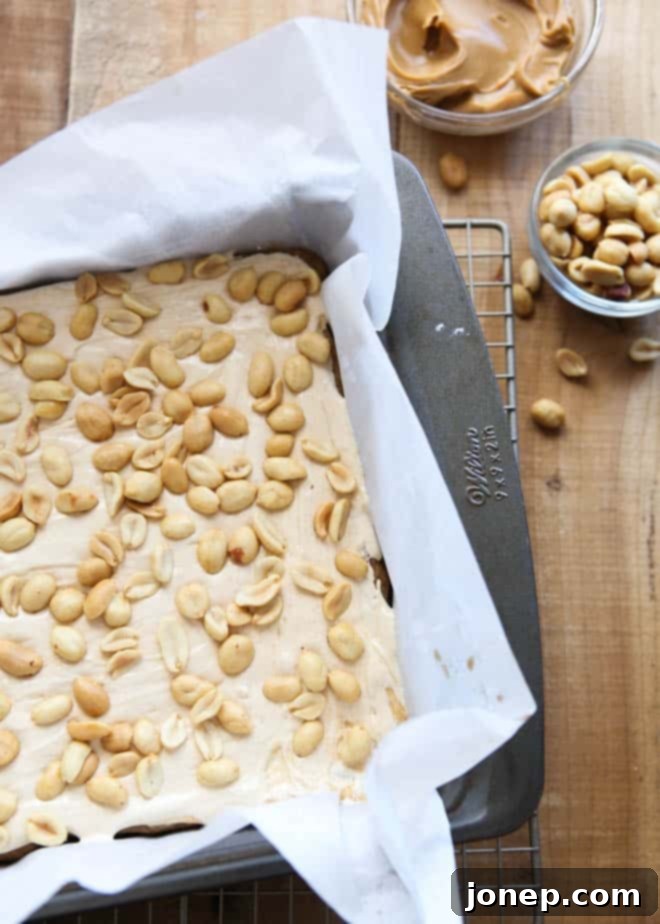
Next up is the incredible peanut butter filling, a layer that truly elevates these bars beyond the ordinary. This isn’t just a simple spread; it’s a luscious, nougat-like concoction made from fluffy marshmallow cream and rich, creamy peanut butter, gently sweetened with powdered sugar. The marshmallow cream gives it an airy, chewy texture reminiscent of a classic candy bar nougat, while the peanut butter infuses it with that undeniable nutty goodness we all adore. This creamy, dreamy layer is then generously studded with lightly salted peanuts, adding a satisfying crunch and an extra dimension of salty counterpoint to the sweetness. The combination is pure bliss – smooth, sweet, and intensely nutty, creating a textural contrast that keeps you coming back for more. It’s the kind of filling that makes these bars a true stand-out.
The Crown Jewel: Irresistible Salted Caramel Topping
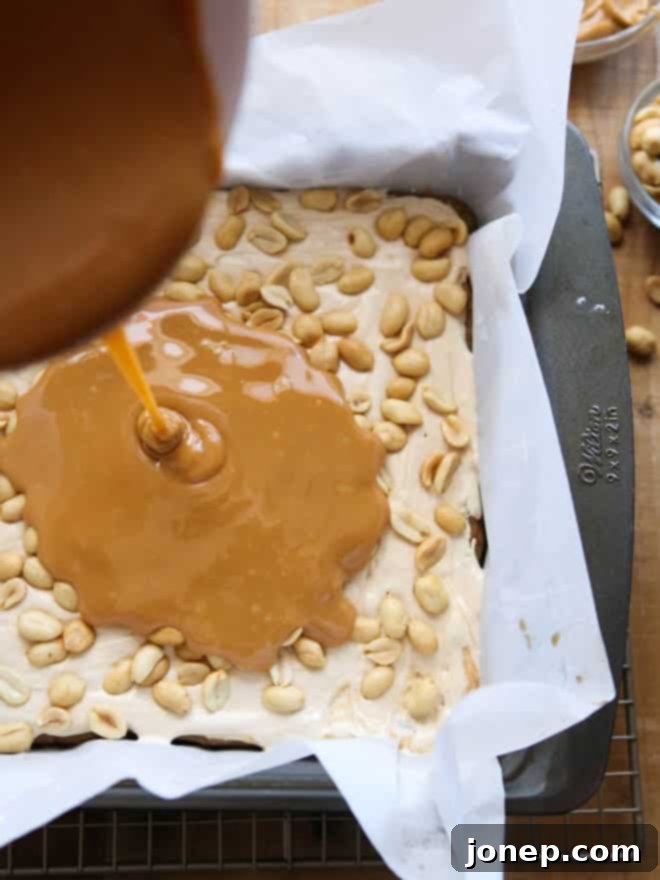
Crowning these delightful bars is a silky-smooth, homemade salted caramel topping. This layer brings everything together, providing a glistening, buttery finish that’s both visually appealing and incredibly delicious. Crafted from melted vanilla caramels and a touch of heavy whipping cream, this caramel is rich, gooey, and incredibly easy to spread. But the true secret ingredient here is the generous sprinkle of coarse or flaky sea salt. This isn’t merely for garnish; the sea salt plays a crucial role in balancing the sweetness of the caramel and peanut butter, enhancing all the complex flavors and creating that quintessential sweet-and-salty combination that so many crave. Each bite offers a harmonious blend of chewy blondie, creamy peanut butter, crunchy peanuts, and buttery caramel, all perfectly punctuated by a subtle, delightful hint of salt. It’s the grand finale that makes these bars utterly addictive.
Why These Salted Caramel Peanut Bars Are a Must-Make
Beyond their incredible taste, these three-layered wonders are a fun treat that everyone needs to make and enjoy. Whether you’re looking for a show-stopping dessert for a gathering, a comforting indulgence on a quiet evening, or a delightful gift for a friend, these bars fit the bill perfectly. They strike that coveted balance between a homemade cookie and a gourmet candy bar, offering the best of both worlds. The complexity of flavors, with their rich brown sugar, creamy peanut butter, crunchy nuts, and smooth salted caramel, belies the relative ease of preparation, making them an approachable project for bakers of all skill levels. Once you experience the magic of these bars, you’ll understand why I can’t resist baking up a batch again ASAP – this time, I might even manage to share some!
Pro Baking Tips: How to Achieve Perfectly Clean Slices for Brownies and Bars
Achieving beautifully neat and evenly cut slices of brownies, blondies, or any dessert bar can elevate your presentation significantly. While the delicious taste is paramount, a clean cut makes serving a joy and truly showcases your baking prowess. Follow these essential tips to ensure your Salted Caramel Peanut Bars, or any bar-style treat, look as professional as they taste:
- Prepare Your Pan Thoughtfully: Always line your baking pan with parchment paper or greased foil. Crucially, ensure there’s enough overhang on all four sides. This thoughtful preparation creates convenient “handles” that allow you to easily lift the entire cooled slab of bars out of the pan, preventing any damage to the edges or the base. It’s a simple step that makes a huge difference in handling your finished product, especially with gooey or sticky layers.
- Patience is Key: Cool Completely: This is perhaps the most important tip for any bar recipe. Resist the urge to cut into your bars while they are still warm or even slightly warm. Hot or even lukewarm bars are very soft and delicate; attempting to slice them prematurely will result in messy, crumbled edges and uneven portions. Allow your bars to cool completely to room temperature, or even chill them in the refrigerator for a short period (as recommended for these peanut bars) until all layers are firm. This crucial step ensures clean, defined cuts and prevents the filling and topping from squishing out.
- Transfer for Optimal Cutting: Once completely cooled and firm, use the parchment paper overhangs to gently lift the entire block of bars out of the baking pan. Carefully transfer them to a sturdy cutting board. Working on a flat, stable surface gives you better leverage and control for precise slicing compared to trying to cut them directly in the pan, which can be awkward and lead to uneven pressure.
- Master the Hot Knife Technique: For the cleanest, sharpest slices, employ a large, sharp chef’s knife. Before each cut, run the knife under very hot water for a few seconds to heat the metal. Immediately wipe the knife completely dry with a clean kitchen towel. The warm, dry blade will glide through the sticky caramel and peanut butter layers with minimal resistance, creating a smooth, unblemished cut. For truly pristine results, repeat this heating and drying process between every single slice. This prevents sticky residue from building up on the blade and tearing the next cut.
- Measure for Perfection (Optional but Recommended): For those who appreciate uniformity and a professional presentation, use a ruler or a measuring tape as a guide. This helps ensure that each bar is cut to an equal size and shape, perfect for impressive presentation when serving at parties, including them in a dessert platter, or creating gifts. Consistency in size also makes for fair portioning!

Salted Caramel Peanut Bars
Pin Recipe
Leave a Review
Ingredients
Blondie Base Ingredients:
- ½ cup unsalted butter , room temperature (113 grams)
- ⅔ cup light or dark brown sugar (140 grams)
- 1 large egg
- 1 teaspoon vanilla extract
- 1 ½ cups all-purpose flour (180 grams)
- ½ teaspoon baking powder
- ½ teaspoon baking soda
- ¼ teaspoon coarse salt
Peanut Butter Filling Ingredients:
- 7 oz jar marshmallow cream (200 grams)
- ½ cup creamy peanut butter (135 grams)
- ¼ cup powdered sugar (30 grams)
- ⅔ cup lightly salted peanuts (95 grams)
Caramel Topping Ingredients:
- 11 oz bag vanilla caramels , unwrapped (310 grams)
- ¼ cup heavy whipping cream (60 ml)
- Coarse salt or flaky sea salt , for sprinkling
Instructions
To make the blondie base:
-
Preheat oven to 350 degrees F (175°C). Line a 9-inch square pan with greased foil or parchment paper, ensuring there are generous overhanging sides. This will aid in easy removal of the finished bars.
-
In a large mixing bowl, using an electric mixer, cream together the room temperature unsalted butter and brown sugar on high speed for about 2 minutes, until the mixture is light, fluffy, and smooth. Stop to scrape down the sides of the bowl with a spatula, then add the large egg and vanilla extract, beating until just combined. Gradually add the all-purpose flour, baking powder, baking soda, and coarse salt to the wet ingredients. Mix on low speed until the dry ingredients are fully incorporated and a cohesive dough forms. Be careful not to overmix, as this can lead to tough blondies. Press this dough evenly into the bottom of the prepared pan.
-
Bake in the preheated oven for 15-18 minutes, or until the edges are golden brown and the center is set. A toothpick inserted into the center should come out with moist crumbs, not wet batter. Remove from the oven and let the blondie base cool completely on a wire rack before proceeding to the next step. This is crucial for the layers to set properly and prevent the top layers from melting into the base.
To prepare the peanut butter filling:
-
In a microwave-safe bowl, combine the marshmallow cream and creamy peanut butter. Microwave on high for 30-60 seconds, stirring halfway through, until the mixture is smooth and easily pourable. Immediately stir in the powdered sugar until fully incorporated and no lumps remain. Spread this warm, smooth peanut butter filling evenly over the top of the completely cooled blondie base, ensuring it reaches all edges. Then, generously sprinkle the lightly salted peanuts over the entire surface of the peanut butter layer, pressing them down gently to adhere.
To create the salted caramel topping:
-
For the caramel topping, you have two options. Method 1 (Stovetop): In a medium saucepan, over medium-low heat, melt the unwrapped vanilla caramels with the heavy whipping cream, stirring constantly until the mixture is completely smooth and uniform. Method 2 (Microwave): Alternatively, place both the unwrapped caramels and the heavy whipping cream in a large microwave-safe bowl. Microwave on high for 60 seconds, then stir well. Continue to microwave in 30-second intervals, stirring thoroughly after each, until the caramel is fully melted and smooth. Be careful not to scorch it.
-
Immediately pour the warm, smooth caramel over the peanut layer on top of the bars. If needed, use an offset spatula to gently spread the caramel evenly across the entire surface, working quickly as it cools and sets. For that perfect sweet and salty finish, generously sprinkle coarse salt or flaky sea salt over the still-wet caramel. Once all layers are assembled, chill the bars in the refrigerator for at least 30 minutes (or longer, up to 1-2 hours) until both the filling and the caramel topping are completely set and firm.
-
Once thoroughly chilled and firm, use the overhanging foil or parchment paper to carefully lift the entire slab of Salted Caramel Peanut Bars out of the pan. Transfer them to a clean cutting board. Using a sharp, hot knife (see baking tips above for best results), slice the bars into desired sizes, wiping the blade clean between each cut for the cleanest edges. For optimal texture and to prevent stickiness, these bars are best stored in an airtight container in the refrigerator. Allow them to come to room temperature for about 10-15 minutes before serving for the best flavor and chewiness.
Notes
Tools for Mastering This Recipe
To help you create these delightful Salted Caramel Peanut Bars with ease and precision, here are some recommended tools. Having the right equipment can make all the difference in your baking journey, ensuring a smoother process and a more successful outcome. From mixing to baking and finally slicing, these items are incredibly useful for this recipe and many other baking projects, making your time in the kitchen more enjoyable and efficient:
Whether you’re an experienced baker or just starting out, these Salted Caramel Peanut Bars are a fantastic recipe to add to your repertoire. They’re a testament to how simple ingredients, layered with thought and care, can produce a truly spectacular dessert that combines the best of cookies and candy. The blend of textures – the soft, chewy blondie, the creamy, airy peanut butter filling, and the smooth, rich caramel – combined with the perfect sweet and salty notes, makes every bite an absolute delight. Don’t hesitate to treat yourself, your family, or your friends to this wonderfully decadent creation. These bars are sure to become a cherished favorite in your household. Happy baking!
