Decadent Mint Chocolate Chip Ice Cream Cake: Your Ultimate Refreshing Summer Dessert
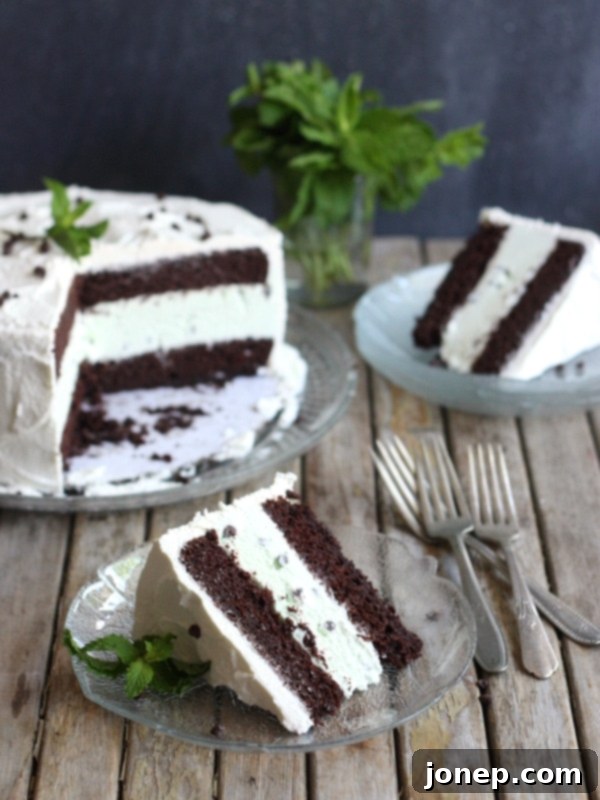
Imagine a dessert that combines the rich, deep flavor of chocolate cake with the cool, refreshing delight of mint chocolate chip ice cream, all enrobed in a cloud of perfectly stable whipped cream. This isn’t just a dream; it’s the Mint Chocolate Chip Ice Cream Cake – a truly beautiful and indulgent treat, especially perfect for those warm summer days. It’s a dessert that not only tastes incredible but also looks like a work of art, promising to be the star of any gathering.
Finding Calm in the Kitchen: A Baker’s Haven
Life, especially with a toddler, can be a whirlwind of unpredictable moments. I’ll admit, I’m not one of those effortlessly adaptable parents who can always “go with the flow.” I thrive on routine, and when my little one’s schedule gets disrupted, my stress levels tend to soar. Last week, for instance, an impromptu road trip to Yellowstone National Park with my mom and sisters, while beautiful and fun (you can see some snapshots here, here, and here), was also incredibly frazzling. Dealing with a tired toddler up four hours past bedtime or refusing to stay in his car seat turned a two-day adventure into a test of endurance.
It often makes me wonder, “What’s wrong with me?” Is it a first-timer mom thing, or just my inherent personality? Either way, I’m actively working on becoming a more easy-going mother. It’s a journey, and I’m hopeful that with practice, I’ll grow more comfortable and adaptable.
Funnily enough, this quest for calm finds an unexpected outlet in the kitchen. The very act of building, frosting, and meticulously photographing an ice cream cake before it melts – a task many might find stressful – is something I genuinely relish. This kind of stress, the creative, problem-solving kind, is a stress I embrace. Perhaps it’s because it doesn’t involve the fluctuating moods of a tiny human, or maybe it’s the sweet reward at the end: getting to savor a few delicious pieces of ice cream cake (because, really, you can’t just throw out a masterpiece, can you?).
My culinary journey has come a long way. A few years ago, the idea of executing a perfect layer cake with ice cream would have seemed daunting, if not impossible. But through practice and a willingness to learn, I’ve gained confidence. Just as I hope to become a more comfortable mom, I also believe my skills in the kitchen continue to improve with every new challenge.
The Anatomy of a Perfect Mint Chocolate Chip Ice Cream Cake
Let’s dive into the irresistible details of this Mint Chocolate Chip Ice Cream Cake. It features my absolute favorite chocolate cake recipe, renowned for its incredible moistness and rich flavor. This decadent chocolate cake serves as the perfect bookend for a generous layer of homemade ice cream, infused with fresh mint and dotted with an abundance of mini chocolate chips. The entire creation is then elegantly covered with a light, airy, and surprisingly sturdy whipped cream frosting. It’s an ideal combination – rich yet refreshing, making it an elegant and utterly satisfying treat for any summertime celebration or simply as a special indulgence.
Baking Tip: What is Stabilized Whipped Cream and Why It Matters for Ice Cream Cakes?
Whipped cream, while delicious, is fundamentally a foam-based solid. This makes its structure inherently delicate and temperamental. It’s prone to collapsing, weeping, or losing its beautiful shape if left at room temperature for too long, or if it undergoes the stress of freezing and thawing. This fragility is a particular challenge when working with ice cream cakes, which spend significant time in the freezer and are served in varying temperatures.
To ensure your desserts remain visually stunning and structurally sound, we use stabilized whipped cream. Stabilizing agents like gelatin (as in this recipe), cream cheese, or instant clear gel work by reinforcing the whipped cream’s delicate structure. This added step, though simple, is incredibly effective. It prevents the dreaded collapse, helps the cream hold its shape beautifully even after thawing, and ensures a clean, elegant presentation from the first slice to the last. For an ice cream cake that needs to withstand freezing temperatures and then gracefully thaw slightly for serving, stabilized whipped cream is not just a good idea – it’s essential for achieving professional-looking results and a delightful eating experience.
Crafting Your Masterpiece: Tips for Success
Creating an ice cream cake might sound intimidating, but with a few key tips, you’ll find it a thoroughly enjoyable and rewarding process. The most crucial aspect is managing temperature. Work quickly when assembling the cake to prevent the ice cream from melting, and ensure both your chocolate cake layers and homemade mint ice cream are perfectly chilled or frozen before assembly. Using a springform pan lined with parchment paper is a game-changer for easy removal and a clean finish. Don’t rush the chilling times; allowing ample time for each layer to set firm in the freezer is vital for a stable, beautiful cake. And remember our secret weapon: stabilized whipped cream, which ensures your frosting stays pristine from the moment it’s applied until it’s time to serve. Embrace the process, and soon you’ll be slicing into your own stunning Mint Chocolate Chip Ice Cream Cake!

Mint Chocolate Chip Ice Cream Cake
Pin Recipe
Leave a Review
Ingredients
For the cake:
- 1 ¼ cup hot coffee (295 ml)
- 1 cup unsweetened cocoa powder (110 grams)
- 2 ½ cup all-purpose flour (300 grams)
- 1 ¼ teaspoon salt
- 2 ½ teaspoon baking soda
- 2 cups granulated sugar (400 grams)
- 3 large eggs
- 1 ¼ cups sour cream (282 grams)
- 1 cup + 2 tablespoons vegetable oil (267 ml)
For the ice cream:
- 2 cups heavy cream (475 ml)
- 1 cup whole milk (235 ml)
- ¾ cup granulated sugar (150 grams)
- Pinch of salt
- 1 bunch of fresh mint
- Green food coloring , optional
- 1 cup mini chocolate chips or chopped chocolate (170 grams)
For the whipped cream topping:
- 2 teaspoons unflavored gelatin
- 2 ½ tablespoons water
- 2 cups heavy whipping cream (475 ml)
- ½ cup powdered sugar , sifted (57 grams)
- 1 teaspoon vanilla extract
Instructions
To make the cake:
-
Preheat oven to 350°F (175°C). Lightly butter and flour two 9-inch cake pans, then line the bottoms with parchment paper. This ensures your cakes release easily.
-
In a small bowl, whisk together the hot coffee and unsweetened cocoa powder until a smooth, lump-free mixture forms. In a separate, larger bowl, sift together the all-purpose flour, salt, and baking soda to ensure proper aeration.
-
In a third large mixing bowl, beat the granulated sugar and large eggs together until the mixture is smooth, pale yellow, and slightly thickened. Gently stir in the sour cream, followed by the vegetable oil, mixing until just combined. Gradually add the sifted flour mixture in two additions, alternating with the cocoa mixture, mixing after each addition until the batter is smooth. Be careful not to overmix.
-
Divide the prepared cake batter evenly between your two 9-inch cake pans. Bake in the preheated oven for approximately 25-35 minutes, or until a toothpick inserted into the center of the cakes comes out clean. Let the cakes cool in their pans for 10 minutes before carefully removing them and placing them on a wire rack to cool completely. For best results and easier handling, chill the cooled cake layers in the fridge for at least 2 hours, or ideally, overnight.
To make the ice cream:
-
In a large saucepan, combine the heavy cream, whole milk, granulated sugar, and a pinch of salt. Warm the mixture over medium-low heat, stirring constantly until the sugar completely dissolves. Once the mixture is steaming and small bubbles begin to form around the edges of the pan, remove it from the heat. Add the fresh mint leaves, ensuring they are fully submerged. Cover the saucepan and let the mint steep at room temperature for 1 hour to infuse its fresh flavor.
-
After steeping, remove and discard the fresh mint leaves. Pour the infused cream mixture into a large bowl. If desired, stir in a few drops of green food coloring until your preferred shade of mint green is achieved. Cover the bowl and chill the mixture completely in the fridge for several hours, or preferably overnight, before churning. This chilling step is crucial for perfectly churned ice cream.
To assemble the ice cream cake:
-
Churn the chilled mint ice cream base in an ice cream machine according to the manufacturer’s instructions. During the last 5 minutes of churning, add the mini chocolate chips or chopped chocolate, allowing them to fully incorporate. The ice cream should be soft-serve consistency.
-
While the ice cream is churning, prepare your springform pan for assembly. Place one layer of the chilled chocolate cake into a 9-inch springform pan. Line the inside edges of the pan with a strip of parchment paper or wax paper, extending above the cake layer. This will help with easy removal and provide a clean edge for your ice cream layer.
-
Once the ice cream has finished churning, immediately spread it evenly over the bottom layer of chocolate cake in the springform pan. Gently place the second layer of chocolate cake on top of the ice cream. Cover the springform pan tightly with plastic wrap and immediately transfer it to the freezer. Allow the cake to harden completely for several hours, or preferably overnight, before proceeding.
To make the whipped cream topping:
-
In a small saucepan, sprinkle the unflavored gelatin evenly over the cold water. Let it sit undisturbed for about 5 minutes until the gelatin has thickened and “bloomed.” Then, warm the mixture over very low heat, stirring constantly, until the gelatin completely dissolves and the mixture is clear. Remove from heat and allow it to cool to room temperature, but ensure it does not set or solidify.
-
In a large, chilled mixing bowl, whip the heavy whipping cream and sifted powdered sugar until it begins to thicken and soft peaks form. With the mixer running on low speed, slowly and steadily pour in the cooled, dissolved gelatin mixture. Increase the mixer speed to high and continue whipping until stiff peaks form and the whipped cream is firm and stable. Finally, mix in the vanilla extract.
-
Once the ice cream cake is completely frozen solid, remove it from the freezer. Carefully unlatch the sides of the springform pan and gently peel away the parchment or wax paper lining. Using an offset spatula, generously ice the entire cake with the stabilized whipped cream topping. Return the finished Mint Chocolate Chip Ice Cream Cake to the freezer immediately and store it there until you are ready to serve. For the best slicing, allow the cake to sit at room temperature for 10-15 minutes before cutting.
Notes
