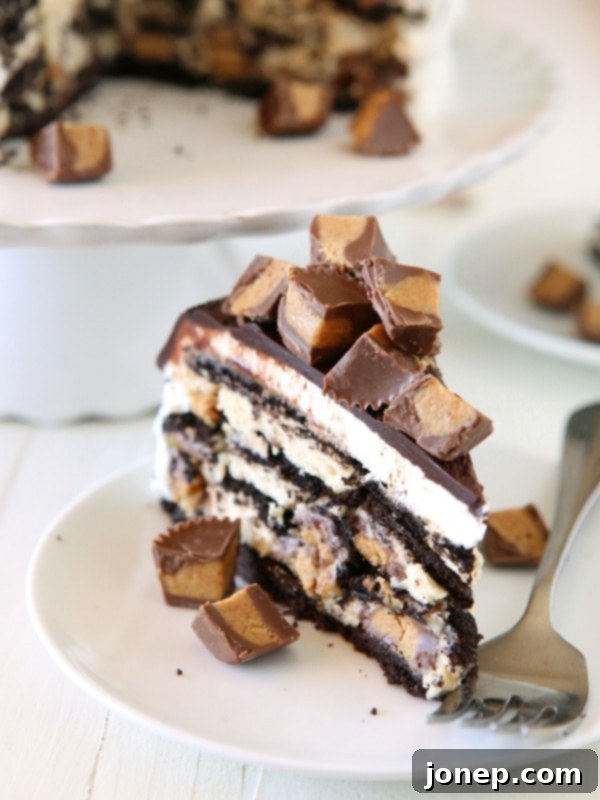
The Ultimate No-Bake Reese’s Chocolate Peanut Butter Icebox Cake: A Dream Dessert Recipe
Imagine layers of rich chocolate wafers, a velvety smooth peanut butter-cream cheese filling, and generous chunks of your favorite Reese’s Peanut Butter Cups, all coming together in a simply stunning, no-bake icebox cake. This dessert isn’t just a treat for the taste buds; it’s an effortless indulgence that brings pure joy with every bite.
No-bake icebox cakes have quickly become a staple in my dessert repertoire, and for good reason. They are incredibly fun to make, surprisingly easy to assemble, and best of all, they require absolutely no baking! This makes them the perfect dessert for warm weather, busy schedules, or when you simply want a show-stopping treat without turning on the oven.
The true magic of an icebox cake lies in its transformation. While the recipe suggests a chill time, the real reward comes with patience. Allowing the cake to rest for a full 24 hours, or even longer, lets all the components meld together, creating an unparalleled depth of flavor and a wonderfully soft, cake-like texture from the chocolate wafers. Trust me, the wait is worth it.
Why Icebox Cakes Are a Culinary Canvas
One of the most captivating aspects of icebox cakes is their incredible versatility. They serve as a blank canvas for almost any flavor and ingredient combination you can envision. From fruity and zesty to rich and decadent, the possibilities are endless. As a devoted fan of Reese’s Peanut Butter Cups, my mind naturally gravitated towards a chocolate and peanut butter masterpiece. I’d been dreaming of this specific flavor profile for months, and last week, that dream finally became a delicious reality.
This particular Reese’s Chocolate Peanut Butter Icebox Cake exemplifies how time enhances flavor. While delightful on the first day, it was truly exceptional on the second and third. Each passing hour in the refrigerator allowed the crisp chocolate cookies to soften beautifully, absorbing the creamy peanut butter filling. The filling itself firmed up, embracing every crack and crevice, while the flavors intensified to an astonishing degree. Every single bite was a moment of pure bliss, eliciting “oohs” and “aahs” with its perfect balance of sweet and salty, rich and smooth.
For anyone who adores the classic combination of chocolate and peanut butter, this cake is nothing short of a dream come true. It’s a celebration of these two beloved flavors, presented in an easy-to-make, impressive dessert that will undoubtedly become a favorite.
Baking Tips for Your Best Icebox Cake
- Quality Ingredients Matter: Since there’s no baking involved, the quality of your ingredients shines through. Use good quality chocolate wafers and a creamy peanut butter that you love. Fresh cream cheese and heavy whipping cream will ensure a rich and stable filling.
- Embrace the Chill Time: As mentioned, while you can technically serve after a shorter chill, plan for at least 12-24 hours. The longer it chills, the softer the wafers become, and the more the flavors meld, creating that signature icebox cake texture. This is when the cake truly transforms into something magical.
- Sifting Powdered Sugar: Don’t skip sifting the powdered sugar for the peanut butter filling and whipped cream. This prevents lumps and ensures a silky smooth texture.
- Mixing Your Cream Cheese Filling: Ensure your cream cheese is at room temperature for easy blending and a lump-free, smooth filling. Over-mixing the whipped cream can make it grainy, so stop once soft to medium peaks form.
- Pan Choice Versatility: The recipe suggests an 8-inch cake pan, but a 9×5-inch loaf pan or a 9-inch springform pan works wonderfully too. The height and number of layers might vary, but the deliciousness remains constant. Just make sure to line it with plastic wrap for easy removal!
- Presentation is Key: Inverting the cake onto a stand or plate before topping with whipped cream and chocolate glaze makes for an elegant presentation. Don’t forget those extra chopped Reese’s Peanut Butter Cups for garnish!
Project Peanut Butter: Sweet Treats and Saving Lives
As I savor each decadent slice of this chocolate and peanut butter dream, it’s a humbling reminder of the simple luxury of readily available food. While many of us are fortunate enough to enjoy such treats regularly, millions around the world, particularly children, face the harrowing reality of food insecurity. Severe Acute Malnutrition (SAM) remains the leading cause of death for children under five globally, claiming approximately 3 million young lives each year. It’s a stark, sobering statistic, but it’s also a challenge we can address.
There is immense hope, thanks to organizations like Project Peanut Butter. This visionary nonprofit is dedicated to eradicating child malnutrition in impoverished African countries, including Malawi, Sierra Leone, and Ghana. Their groundbreaking solution? The development and distribution of a peanut-based Ready-to-Use Therapeutic Food (RUTF).
These RUTFs are a marvel of nutritional science, meticulously packed with essential vitamins and nutrients. They are so effective that they can cure up to 95% of children suffering from SAM in just a few weeks. It’s a simple yet incredibly powerful intervention that provides a lifeline to those who need it most, giving children a chance at a healthy, vibrant future.
The Hershey Company plays a crucial role as a proud partner of Project Peanut Butter, specifically instrumental in bringing the nonprofit’s life-saving work to Ghana. Hershey has a long-standing commitment to supporting education and community development initiatives in rural Ghana, a region renowned for its cocoa production. The establishment of an RUTF factory in Ghana, in collaboration with Project Peanut Butter, is a testament to Hershey’s dedication. It’s a tangible way they’re helping to uplift the very communities that contribute to the chocolate delights we all cherish, like that iconic Hershey’s Milk Chocolate Bar and, of course, the beloved Reese’s Peanut Butter Cup.
Knowing that the joy these treats bring is connected to such a profound and impactful cause makes indulging in this incredible icebox cake even more meaningful. It’s a reminder that even our simplest pleasures can be linked to a greater good.
To learn more about the inspiring work of Project Peanut Butter and discover how you can contribute to their mission, please visit ProjectPeanutButter.org. Every effort, big or small, helps create a world where no child suffers from malnutrition.

Reese’s Peanut Butter Icebox Cake
Pin Recipe
Leave a Review
Ingredients
For the cake:
- 8 ounces cream cheese , at room temperature (1 package, 226 grams)
- ½ cup creamy peanut butter (135 grams)
- 1 cup powdered sugar , sifted (227 grams)
- 1 teaspoon vanilla extract
- 1 cup heavy whipping cream (250 ml)
- Approximately 40 chocolate wafer cookies
- 2 cups Reese’s Peanut Butter Cups , cut into fourths
For the whipped cream:
- 1 ½ cup heavy whipping cream (375 ml)
- ⅓ cup powdered sugar (40 grams)
- 1 teaspoon vanilla extract
For the chocolate glaze:
- ¾ cup bittersweet or semisweet chocolate , chopped (4 oz, 113 grams)
- 2 tablespoons milk or cream
- 2 tablespoons unsalted butter
Instructions
-
In the bowl of a stand mixer fitted with a paddle attachment, or in a large bowl with a hand-held mixer, beat the cream cheese, peanut butter, powdered sugar and vanilla on medium high speed until smooth. Beat on high for an additional 1-2 minutes until light and fluffy.
-
Either transfer mixture to a separate bowl and clean mixer bowl or with a second mixer bowl, beat the heavy cream to soft peaks. Use a spatula to fold cream cheese mixture into whipped cream in 2 additions, mixing only until smooth.
-
To assemble the icebox cake, line an 8-inch cake pan (see Note) with plastic wrap. Place a layer of chocolate wafer cookies on the bottom. Spread 1/3 of the peanut butter cream cheese mixture on top. Scatter 1 cup of chopped peanut butter cups on top (about 10 whole cups). Top with another layer of chocolate wafer cookies. Continue layering until there are 3 layers of cookies, filling, and peanut butter cups. Cover with plastic wrap and place in fridge overnight.
-
The next day, prepare the whipped cream. Beat the heavy cream to soft peaks. Add the powdered sugar and vanilla and beat to medium peaks, just another minute more.
-
Invert the icebox cake onto a plate or cake stand. Remove pan and plastic wrap. Cover cake with whipped cream and chill while you prepare the chocolate glaze.
-
Put the chopped chocolate, milk or cream and butter in a large bowl set over a pot of simmering water. Let melt, stirring frequently until just barely smooth. Do not over cook. Remove from heat and let cool to room temperature.
-
Remove cake from fridge and pour chocolate glaze over the top. Top with remaining chopped Reese’s Peanut Butter Cups. Chill until ready to serve. Icebox cake with keep in the fridge for several days.
Notes
Disclosure: This blog post is sponsored by The Hershey Company as part of my participation in their Food Ambassador program. All thoughts and opinions are 100% my own, as always. Thank you for supporting partnerships with brands I believe in, which make it easier for me to bring you new creative content.
