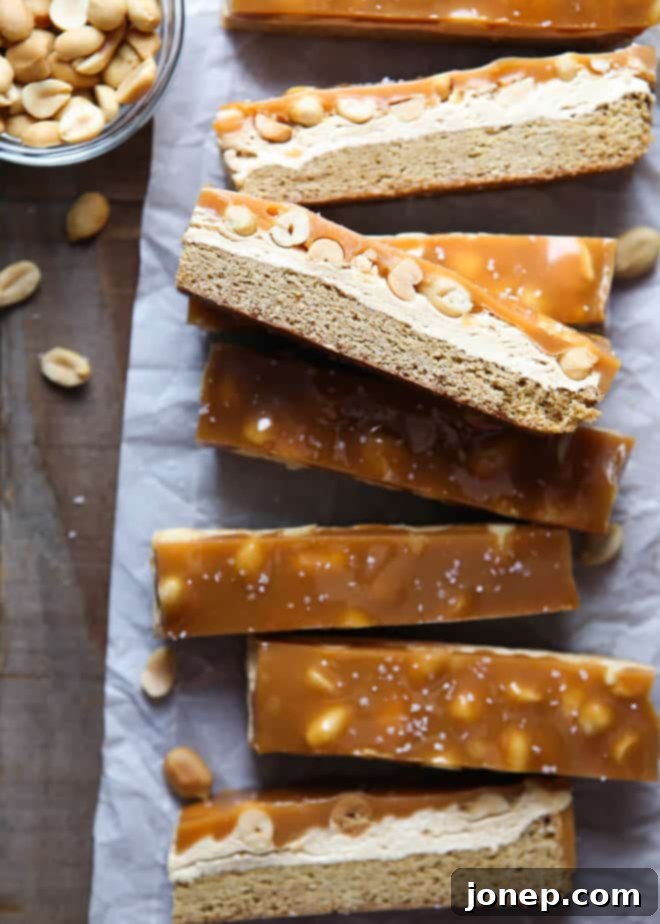
Decadent Salted Caramel Peanut Bars: Your Ultimate Sweet & Salty Treat Recipe
Life often throws curveballs, and for my family, a recent move from the serene landscapes of Moab back to the bustling vibrancy of Salt Lake City was one such event. While we fondly recall our desert adventures, the joy of returning home is undeniable, almost as if time hadn’t passed. However, transitions, no matter how welcome, can bring a fair share of stress. I’ll admit, my coping mechanism often involves indulging in comforting foods – think juicy burgers, cheesy pizzas, delightful ice cream, and, of course, an abundance of sweet treats. These Salted Caramel Peanut Bars, among the last recipes I perfected before my studio packed up, became my ultimate solace. There’s just something about this decadent cookie-meets-candy bar creation that perfectly hits the spot, making it all too easy to reach for “just one more” during those hectic moving days. Now that the moving boxes are mostly unpacked and life is slowly regaining its rhythm, I’m trying to rein in the endless parade of sweets. But I can tell you, resisting the urge to whip up another batch of these delightful bars is proving to be quite a challenge. This time, I promise to share!
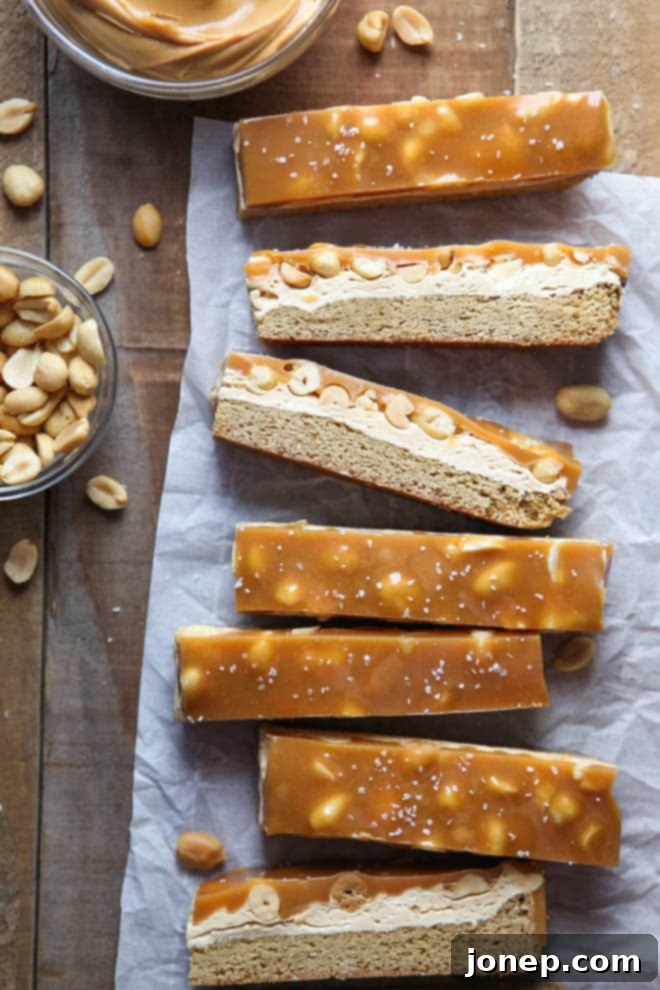
Why You’ll Love These Salted Caramel Peanut Bars
These aren’t just any ordinary dessert bars; they are an experience. Imagine the comforting chewiness of a perfect cookie blended with the rich, complex flavors and varied textures of your favorite candy bar. That’s exactly what these Salted Caramel Peanut Bars deliver. Each bite offers a harmonious symphony of sweet and salty, soft and crunchy, making them utterly irresistible. Whether you’re a fan of classic blondies, obsessed with peanut butter, or can’t get enough of gooey caramel, this recipe brings all those beloved elements together in one show-stopping treat.
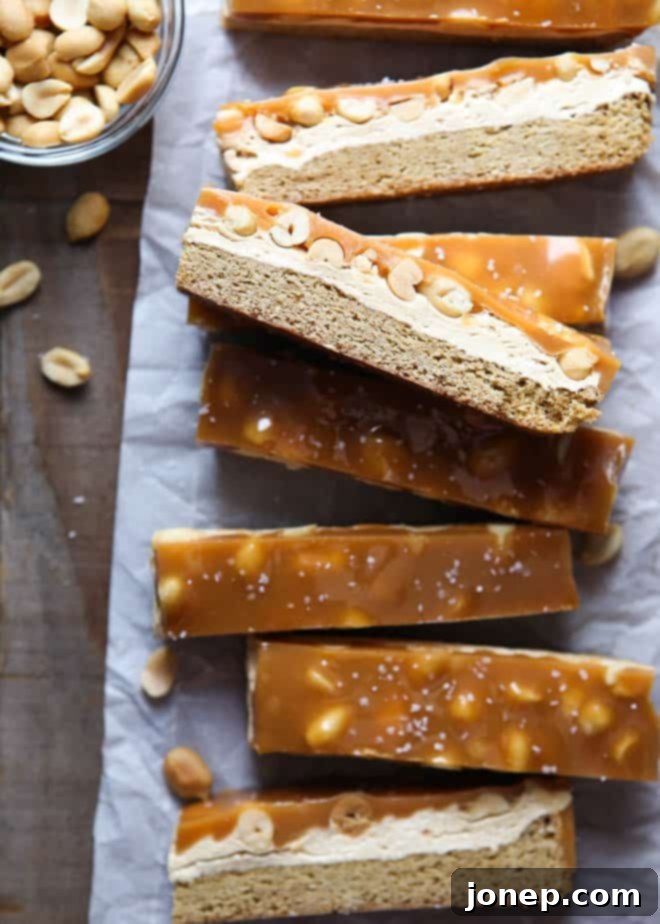
The beauty of these bars lies in their perfectly balanced layers. We start with a foundational blondie base that’s moist and buttery, then add a unique, nougat-like peanut butter filling studded with crunchy peanuts, and crown it all with a glistening layer of smooth, salted caramel. It’s a treat that looks impressive but is surprisingly straightforward to make, promising to be a huge hit at any gathering or simply as a well-deserved indulgence.
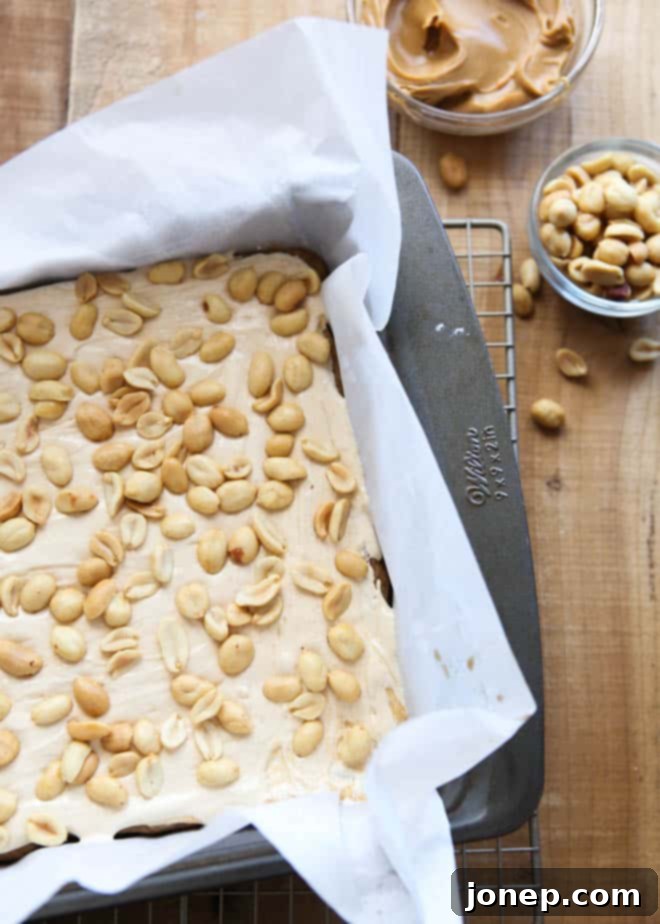
The Layers: A Symphony of Flavor and Texture
These incredible bars are composed of three distinct yet complementary layers, each contributing to their unforgettable taste and texture:
1. The Chewy Brown Sugar Blondie Base
The foundation of these bars is a classic brown sugar blondie. Unlike a traditional cookie, the blondie base is designed to be slightly dense yet incredibly moist and chewy, providing the perfect counterpoint to the softer layers above. The brown sugar not only imparts a beautiful golden hue but also a deep, molasses-rich caramel flavor that enhances the entire dessert. This layer bakes up just enough to hold its shape, creating a sturdy yet tender foundation for the indulgent fillings that follow. It’s simple, comforting, and utterly delicious on its own, but truly shines when paired with the other components.
2. The Dreamy Peanut Butter Nougat Filling
Prepare to be amazed by the peanut butter filling, which leans into a delightful nougat-like consistency. This unique texture is achieved by combining marshmallow fluff with creamy peanut butter and a touch of powdered sugar. The marshmallow fluff provides that signature light, airy, yet chewy quality, while the peanut butter infuses it with its rich, nutty flavor. Adding a generous scattering of lightly salted peanuts into this layer is crucial. They introduce a fantastic crunch and an extra layer of salty goodness, cutting through the sweetness and elevating the overall flavor profile. This filling is truly what transforms these bars from a simple dessert into a candy bar masterpiece.
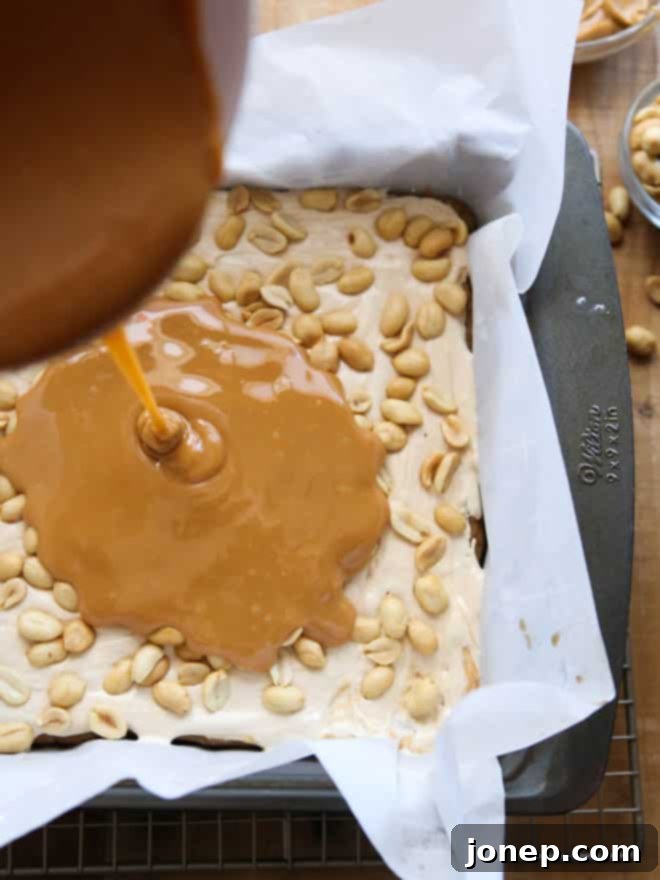
3. The Irresistible Salted Caramel Topping
Crowning these magnificent bars is a luscious layer of salted caramel. We achieve this by melting vanilla caramels with heavy whipping cream, resulting in a smooth, pourable, and incredibly flavorful topping. The quality of your caramels here makes a difference, but even store-bought soft caramels can be transformed into a silky, sweet blanket. What truly elevates this layer is the generous sprinkle of coarse or flaky sea salt over the top. The salt isn’t just an afterthought; it’s a vital component that balances the richness of the caramel and the sweetness of the other layers, creating that addictive sweet-and-salty contrast that makes these bars so memorable.
baking tip:How to Cut Brownies and Bars Cleanly
Achieving perfectly neat, professional-looking slices of brownies and bars can seem challenging, but with a few simple tricks, you’ll be cutting clean edges every time. Here’s how:
- Prepare Your Pan Properly: Always line your baking pan with parchment paper, leaving enough overhang on the sides to create “handles.” This makes it incredibly easy to lift the entire batch of bars out of the pan once they’ve cooled, preventing any crumbling or sticking.
- Cool Completely (and Patiently): This is perhaps the most crucial step. Bars that are still warm from the oven are very soft and will inevitably lead to messy, uneven slices. Allow them to cool completely to room temperature, or even chill them in the refrigerator for 30 minutes to an hour (especially helpful for bars with gooey toppings like these), which allows all the layers to fully set up.
- Transfer to a Cutting Board: Once cooled, use the parchment paper overhang to gently lift the entire slab of bars out of the pan and transfer them to a clean cutting board. This gives you a flat, stable surface for precise cutting.
- Use a Hot, Clean Knife: For the cleanest cuts, use a large, sharp chef’s knife. Run it under hot water for a few seconds to heat the blade, then wipe it completely dry. The warm blade will glide through the sticky caramel and peanut butter layers without dragging. For ultra-clean slices, wipe the blade clean and re-heat it between each cut.
- (Optional) Measure for Perfection: If you’re aiming for uniformly sized bars, use a ruler as a guide to mark out your slices before cutting. This is especially useful for serving at parties or for gift-giving.
Tips for Success & Variations
To ensure your Salted Caramel Peanut Bars turn out perfectly every time, here are a few additional tips:
- Room Temperature Butter and Egg: For the blondie base, make sure your butter and egg are at room temperature. This helps them cream together smoothly with the brown sugar, resulting in a lighter, more consistent batter.
- Don’t Overbake the Blondies: The blondie base should be golden at the edges and set in the center, but still slightly soft. Overbaking can lead to a dry, crumbly base, which we want to avoid.
- Microwave Method for Caramel: If you’re nervous about making caramel on the stovetop, the microwave method provided in the recipe is a fantastic alternative for melting the caramels with cream quickly and smoothly. Just be sure to stir well between intervals.
- Chill Time is Essential: Do not skip the chilling step! It’s crucial for setting the peanut butter filling and caramel topping, making the bars much easier to slice neatly.
Creative Variations to Try:
- Add Chocolate: Drizzle melted dark or milk chocolate over the set caramel layer for an extra layer of decadence.
- Nutty Swaps: While peanuts are traditional, feel free to experiment with other nuts like chopped pecans, walnuts, or cashews in the filling for a different flavor profile.
- Spice It Up: A pinch of cinnamon or nutmeg in the blondie batter can add a subtle warmth.
- Dark Brown Sugar: Using dark brown sugar for the blondie base will deepen the molasses flavor even further.
Frequently Asked Questions About Salted Caramel Peanut Bars
How long do these bars last, and how should I store them?
These bars are best stored in an airtight container in the refrigerator. They will stay fresh for up to 5-7 days. The caramel and peanut butter layers remain perfectly gooey when chilled.
Can I freeze Salted Caramel Peanut Bars?
Yes, absolutely! These bars freeze beautifully. Once completely cooled and sliced, place them in a single layer on a baking sheet and freeze until firm. Then, transfer them to an airtight freezer-safe container or bag, separating layers with parchment paper. They can be frozen for up to 2-3 months. Thaw in the refrigerator or at room temperature before serving.
What kind of peanut butter should I use?
Creamy peanut butter is recommended for the filling to achieve that smooth, nougat-like texture. Avoid natural peanut butter that separates, as it can make the filling too oily or runny. A standard processed creamy peanut butter works best.
Can I make my own caramel from scratch instead of using vanilla caramels?
Yes, if you’re an experienced caramel maker, you can certainly substitute homemade salted caramel for the melted vanilla caramels. Just be sure it has a good pourable consistency when warm. This recipe, however, is designed for convenience with store-bought caramels.
My caramel hardened too quickly. What went wrong?
Caramel can seize if it cools down too much or if there’s not enough cream. Ensure you’re melting the caramels with the specified amount of heavy cream. If it hardens, you can gently reheat it over low heat on the stovetop or in the microwave in short bursts, stirring frequently, until it returns to a pourable consistency. Work quickly when spreading it over the bars.

Salted Caramel Peanut Bars
Pin Recipe
Leave a Review
Ingredients
Blondie base:
- ½ cup unsalted butter , room temperature (113 grams)
- ⅔ cup light or dark brown sugar (140 grams)
- 1 large egg
- 1 teaspoon vanilla extract
- 1 ½ cups all-purpose flour (180 grams)
- ½ teaspoon baking powder
- ½ teaspoon baking soda
- ¼ teaspoon coarse salt
Peanut butter filling:
- 7 oz jar marshmallow cream (200 grams)
- ½ cup creamy peanut butter (135 grams)
- ¼ cup powdered sugar (30 grams)
- ⅔ cup lightly salted peanuts (95 grams)
Caramel topping:
- 11 oz bag vanilla caramels , unwrapped (310 grams)
- ¼ cup heavy whipping cream (60 ml)
- Coarse salt or flaky sea salt , for sprinkling
Instructions
To make the blondie base:
-
Preheat oven to 350 degrees F (175°C). Line a 9-inch square pan with greased foil or parchment paper, ensuring there are overhanging sides for easy removal later.
-
With an electric mixer, beat the room temperature unsalted butter and brown sugar on high speed until the mixture is light, smooth, and creamy, which should take approximately 2 minutes. Scrape down the sides of the bowl to ensure everything is incorporated. Add the large egg and vanilla extract, beating until just combined. Gradually add the all-purpose flour, baking powder, baking soda, and coarse salt to the wet ingredients, mixing on low speed until the dry ingredients are just incorporated and no streaks of flour remain. Be careful not to overmix. Press the blondie batter evenly into the bottom of the prepared pan.
-
Bake in the preheated oven for 15-18 minutes, or until the edges are lightly golden brown and the center is set (a toothpick inserted into the center should come out with moist crumbs, not wet batter). Do not overbake. Let the blondie base cool completely in the pan on a wire rack.
To make the filling:
-
In a microwave-safe bowl, combine the marshmallow cream and creamy peanut butter. Microwave on high for 30-60 seconds, stirring halfway through, until the mixture is smooth and pourable. Stir in the powdered sugar until fully incorporated and smooth. Immediately spread this peanut butter mixture evenly on top of the completely cooled blondie base. Evenly sprinkle the lightly salted peanuts over the top of the filling, gently pressing them in slightly.
To make the caramel topping:
-
In a medium saucepan, melt the unwrapped vanilla caramels with the heavy whipping cream over medium-low heat, stirring constantly until the caramel is completely smooth and lump-free. Alternatively, place both caramels and heavy cream in a microwave-safe bowl and microwave on high for 60 seconds. Stir well. Continue to microwave in 30-second intervals, stirring thoroughly after each, until the caramel mixture is smooth and glossy.
-
Immediately pour the warm caramel topping evenly over the peanut butter layer on the bars, using a spatula if needed to spread it to the edges. Sprinkle generously with coarse salt or flaky sea salt. Chill the bars in the refrigerator for about 30 minutes to 1 hour, or until both the filling and the caramel topping are completely set.
-
Once set, use the overhanging foil or parchment paper to lift the entire block of bars out of the pan. Transfer to a cutting board and slice into desired bar sizes using a sharp, hot knife (refer to our detailed baking tip above for clean cuts). These delectable bars are best stored in an airtight container in the fridge to maintain their texture and freshness.
Notes
Tools for this recipe
Having the right tools can make all the difference in your baking experience. Here are some essentials that will help you achieve perfect Salted Caramel Peanut Bars:
These Salted Caramel Peanut Bars are more than just a dessert; they are a delightful combination of textures and flavors that will satisfy any sweet and salty craving. They’re perfect for celebrations, casual gatherings, or simply treating yourself to something truly special. So go ahead, whip up a batch, and enjoy the pure deliciousness!
