Homemade Snickers Bars: The Ultimate Recipe for a Sweet Indulgence
There are moments in life that call for a truly special celebration. For me, this past week marked a significant milestone: I finally achieved my pre-pregnancy weight goal! After two years of dedication and perseverance, reaching this personal benchmark felt like a tremendous accomplishment. And what better way to honor such a sweet victory than with an equally sweet, incredibly decadent treat? Forget the diet for a day; this was an occasion demanding something extraordinary. That’s why I decided it was high time to tackle a recipe I’d been eyeing for months: homemade Snickers bars.
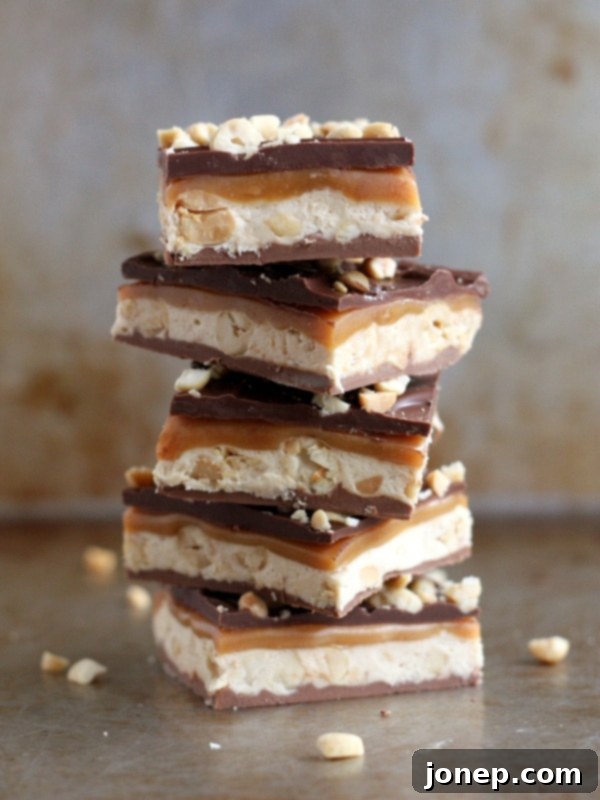
These aren’t just any candy bars; they’re an homage to a beloved classic, reimagined in your own kitchen. I first stumbled upon this particular recipe for homemade Snickers from How Sweet It Is, and it’s been dancing around on Pinterest, constantly tempting me. The idea of recreating that iconic combination of chocolate, gooey caramel, fluffy nougat, and crunchy peanuts at home was irresistible. And let me tell you, it was worth every single moment of anticipation and effort. In fact, I’d go so far as to say these homemade Snickers bars aren’t just good—they are, dare I say, *better* than the real thing. Once you try them, you’ll understand why I ended up eating the whole pan!
Making your own candy bars might seem like a daunting task, but I promise you, it’s more achievable and rewarding than you might think. While this recipe for homemade Snickers bars is quite straightforward, it does involve several distinct steps and, fair warning, you’ll likely accumulate more than a few sticky dishes along the way. But please, don’t let that deter you. The process itself is part of the fun, and the end result is a truly unparalleled dessert experience. Imagine biting into a perfectly layered bar, tasting the freshness of each component, and knowing you created this masterpiece yourself. It’s the kind of project that yields both delicious treats and a real sense of accomplishment.
Why choose homemade over store-bought? Beyond the incredible taste and texture, there’s a unique satisfaction in crafting a beloved confection from scratch. You control the quality of ingredients, ensuring no artificial flavors or preservatives. Plus, the sheer joy of presenting these to friends and family, knowing you put your heart into making something so delightful, is an experience in itself. So, if you’re ready to embark on a sweet adventure and elevate your dessert game, keep reading. You probably shouldn’t hold out any longer either; these homemade Snickers bars are calling your name!

Homemade Snickers Bars
Pin Recipe
Leave a Review
Ingredients
Bottom chocolate layer:
- 1 ¼ cups milk chocolate chips (213 grams)
- ¼ cup peanut butter (68 grams)
Nougat layer:
- ¼ cup unsalted butter (55 grams)
- 1 cup granulated sugar (200 grams)
- ¼ cup evaporated milk (60 ml)
- 1 ½ cups marshmallow fluff (128 grams)
- ¼ cup peanut butter (68 grams)
- 1 ½ cup salted peanuts , roughly chopped (215 grams)
- 1 tsp vanilla extract
Caramel layer:
- 14 ounce bag vanilla caramels (400 grams)
- ¼ cup heavy whipping cream (60 ml)
Top chocolate layer:
- 1 ¼ cups milk chocolate chips (213 grams)
- ¼ cup peanut butter (68 grams)
Instructions
Chocolate bottom layer:
-
Thoroughly grease a 9×13-inch baking pan. Melt ingredients together in a saucepan or microwave, then pour into the baking dish and spread until even. Let cool and harden completely.
Nougat layer:
-
Melt butter in a saucepan over medium heat. Add in sugar and milk, stirring until dissolved and bring to a boil. Let cook for 5 minutes, stirring occasionally. Add in fluff, peanut butter and vanilla, stirring until smooth. Turn off heat and fold in peanuts, then pour over bottom chocolate layer. Let cool completely.
Caramel layer:
-
Combine caramels and cream in a saucepan over low heat. Let melt, stirring occasionally, until smooth – this took about 10 minutes for me. Pour over nougat layer and let cool completely.
Top chocolate layer:
-
Melt ingredients together in a saucepan or microwave, then pour over caramel and spread until even. Let cool and harden completely.
-
Refrigerate for at least one hour before serving, then cut as desired. These can stay at room temperature, but they do get gooey. I like them refrigerated best!
Notes
Once you’ve gone through the steps and watched your incredible homemade Snickers bars come together, the hardest part will be waiting for them to chill! Patience, however, is key to achieving those perfectly set, distinct layers that make these bars so irresistible. I find that refrigerating them for at least an hour, or even longer, makes for the cleanest cuts and the best texture. While they can certainly be enjoyed at room temperature, be warned: they do tend to get a bit gooey, which some might love for an extra-chewy bite, but I personally prefer the firmer, more satisfying snap they have when thoroughly chilled.
Tips for Perfect Homemade Snickers:
- Cutting Cleanly: For sharp, clean edges, use a very sharp knife. Running the knife under hot water and wiping it dry between cuts can also work wonders, preventing the chocolate from cracking and the caramel from sticking.
- Storage: Keep these delightful homemade candy bars in an airtight container in the refrigerator. They’ll stay fresh for up to a week. If you want to make a big batch and store them for longer, they freeze beautifully for up to a month. Just make sure to wrap individual bars tightly in plastic wrap before placing them in a freezer-safe container.
- Personalize Your Layers: Feel free to experiment with the chocolate layers. While milk chocolate chips are classic for a Snickers, you could use a mix of milk and dark chocolate for a richer flavor, or even white chocolate for a different twist.
- Nutty Variations: Don’t limit yourself to just peanuts! While traditional Snickers feature roasted peanuts, you could try toasted almonds or cashews in the nougat layer for a unique flavor profile. For an extra touch, you could even sprinkle a little flaky sea salt over the top chocolate layer just before it sets, creating a delicious salted caramel effect.
- Gifting Idea: These homemade Snickers bars make fantastic edible gifts! Package them in decorative boxes or bags for birthdays, holidays, or just to show someone you care. They’re a thoughtful and impressive present that everyone will adore.
Creating these multi-layered masterpieces at home is not just about the final taste; it’s an experience that truly connects you to the joy of baking and the simple pleasure of a perfect sweet treat. Every bite of these homemade Snickers bars is a reminder that some of the best things in life are made with a little effort, a lot of love, and a desire for pure indulgence. So go ahead, whip up a batch, celebrate your own milestones, big or small, and savor every delicious moment!
I genuinely hope you take the plunge and try this recipe. There’s nothing quite like the satisfaction of a homemade classic. Don’t forget to share your creations! Take a photo and tag it on Instagram @completelydelicious with #completelydelicious. I can’t wait to see your amazing homemade Snickers bars!
